Showing posts with label Curved Piecing. Show all posts

Friday, November 13, 2015

Getting Serious About Sewing the Rising Sun Blocks and Other Stuff

So I finally quit procrastinating and started work on the rising sun blocks again. The only one I had sewn was the one on the far right bottom. Things were going well, or as well as you can expect with curved piecing, when things started getting interesting.
Rising Sun blocks
When sewing curved pieces, I generally use the one-pin method as in the picture below. Convex side up means the pieces sew together almost by themselves. lol  If you look at the top left rising sun blocks, the blades are going in the reverse direction as the others. What I didn't realize is that by reversing some of the blocks {I only reversed 7 out 12 blocks}, I would end up with a really tricky situation in doing the curved piecing. No matter which way I tried to sew the blades together, I ended up with two options: either sew them from the bottom up (no way Jose!) or sew them with the concave side up (no way Jose!). Arghh! I cannot believe I got myself into this situation! Anyway, long frustrating story later and lots of 'un'sewing resulted in my doing the two reverse blocks with the concave side up whether I wanted to or not. So now I only have 5 more of them to do. 5 more!! Thankfully, it gets a lot easier after I reach the middle pin and fabric isn't constantly trying to get wadded up underneath my needle! But oh! I am not happy about this at all!
Some curved piecing
Also, I've been trying to decide on a setting plan for my Lil' Red Riding Hood blocks. I think this is what I'm going to go with. It is a bit old fashioned, but still allows for the blocks to stand out and do all the hard work. I bought the pink floral fabric for another quilt altogether awhile back, didn't use it and then found it later in the clearance bin. Yep, I bought some more thinking it would work for a backing and then, well, it starting intriguing me as a sashing fabric. You know how I love to play with sashing in my quilts! Love those scattered darker bits of flowers especially and how they will {easily} add just a touch more interest to these mellow, very sweet blocks.
Playing with layout
And of course I'm still plodding along with my circle a day--picking out the fabric. Stitching is starting to be about a three-circle-at-a-time thing, twice a week or so. I am just completely blown away by all the creativity I'm seeing with others circles though! I keep thinking, 'why didn't I think of that?'
A few more circles
I think that's the best part of quilting, taking a project or an idea and making it very personal and unique. It makes our quilts so much more special and meaningful! If you'd like to know more about Quilty 365, the link will take you to a description of what it's all about. Please feel free to jump in at any time! Love all the interest and support with this project. I think we're getting a good little group to prop us up and help motivate us along the way!

Friday, September 19, 2014

Ta Da! Flowering Snowballs is Officially a Completed Top!

I didn't have a whole lot left to do in order to call this a completed quilt top. Something I always celebrate around here, because it feels like a finish even if it isn't really a FINISH finish (sandwiched, quilted and bound). I like to be excited at this particular phase and then later on as well, when it's well and truly done. 
I love my Flowering Snowball quilt top.....
I saw the 'Who's interested in doing a Flowering Snowball Along?' over at Molly Flanders Makerie early in the summer and started getting a little flutter in my belly. Excitement? Oh yes, count me in! It's something that in years past I would have ran from just as fast as my cowardly legs could carry me, but now? I'm not nearly afraid of curves as I used to be. Something about doing a bazillion drunkards path segments will do that to you. (Or even me.) And trust me when I say this, these are gentle curves.
The lights not great today so I moved it back upstairs.
Isn't that what people always say AFTER? It was soooo easy. Nothing to it! hehe But not the matching up the seams stuff. I'm not afraid to tell you that it took some work getting through that little part. A little unstitching. A bit of grinding the back teeth off.*wink  Just kidding. I never do that. And fyi, the quilt below has not even been ironed yet. I'm positive that all the seams will look simply amazing afterward......
A close up of some of my fabric choices....
Initially, I had a little trouble cutting into my creamy white prints that I love to hoard up, but I think it was a wise choice to use them. This quilt has some dark and moody fabrics that needed the light, bright, almost whites to wake everything up and/or give it a softer feel. These colors have really been speaking to me lately and I wanted one more chance to play with them before I moved on. No reason to cheat this quilt out of some great fabrics just because I have a tough time cutting into a couple very-hard-to-get (around here) fabrics.
I am really enjoying the secondary pattern in this quilt....
For awhile now, I've been trying to branch out a bit and use 'larger' prints too, which always makes me plenty nervous. They never look properly balanced in the low percentage usage that I end up with, mostly because I don't actually buy that much largish printed fabric! The left side of my brain whines about the balance but the right side revels in the discrepancies--wants to think it looks more vintage or antiquish. Well, how can we do the make-do thing right anymore when most of us have so much more than we need? Do you think the quilters of old WANTED to use those oddball mixes of fabric? They probably apologized for them every time they showed off their quilt and people like you and me think it's 'charming'!

Anyway, I don't think I'm going to add a border to this quilt top. I like the piecing right out to the edges and it's already 77" x 89". Plenty big enough for me! If you haven't already, go check out the other Flowering Snowball quilts in Molly's Wrap Up post. Beautiful! I didn't get finished in time to link up, but this quilt top still feels like a real winner.


Thursday, September 11, 2014

Hand Quilting and Precision Piecing {or not}

It took me a couple evenings with the hoop to settle back into my 'zone'. At first the needle felt really small and my fingers were a bit fumbly. The correct rocking motion was eluding me and it doesn't help that my thimble is mostly worn out. Occasionally the needle actually slips right through a hole in the leather {ouch!}.
Hand quilting the Worry Baskets
I finally found my groove late one night after everyone had went to bed, leaving me alone on the couch doing my thing. Ahhh.... Just me and some little baskets, the silence, my thoughts and the soft swooshing noise of the thread moving in and out of the fabric. Complete and total peace. I do love that. Couldn't hardly put it down at the end of that 'last' frame but I'm far from the finish at this particular point. No point in ruining my next day over a silly lack of sleep.
Back in the bag until next time
In good contrast of different quilting methods, I've been working with my Flowering Snowballs a little every day. So glad I went ahead with this challenge, but getting through this particular phase isn't exactly fun. All the seams are pressed in the same direction and it makes for a tough time getting things to match up properly.
Sewing the Flowering Snowball row
I saw a tutorial for using glue, but I just can't quite bring myself to do that yet. Even I know it's a great idea. Fabulous really. And everybody is using glue these days. Except me. Which just makes me stubborn or old fashioned or maybe even... cautious? I mean, what if the glue loves my quilt so much it never wants to wash out? lol
Matching up the seams {or not}
Don't worry. I'm sure I'll get through this rather awkward period in my quilting life too. You know I always have before.

So basically, (by looking at the picture above) you can see what I have to deal with in about one (out of four or five) sets of the piecing match-ups. The seam on the left is just a smidge off. Which is why I baste a small area at the seam before I do the real seam thing. Still....test, test, testing doesn't always eliminate the issue at hand. Every single time I get these results, there is a decision to be made. Yippee skippee. Why does there always have to be decisions? Be fussy flossy and rip it out? Allow for margin of error in my quilt and move on without using the seam ripper? {I am a devotee of the galloping pony test afterall.} And sometimes I just pretend I don't even notice. Which, of course, is always a fun option, but don't kid yourself. It IS a decision too.  ienie mienie minie moe......

Well, this time I came down on the side of fussy. Mostly I'm trying to fix the 'smidge' if it's obvious--a seam width or so. After all, this is a challenge. I might as well try to get it right the first time and LEARN something right? Ahem, all it really means is that I'm learning to pin a little better. Just don't think I'm quite ready for that glue yet.*wink


Monday, September 23, 2013

Plodding Along With the Learning Curves

So this weekend... I actually made it into the quilting room, over and over again. I had this idea of what I wanted to accomplish and somehow it never quite materialized (lovin' that pun right now) the way I envisioned through my rose colored glasses.
Working on Learning Curves
You might remember this project from earlier in the year? I was determined to learn how to master the drunkards path curve and got overly ambitious in my enthusiasm determination.
Where I got stuck with my Learning Curves....
I had this plan for a quilt that would include umm... yeah, thirty 16-patch drunkards path blocks. Yep, I do like big quilts and thought it would be funky and bold and etc. etc. Come to find out, it is a HUGE project and looked way more contemporary than I was prepared to even think about at the time. I might still be. I'll probably be getting back to you on that.

Now, I have decided to be done with dragging my feet over making a decision. Add that in with the fact that the leaves are doing their beautiful fall thing outside my window and all of a sudden I'm much more interested in working with these fabrics again. Anyway, long story short, I planned to finish up the curved piecing segments, trim each of those segments, sew all my blocks together and start working on a layout plan--all over the weekend. HA!

The sewing really wasn't too bad. I've finally got the curved piecing thing figured out. Turns out though, that the trimming alone took a million hours of my time and made my hand hurt and was just so incredibly tedious. Thus the broken up work time in the quilting room. I trimmed 288 curved segments this weekend and then just inexplicably quit. My work ethic clearly needs to be re-examined.
Only a small portion of the havoc I have wreaked
Honestly, I had the most fun brushing my trimmings off onto the floor, just letting them fly everywhere. Very juvenile of me for sure (I do have a trashcan), but it made me feel very good. And creative. Just look at all the color on my ugly carpet now? lol

Monday, April 22, 2013

Need to Figure Out a Strategy Soon

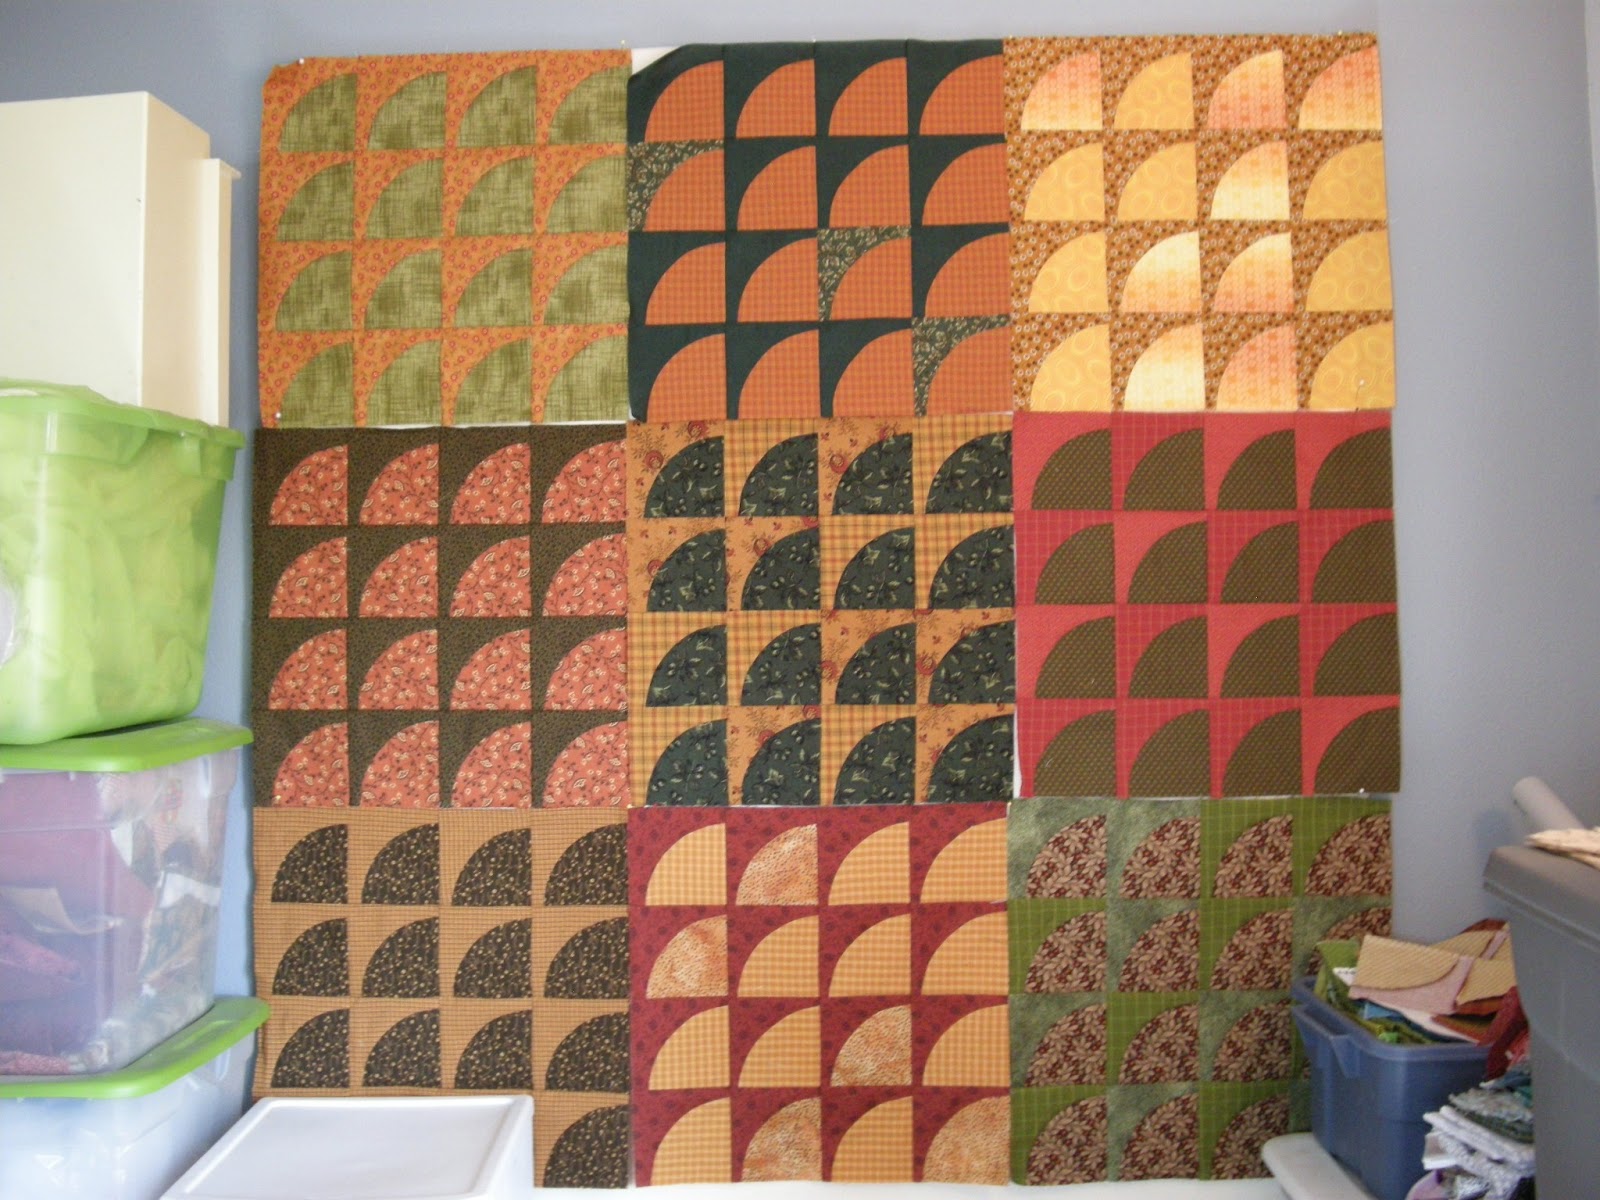
I think I got a little crazy with this project.  Maybe.  Mostly right now I'm recovering from the flu (yeah I've been hiding it from you on purpose) and so I'm looking at this very saturated block of color on my wall and wondering just what it is I'm supposed to do next?
Learning Curves
There's still a ton of these little guys to iron and trim up too.  It's exhausting really.  I know I like bed sized quilts and all, but this is starting to look ridiculous....
So many to iron and trim up...
Maybe I need to finish the curves up and try to make two quilts out of my blocks? What I wish I had is a bigger design wall so I could throw some more of the curves on the wall and move things around, get some fresh perspective.
It has been fun learning to sew curves though
 believe it or not....
Wowsers.  Let me just say that it's a whole lot of color to deal with after staying out of the quilt room for a few days. Obviously I need to regroup and figure out a strategy or put it away for awhile if that's what it takes.  Does anybody else out there ever take a break from a quilt project and then come back in on it and positively flounder for direction?

The thing that really makes me sweat is how contemporary my quilt blocks look together up on the wall. Whoa....  That is so not something I'm used to dealing with ever in a million years!  Apparently I've been a little too wrapped up in having fun sewing the curves and not paying attention to the end result.  Who'd have ever thunk it?  Me being engrossed in sewing curves?

Monday, April 1, 2013

Learning Curves and the Creative Process

Easter weekend is always so busy.  Once again I found myself in the grocery store on a late Saturday afternoon trying to find candy for my kids.  Every year I tell myself it'll be different next year, but it never, ever is.  Not to worry, I wasn't the only mom rushing around the candy aisles looking frantic because all the best candy was gone!
Learning Curves Quilt--Drunkards Path
I did a little bit of sewing Friday night and Saturday too, but really, it was hard to settle into work on my Learning Curves quilt especially.  Sometimes, there are other projects calling my name a whole lot louder than that one will probably ever be able to.  You know, because of those dreaded curves and all.
Getting Started on Drunkards Path block
I wouldn't want to admit to anything that could possibly incriminate me in the future, but these blocks are actually getting a lot easier to sew.  I am finally able to sew at a faster pace than a snail!  Smooth and steady, that's me, plugging along one section after another.  The tweezers really help at the end of the block too, keeping everything aligned and straight for me.  I did cut all the blocks just a smidge too big (room for error) so when I get the initial curved sewing done, then I have to trim them down.  Ughh...  Not always what I want to do.
Working on The Big Broken Dish Quilt
At some point this weekend, I jumped back into my Big Broken Dish Quilt.  With the help of Linda from Quilts in the Barn (thank you!), I had previously figured out my light bulb block.  I think it sort of looks like a skull right now, but my daughters assure me that with properly applied stitching it will be just fine in the end.
Ready for the applique words now...
With the slightly curved borders, sewing the corners blocks on was a bit of a nightmare.  I had to lay the border and the blocks out and mark just 'so' and then pin a lot.  I used my seam ripper more than I wanted to and almost peed my pants once when the phone rang while I was deep in concentration mode.  I forgot to trim a 1/4" from my marked seam on one particular border and started sewing before I even realized what I was doing.  And the phone rang and rang and rang.

Then it was all together, laying fairly flat and looking back at me like, 'See? that wasn't so hard after all!'  (Can you slap a quilt?)  It was only after my kids gathered around and asked me to explain once again what this quilt was all about when I noticed (thank you my dear youngest son for pointing it out) that the light bulb block and the palm tree block had somehow switched places.  I think there must be a subliminal message in that particular 'oops', don't you?  And honestly? Right now, I'm leaning very heavily toward leaving it just like it is.

Friday, March 22, 2013

A Few Projects I've Been Thinking About

The borders have been finished on this Scrap Attack quilt for several days now.  I am really liking the rough, primitive style to the applique.  I drew four sets of the border detail freehand, transferred it to freezer paper and then used it for my templates.
Scrap Attack #2--red & blues
I know this quilt isn't to every one's taste, but everything about this quilt is ME from the improv. piecing out of my scrap bin, using up leftover applique pieces for the trees, and then adding primitive border detail.  My husband says it's a very dark quilt, but that's okay.  Sometimes I'm a dark and moody person.*wink
Closer look at the borders
I have slowly, slowly started working on my Learning Curves quilt too.  Can someone please tell me what I was thinking to do something like this?  (*hair pulling starting right about now!)  Oh yes, I wanted to sew better curves.  Well, I better be a master after this huh?  Oh, and does anybody know if you're supposed to iron the curves to the inside or the outside?
Learning Curves quilt

I have long been a fan of 16 patch/25 patch etc. blocks so it really shouldn't be a surprise that I went for the 16 patch drunkards path look.  The quilt below is one I was working on in the winter of 2007-2008.  It's kinda dark too! Hmmm...  Anyway, towards spring, we realized that my brother had a terminal illness and so I rushed to finish it for him.
Josh's quilt.
He always bugged all of his many sisters, me included, about making him a quilt 'cuz he loved them.  The one thing he complained about though was that most quilts were too short to tuck under his chin properly and then also tuck under his feet (he was well over 6 ft. tall).  This was something he complained about even when he was perfectly healthy because he just liked to curl up in a quilt on occasion!  I took a quilt I was working on at the time, added an improv. border, and THEN added about 11 more inches to the top and bottom just for his benefit.  Let me tell you this quilt was about 110" long so he probably could have wrapped it over his head and feet all at the same time.
The bottom of Josh's quilt.
Never could get a good picture of the quilt in it's entirety, but I have no regrets about giving him the quilt even though he only got to enjoy it for a few months.  And yes, I had already made him a quilt years before that he had already just about wore out!  He was always a little greedy about quilts, that guy.:)

Sunday, December 2, 2012

Big Stars Progress & Another QAL Block

Okay.  Here's the last of the Big Star blocks in all of their glorious imperfection.  I used my seam ripper more than I want to admit to on the star with the red center and then called it good.  Whew!  Now I know why people takes classes to learn this stuff!
The last of the big stars!
With these three stars finished up, I was also able to sew on the last of the background pieces too.  Feels good to get that part done and it seemed to go smoother and faster than the inside curves??  And yes, I deliberately mixed up the backgrounds per each block as they were all cut out of a stack of mixed cuts of fabric.  Fat quarters especially only allowed for three background pieces each, so some blocks were going to have to have a patchwork background.  You'd never guess, but it's actually a fave look of mine.*wink
Applique squares for where sashing will meet up.
The pattern calls for sewing the star blocks three across and three down without sashing, which looks great in the pattern book.  Somehow in translation though, my big star blocks look like they're lacking well, something special.  I think it's the pale background fabric--looks better in theory than in practice!  I decided to go with a sashing that's about 4" wide and started in on making these homely little applique stars to join the sashings in the center of the quilt.  In honor of all my curved piecing troubles, I have made them wobbly and imperfect on purpose.  Hardly worth linking up to Kathy's Slow Sunday Stitching with! lol
Greek Cross block for Random Sampler QAL.
The last block for the Random Sampler QAL over at Bloomin' Workshop is finally finished up as well.  I've been so busy working on other projects that I let this one slide for awhile.  This block really has potential and I may try to play with it a bit more.  Love it!

Thursday, November 15, 2012

More Progress on the Big Stars

I've been plugging along the last couple of days.  Three more stars are sewn together.  These turned out a little bit better than the previous three.  Probably because I checked out a couple tutorials here and there!  Sewing curves is not something I'm very good at, but I am determined to learn.
A few more big stars.
Two of my panels for the 9-patch series #4 are finished up too.  They have been super easy to take with me and work on in the car etc. while I wait on my husband or whatever else is going on.  At first I worried that I had used too many medium and similar tones, but now I'm liking the bright, zingy vibe going on.  Hopefully they will do what I want them to for the quilt in question.  Fingers crossed!
9-patch series #4 panels
As I look forward to the holidays I'm wondering what I'll be doing for hand work during the times it's inconvenient to hand quilt on a large quilt.  I really need to get my next forever project figured out!  The thing is, I want it to be fascinating enough to hold my attention for years if that is what it takes.  Hmmm...  What to do, what to do...

Today is another half day of school for my kids and for some reason I can smell something burning.  It may be time to re-teach the kidlings how to properly cook mac and cheese again.  Always something going on around here to distract me from my quilting!

Saturday, November 10, 2012

Getting Close to Another Finished Quilt!

The hand quilting is all finished up now on my Monkey Wrench quilt!  Hard to see the details because of the dark thread I used, but trust me, it's all there.  The binding color was a no-brainer for me this time around.  Plain old black seemed to be the only color that made sense, so why bother fighting it?
Monkey Wrench all ready to start binding.
I'm still not sure why I put the red sashing squares on the outside sashing strips like I did.  Probably because I still hadn't made any decisions about the borders at that point?  Someday I'm sure I'll get a better handle on my decision making skills.*wink
And now there are three!
Here are two more Big Stars that I have made (I previously posted a pic of the top left one).  This is a pattern out of 'Simple Pleasures' by Jan Patek, Alma Allen and Sue Spargo.  Karen over at Log Cabin Quilter recently made another sweet quilt out of this same book that I have considered making for myself.  After looking at the finished product up on my design wall, I'm thinking that I may need to sew a bit slower.  You know, for the smoother curved seam look.  Ahem.  Or maybe give it up completely?  hehe  Now if I can just dig up the courage to sew on the outside curved pieces for these big monsters.....

Tuesday, September 25, 2012

Something Different For Me

Um.... yeah.  I think maybe it's the smoke from all the wildfires.  Something is definitely out of whack if I voluntarily start cutting and sewing together 'complicated' blocks.  I'm a nervous wreck about this--1st, 2nd and third thoughts, you name it and still..... here's the first block just waiting on the background fabric.
Here's where I veer off in a new direction.
It's a large block.  Waaay bigger than I imagined, which means that now you know how much I read patterns before I got started.  My basket blocks are going to be 9" finished, so that gives you a pretty good frame of reference for the star.  I'm not planning on buying any fabric for this project (until maybe the border) and hopefully I'll find everything I need in my totes.  Please let me find what I need in my totes!
So you can see how big this star is....
The background will definitely need to be pieced because I buy mostly fat quarters.  (And the jury is still out if I will go ahead and sew the curved background pieces on or just applique this big monster to a pieced square.)  This is so not my normal comfort zone, but I'm extremely happy with what I'm doing anyway.  It feels really good to challenge the status quo once in awhile.  You didn't think I was going to sew all basket quilts for the rest of my life did you?*wink