Thursday, December 30, 2021

About Ready To Turn the Page To the New Year!

Got the Christmas Stars quilt into the hoop. Finally! I've been running so far behind on where the quilt line-up 'should be' this year that I just wanna shake my head. Not making a lot of progress on plowing through the completed quilt tops 'cuz I'm too busy making new.

Christmas Stars next up in the hoop
No matter. Christmas Day might be behind us, but I'm still very much in the mood to work on a quilt that looks like this. I made a total of four Christmas-look quilt tops within the last year and a half. Just to hand quilt during the holidays! This was one of the first two attempted and probably the most obviously holiday looking.

Almost ready to pin...
Very poor planning for fitting the individual blocks inside the quilting hoop though.*wink  How inefficient is this? Mostly I just get a larger background square into the hoop and then pull off the side clamps whenever they get in the way of stitching on the stars. So annoying to move the hoop every half an hour or so.

Keeping the stitching simple on this one!
And it always feels wonderful to have a true blue, absolutely finished quilt to finish out the year. This one has such a cozy vibe, it could have happily been laying across my lap for another week or two and I wouldn't even have cared. Love all the scrappy feels.
Strippy Triangles is a finish!
It was tricky to get try and get a good pic of the full quilt, so this will have to do. I'm sure it would be soo much better if I managed to get the quilt properly arranged during that 20 minutes of perfect lighting we seem to have this time of year!

Lots and lots of triangles
It took me almost three evenings to finally figure out exactly how those long skinny gray strips were going to have to be hand quilted. I tried vines with leaves, vines with berries, straight lines, and then finally ended up with a double stitched wavy vine without any extras at all. Still wasn't 100% sure until there was several stitched frames to look at. Okay. That should do it!

Hand quilting for the win!
All along I thought the binding would have to be black, but then.... Nope! The quilt wanted red for some reason. Good thing there was enough of the right colors hanging around in the stash totes or this would have had to be delayed for quite awhile. Fabric shopping is not exactly on the priority list right after the holidays, though of course I wish it was. No gift cards for Christmas this year, but I really can't complain. My youngest daughter gifted me with a box of Valdani perle cotton thread.*sigh  I'm so in love.... Would it be silly to design an entire quilt around a variegated thread color?

All ready for cuddling
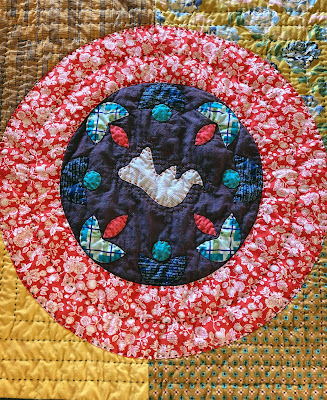
Also included in this end-of-the-year post is the very last completed quilt top, Crossroads. Once I got the applique out of the way, then it was only a matter of cutting out the sashing strips and finding time to sew the rows.

Just a little underwhelming
As you can see, I was trying to stick fairly close to the antique quilt inspiration this time. Not ever exactly, but hopefully my interpretation rings true for the overall spirit of the quilt! How boring if it was a spitting image! This quilt has been in a couple different books I believe, but where I found it is: 'Quilts. An American Heritage' by Terri Zegart, a book published in 1994. I literally paid a dollar for at a quilt show guild booth a couple years ago. 

Taking another look at the original Inspiration
At first, I was just a little disappointed with the wispy, fade-away look it had {see first picture}. If you remember, I had a little play at this very same inspiration with this previous quilt, and somewhere along the way, the vibe of that particular quilt had went sideways on me too. In that case, I just shrugged and went with it. Basically, I was thinking 'Wow, here we go again! Just cannot seem to get this quilt figured out!'

Playing with border ideas
Since border additions are like my secret little addiction, I almost instantly talked myself into adding a blue/peachy pink triangle border. I mean really, before I even gave it any other serious thought, there I was doing the math and auditioning for the most likely scenario. Then I sorta stepped back from it all and thought, 'What am I doing?' A pieced border was going to blow this whole quilt vibe into a million pieces!

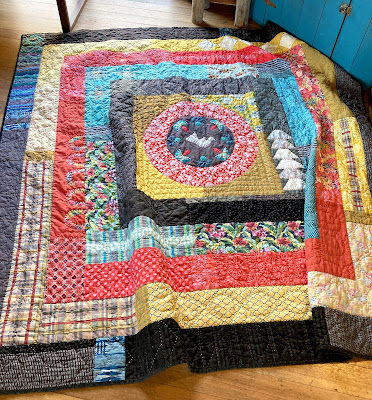
So much better with the subtle-y scrappy but plain border
So I folded the quilt top up and purposefully left it on a slow simmer for awhile. Sometime just before I fell asleep that night {the subconscious can work so fast!}, it occurred to me that maybe, maybe? the quilt might welcome a slightly larger, but definitely darker surround of fabric. Hmmm... And something like that probably wouldn't ruin the lovely feeling the original maker had so successfully ended up with. Of course I wanted to immediately run upstairs and check the idea out, but decided that was a very poor idea. Would probably freak everybody in the house out if mama got busy in the quilt room at 1:30 in the morning...

Ahh.. Surely you can see that this make-do, pieced but plain, border looks so much better already. You'll never believe how ugly the darker, almost dingy peachy pinks {mauve?} looked all by their lonesome! It was almost scary to even properly audition them. But attached to the quilt? They are Beea-utiful! Such a wonderful, lovely complement to the rest of the quilt. So very glad that I hit pause and took a few extra minutes to think it all through.

Still trying to learn what the secret really is!
It's always so exciting when the perfect solution makes itself known and all the cranky quilt problems can just drift away. I totally have a soft spot for these antique quilt interpretations that I've been dabbling with now for several years. I always think that if I can just successfully interpret a few of these fabulously unpretentious quilts {unpack their secrets}, then in some mysterious way, the look/feel/spirit of these quilts will somehow rub off onto mine. I'm earnestly trying because these are the best of best quilts to me. 

Now I'm dreaming up ideas for the cream fabric cut-outs from behind these gold circles. Which absolutely needs to be a series, right? Because there's definitely gonna be a quilt from those cut-out circles next. I mean, why not? Happy Happy New Year to All! We'll probably be having a quiet evening at home this year by ourselves, just me and the husband. Sounds good to me!

Tuesday, December 21, 2021

Catching Up With the Last AHIQ Prompt of the Year

 *Remember! The Christmas Giveaway is still open through December 25th!* All year long I've felt like I'm back in junior high, always the last one to finish up the 5K run. Here I am though, finally running across the finish line! The last AHIQ prompt had to do with symmetry or asymmetry, whichever felt least comfortable to us.

The new baby quilt
So I've been thinking and thinking, wondering, 'Am I actually uncomfortable with either?' And yes, while symmetry comes very natural to me, attempting an asymmetrical design usually comes about as a last resort. Sometimes it happens by accident, other times I'm attempting to fix a problem, or perhaps it's another persons pattern. You can see from some of the finished quilts around here that it does happen, though not as often as the symmetry thing. Patchwork GardenAHIQFlowersRhi's QuiltComfortably QuirkySeedpod Flower, and Glory Be are just a few recent examples of asymmetry happening in my quilts. Most generally though, it's a gently asymmetrical look, nothing terribly modern, bold or overwhelming.

After much contemplation {and even a bit of anxiety}, I eventually had to completely leave off the idea of trying to start a project with the intention of using asymmetry as the ultimate destination. While it felt like a worthy goal, there was just too much going on in our life to set about attempting something 'off balance' and perhaps even a bit chaotic as the seed of the entire design. I need serenity and balance right now!! So I shrugged off the deliberate pursuit and decided to just write about it when and if it happened.

All fabrics from the stash....
This baby quilt {for a great-niece} needed to happen fast if I wanted to send it off with the grandma and avoid shipping costs! Digging through my stash as always, I stumbled upon the peachy pink mouse fabric {background fabric} and decided to base the entire quilt right there. It was cute, girly, and more importantly, needed used up! I gathered all the rest of the fabric together and quickly fleshed out an easy pattern, 4-patch units with alternating background squares. Honestly, this baby quilt came together--design idea to implementation--so quickly. This time I didn't slow down long enough to let doubts get in the way!

So sweet!
The background fabric is where I ran into a dilemma though. Not quite enough mouse fabric. Oh well. And that's when the 'asymmetry' just sort of happened. Why not go with a wildly different color fabric for those seven remaining background squares? It would have been quite simple to find a similar look/color of fabric and let it all blend, but no... So much more interesting to add a blast of energy to the quilt, which the unequal amount of darker fabric accomplishes in a heartbeat. 

After making that particular decision, then I ended up rearranging the pink/yellow 4-patch blocks into a more obvious 'chain' pattern, rather than placing them willy-nilly around the quilt like intended. With those blocks now providing a certain amount of directional 'flow', it made it easy to randomly place the large dark squares within the boundary of the missing background fabric squares. It was a fast, simple quilt to sew together and then machine quilt in a basic crosshatch. Altogether, it took maybe three days start to finish. Yay! All it needs now is a label and we're good to go. Crossing my fingers the new mama likes yellow 'cuz I think it looks super sweet!

Finishing up Ode to Joy, Big Basket #4
This Big Basket #4 project has been floating around the quilt room for a long time. It was started impulsively, late in the day as an addendum to my Big Basket Series. All along I had this vague idea of trying to play with a bit of asymmetry in the final applique touches. However, it seemed problematic to announce it on the blog as part of the AHIQ challenge. What if I boldly asserted that THIS quilt was going to go a little off the rails as per 'perfect' balance {one side of the quilt to the other}, and then the quilt decided it didn't want to cooperate? lol Wouldn't be the first time!

This quilt is having a great time

All along the way, this quilt had a mind of its own. I thought the flowers in the basket were going to be lush looking tulips, but nooooo. They wanted to be spare and more Scandinavian in look, mimicking the print on the darkest blue fabric in the basket. Several times throughout the making of this top, I almost ripped them off and started over. Seriously, they made me nervous. Originally, I attempted to make the basket surround sashing a red fabric, then maybe a blue fabric? Not having it. Had to be the charcoal text print. Which ultimately made for the perfect framing for the heart flower applique, but at the time? Woo! Totally feeling boxed in and a bit limited as per addressing the potential applique block border.
Loving the scrappy, low-key strip additions
One of the absolutes, I thought, was that the log cabin-like strips {puzzle piecing the pear blocks together} were going to have to be mixed greens. You know, in order to make those pear blocks pop? Uh huh. So appalling to see those colors in that position in the quilt. Ughh! So then I started trying to use up all the remnants of light gray fabric that was leftover from the pear backgrounds. I was loving how soft and light hearted it looked while still being scrappy, but what about the overall look to the quilt??? My bold and bright quilt that I previously imagined was turning into a shadow of itself...

The bird is feeling pretty good about things too
Nothing else appeared as a better solution though, so onward progression continued. Might as well go with what seems to be working even if I didn't understand the how and why. When I stumbled on the idea of throwing in those patchwork, scrappy-look cornerstone squares {with the hint of red?}, everything just started making perfect sense. Ahhhh... I could suddenly see where the pear blocks needed to be part of the background symphony, not have a starring role in the overall impact. 

In my opinion, the little square fabric pops of color were needed to gently lead the eye around the edges of the quilt and then back to that fun center again. Well, I was hoping it was going to be a fun looking center! Anyway,.... So very glad that to find that specific bit of fabric and I can tell you that every bit of it was used up! Basically, the initial auditioning was showing that because of the light, light gray fabrics used, if there was absolutely no color at all between all the pear blocks, then everything at the outside border would come off as choppy and disorienting to the eye. And adding darker gray, except in a very few areas, just made everything look dingy and dull. Gotta love finding those unexpectedly good, problem-solving-fabrics in the totes!

Just had to use one darker square in the upper corner
From there, it was easy, peasy to attack the asymmetry idea, in a bold, red, applique sort of way. Those heart-flowers that I had doodled onto my rough draft drawing? Why not try and make them as-is? So many times the doodle is a general representation of a flower etc. and really, anything works. 

This time I studied the drawing and then earnestly tried to replicate that naïve style to the best of my ability. I carefully drew them out on paper in the scale needed, one after another, then trimmed or fussy cut as needed. They were traced and cut out in fabric and after that, placed onto the quilt in appropriate areas. I played and played, trying to get the look just right. Tipped the flowers this way, that way, a little bit of space here, more there and so on. Maybe if I add one more? It took a bit of time, but it was completely worthwhile. So happy to see the heart flowers cheerfully dancing off the edge of the quilt now. Whew! Love it when a plan {hair-brained idea?} starts coming together!

This part makes me smile!
A bird had been drawn onto the rough draft and placed high on the right side of the quilt. It was a bigger bird than what I would normally think was necessary. Though I knew the bird needed to be a bright, solid blue, the template I made looked terrible on that specific side of the quilt. Okay, leave it off. Nope. It definitely needs a bird, but where??? And it all fell into place when I determined that what it really needed was a bird with something in its mouth. Aha. Well, that changes everything! It took a little finagling and yep, wasted bits of cut outs of stems, flowers etc. until the little heart finally, finally made itself known. Hmm... So very sappy.... Sometimes I am just scratching my head at what the quilts finally end up looking like! 

The 'Joy' word was the final wrap up to totally finish things off. I had originally cut it out in a white/gray fabric and while I loved the word on the quilt, the coloring was way too cold. After figuring out the bird, it was simple to see that the same, exact fabric was perfect for the lower part of the basket. I don't know why this quilt needed a word added, but somehow this quilt has renamed itself 'Ode to Joy'. Maybe that's why. Whatever. The quilt needs what it needs! 

Such a good vibe!
So yeah, that's why I've been hiding most of the ongoing progress of this particular quilt. Some of you were gonna love it and some were gonna go 'Meh!', and probably want to hate it. I wanted so badly for this to fall into the AHIQ Symmetry/Asymmetry prompt, that I didn't want to jinx it by letting you get a peek. Sometimes, rarely, the constructive criticism, advice and/or fond comments of affirmation can make me second guess the entire creative flow. Then I have to let things sit and stew until it's all properly sorted out in my brain. Not usually much of an issue, and as you know, I'm generally all about sharing the process. That's what I do! In this case I hesitated simply because this quilt was on the finish-up-before-the-end-of-the-year list and I am resolutely trying to clear the decks!

There is much, much satisfaction in checking this one off the list. It seemed a little tricky at times. My own family is still a little doubtful about how cool this quilt is, but I'm immensely pleased with it. You know how difficult the color green is for me.... and then there is that weird pink background color..... It's got the pear blocks I've been wistfully dreaming about forever.... But I didn't let it end up being a PEAR quilt per se., it's still a BASKET quilt! Just wait till the hand quilting joins in.....*sigh It might just prod me to make yet another big basket quilt for the series. These are just too much fun!


Tuesday, December 14, 2021

It's That Time of Year! Quilty Folk Applique Template Giveaway!

I cannot believe we are this close to Christmas again! Where did the year go? Fed-Ex finally delivered our tree today, so maybe we can get into the proper holiday spirits after the tree lights start twinkling. Last year I gifted an applique template during this time of year and it seemed to be well received. Well over a hundred 'Yes, please! I want that!' comments plus emails, which really, is the best sort of compliment. Cozy quilts seem to be the thing we most want to work on during the holidays.

The older {Happy Flowers} Love Apple blocks
So this year, much in the same vein, I am doing another Very Merry Christmas giveaway to all my loyal readers! *This offer is good through December 25th!* Most everyone who responded the other day wanted the older Happy Flowers template, but I just couldn't resist offering the newer, funkier looking flower too. They are just so sweet! Everyone should have at at least one Love Apple quilt hanging around, right?
The newer 2021 Love Apple Blocks
If you are interested in obtaining the gift of these simple, folksy applique templates, all you have to do is leave a request in the comments or drop me an email. It's that easy! Both templates will be included in the PDF that will be attached in the return email. Depending on how many requests that I receive, it may take me until January 1st to get completely caught up. Please be patient! If you haven't received anything by that date, it will be because I can't find your return email. Then you can get grumpy {hopefully reach out again}, we can talk more, and then, probably, the PDF will finally be zinging your way.

A few things to consider:

  • Please leave your email address in the comment or you might very well get lost in the Blogger quagmire of privacy issues. Can leave it in this form: 'audkateaster at gmail dot com'  if you are nervous about throwing it out into the universe {use your email address not mine of course} . Or you can just email me directly if that works better. 
  • If you don't request the template, I won't be sending it to you. I'll just assume you stopped by to say 'Hi'!
  • This is a limited time offer, good only through Christmas Day, 2021. Last year I randomly got requests throughout the entire year! Which occasionally kind of drives me nuts, just saying. After December 25th, 2021 you will only get this giveaway PDF if you physically mail me a fat quarter or two through the postal service: Audrey Easter, PO Box 2251, Pateros, WA 98846. That tells me you're seriously in the mood to make this and not just trying to scoop up a freebie. It doesn't even have to be brand new fabric, just make sure it's suitable for quilting! And I'm dead serious about this unless maybe you live overseas and the shipping would be astronomical. Then we'll talk. Call me a meanie, but a giveaway needs to have an end date! Be sure your email is included with the fabric so I can get the PDF sent to the right person. 
  • Just to be clear, this giveaway is for applique templates ONLY, not quilt patterns. You'll probably want to trace the designs onto template plastic or freezer paper before you get started. 
  • When cutting the background fabric, 9" x 9" squares of fabric work fine for both motifs, even though one is on point and the other straight up and down. Feel free to make your background whatever size looks best to you though!
  • Both templates include a skinny rectangle shape that can be traced and used for the flower stem. I prefer to make long {bias or not} vines and cut into proper lengths. In the case of the Happy Flower block, you'll want to start with 2" strips and sew the really scant seam and then iron the seam to the back. For the newer Love Apple block, start with 1 1/2" strips and proceed like the previous block. So much easier hand stitching straight edges when all the raw edge is clear out of the way!
  • For all you stressy peoples out there, I need to tell you that it's highly unlikely these motifs will line up exactly even steven. Ha! Remember that the preferred look around here at Quilty Folk is cozy and hand touched, not precise and rigidly straight!
  • Please do not copy, redistribute or try to sell these templates. It might make me shut down my blog and go cry in a corner.
Okay, that's it. Any questions? Shoot me an email! Happy Holidays to all!

Thursday, December 9, 2021

Bullseye Medallion is Finished Up!

Loving this latest finish! When the last stitches went into the binding I thought to put it immediately on our bed. Alas, too many blue markings that needed washing out.

Love how the center turned out!
Thankfully it washed up very well and though there was a bit of dye in the Color Catchers, nothing seemed to make its way into the lighter colored fabrics. 

The colors seem so intense, it's hard to see it in the pictures
I'm obviously very drawn to the look of circles in my quilts. This center motif was such a simple look to pull off, though you'll probably notice the circle is not exactly perfect. What is around here? That red and white print has been in the stash totes for years. Not even sure now where it came from {or from whom?} but I love the impact it makes on this particular quilt.

Enjoying the look of the hand quilting
I saved the circle template and will try something else with it some day in the future. Mostly, I wanted to experiment with a wide, stripped down piecing look for the borders on this quilt and thought an applique center would help give the quilt some pizazz. Focus. A place to establish the overall vibe. Plus I wanted to play with an element I saw in an antique quilt years ago. You know how it is!

A different pieced or applique element for each border
The border width exact repeats was an interesting challenge. Having the colors change so dramatically each border helped give the quilt energy for sure. I really enjoyed trying to achieve a bit of a 'blend' from one border to the next in that area where the basket handles landed. Things like that always make me smile!

A couple pieces of vintage fabric!
As always, I started with a stack of fabrics that had been simmering and ready to go forever. These were pretty much chomping at the bit for their place in line! As each border developed, I tried to figure out ways to incorporate the most interesting fabrics into each border. It didn't take long before I realized that some fabrics needed a solid break between them as they didn't transition as smoothly as others. Simple to insert a rectangle of a completely different fabric and try to make that rough transition seem more 'purposeful'.

So fun to use up difficult fabrics....
The entire quilt is hand quilted with Perle Cotton #8 and #12 as per usual around here. When I ran out of the first variegated red Perle Cotton ball, I switched to the other similar red that I had available. Same brand, number etc., but this ball of thread went from red fading to white, instead of red fading into light pink. At first I was dismayed, but then quickly started preferring the more dramatic escalation of color and then lack of. So lovely to see it helping to 'pop' the texture on the black background! I can only assume the dye lots were different or perhaps I bought them at separate times?

The variegated threads are the best!
Obviously this isn't a super complex top, but I feel that I learned a lot making this quilt. It's always a bit of a thrill when a personal challenge project ends up working out so well. This was started in the month of January 2019 and took most of a year to plow through all the details, often involving a pep talk or two on the merits of keeping to the stated boundaries. There were definitely times that I wasn't at all in the mood to put the time in, push myself, or think outside my comfort zone. But that fabric!!! It just kept demanding that it needed to be used!

Finally got the last border on Crazy Daisy this week too. After cutting the strips out, there was just over an inch wide x 42" of fabric plus another small piece leftover from the border width. So close! This was one border fabric that clearly didn't need another fabric involved to spoil the look.

The floral fabric was a one yard piece that I had picked up on a clearance sale where you had to buy the minimum to get the 'deal'. So fascinating to see it finish off this Crazy Daisy quilt in the best possible way.

I love how the extra bit of pink saturation at the border helps make the blue background fabrics shine, which of course, is what I always intended from the start, sort of fallen short of the goal along the way, and then wallah! found my way once again.*sigh  Some quilts just wanna take the hard road! This is a busy, loud, bossy sort of quilt and I can't wait to see what the quilting texture will do for it later on.

Right when I was sewing on the final 12" or so of the last border, I found a frayed hole in the border fabric. Just a little smaller than the size of an eraser on a pencil, nevertheless, it was a  big problem. After a moment of contemplation, I admitted utter defeat and just spliced in the little tiny chunk of border fabric that had been leftover from the yardage. I hate, hate, hate doing that! So tacky looking! The fabric is so busy that it's not immediately obvious, but it does annoy me that it was necessary. So thankful that I caught it NOW and not while I was attempting to quilt it! One of the good things about pre-washing fabric!

A corner fix. Don't worry, everything lays
nice and flat after it's ironed properly...
There is a couple more projects that I'm trying to bring to 'completed quilt top stage' by the end of the year and hopefully one more true blue quilt finish as well. Since we had most of our Christmas with the immediate family at Thanksgiving, there should be a bit more time available for quilting during this holiday than what I normally end up with. Still have one more Christmas shopping trip to work into the schedule, but the husband is self employed and it seems that we're always waiting on the next check. Also, we gave in and bought a fake Christmas tree this year and then ended up with one with a cracked base. Had to send it back and now we're waiting on the replacement. Hmm... That's a little scary with all the supply chain issues these days but what do you do? Hope the new one arrives next week like it's supposed to!!

Friday, December 3, 2021

Still in the Applique Groove

The Crossroads blocks sort of jumped to the head of the line. They just weren't happy hanging out in the handwork bag any longer. I'm having so much fun stitching these down though! Love the fact that the circles are not meant to be perfect, never will be, don't wanna be, the end.

Crossroads blocks on the wall
When I was sewing the background of the blocks together, the scrappy piecing didn't seem especially impressive. I definitely second guessed myself more than once! Now that the applique is coming along, I remember why the mixed fabric backgrounds appeal to me so much. It's the make-do vibe that makes so much of the warm and fuzzy vibes happen around here. And the blocks were too big to do all one piece fabric anyway, seeing as how I tend toward fat quarter cuts....

An Amish look for the applique
The cut-out circles from behind the crossroads applique are entirely too sweet to throw away. Because of the piecing, I have to go back and reinforce all the seams where it's newly cut. That's not slowing me down at all! I've already been playing with several ideas for a brand new project using these cut-outs. It's just soooo irresistible! The motif in the picture below is probably the winner. Love the spunkiness of that particular flower, whatever it is. Tulip? Lily?

Or something with more attitude...
All the applique is finished up on the pear blocks now. The light gray background fabrics was possibly a huge mistake, but I'm gonna do my best to make things work out regardless. It just changes up where I thought the challenges were focused at in the quilt!

A stack of pear blocks
And though it was a busy, whirlwind sort of Thanksgiving weekend, I did manage to squeeze in just enough hand quilting to move this quilt out of the hoop earlier this week. After all the initial angst about how best to do the stitching, it simply soaked up tons of texture from the hand quilting! Yay! Binding is already sewn on by machine and hopefully there will be a window for hand stitching on this later this month.

Bullseye Medallion ready for binding work
The next quilt in the hoop should be a Christmas-look quilt, but the heart wanted this one. The soft vibe of this scrappy quilt was calling out very loudly and so really, what else is there to do but get it in the hoop? I've fussed with the initial stitching on this one for three nights now and am getting close to being satisfied. It's terribly hard sometimes to 'see' in that first stitching, but some colors of thread just look so very wrong

Strippy Triangles
I know that once I figure out that first hoop, the rest should be smooth sailing. Crossing my fingers this quilt will be super relaxing to turn to in the cold December evenings! If you're interested in making a similar looking quilt, I posted some rough directions here. It's a very fast and easy quilt to put together if you don't overthink things. Which I NEVER do! hehe

Loving the old fashioned look to this one
So that's that. I'm thinking about doing a Christmas applique giveaway again this year {am I crazy?} and can't decide between two Love Apple designs. What do you think, the older one, or the newer one