Showing posts with label Border Work. Show all posts

Tuesday, June 11, 2024

Sporadic Quilting These Days

Just gonna catch up for a minute and then disappear for a couple more weeks. I can't seem to keep up with everything going on lately, so if it seems like I've been checked out for awhile, that's probably why. I'm not at total overwhelm, but close.*Ugghh  What has happened to my life? Plentiful quilting time seems like such a luxury these days!

Another border for Peace Always
I did get all the little baskets appliqued and sewn onto the 'Peace Always' medallion quilt. Started way back when and moving forward very slowly! It's such a bright, happy quilt so far and the yellow backgrounds to the baskets just make everything pop. Love it so much already! Crossing my fingers the next border surround won't dampen this quilts enthusiasm.

ready for some handwork
'A Tisket, A Tasket' is ready for hand sewing the binding on. I've already mentally prepared to give this as a wedding present and now we know the wedding will be this fall. Lots of time to get the binding taken care....

Baby quilt on the design 'floor'
I am sooo behind on everything these days. Finally, finally got started on my grandsons baby quilt. Was wanting to keep it very simple, but as always, I try to work in the mommas preferred colors. My DIL is probably the only person in the world that I will make an effort to do that. It's so much harder for me to start somewhere besides a stack of fabric that is calling my name. I still have to sew the rows together and then add on the last two borders, but much progress has been made by this past weekend. I'm thinking it will end up with some machine quilting and then a bit of hand quilting to cozy it up.

playing with fussy cut applique ideas
On a whim, I cut up a piece of fabric my mother gave me this past winter. Lots of lovely flowers that were making me wonder what they might look like fussy cut and appliqued onto a pieced background. Hmm... what about 'Old Fashioned'? Such a simple quilt, I'm sure it would appreciate a little extra time and attention. Still haven't settled on exactly how I'll approach the layout, but it will definitely need some interesting leaves and lots of stems cut out and sewn down!

Next up in the hoop!
Next up in the hoop is Coronacrazy. It's been at the top of the hand quilting list for well over a year and I've just been finding one excuse after another to avoid doing it. Finally got it sandwiched and pinned, all snugged into the hoop. Hope it turns out well! I'm thinking about putting it into the NCW Quilt show this summer. Haven't went since 2019, so it might be time. We'll see. I love putting my quilts into shows where I can see them hang, but always feel a little bad that I'm not part of the guild. Oh well. It's too far away and their meeting times would never work for me and my commitments. Just easier to pay the fee per quilt and hope they don't turn me away!

Am trying to work on the next prompt for Bramble Blooms too. Will hopefully have something up and present by the end of June or perhaps the first week or so in July! So far, I'm not finding it difficult to work with those older fabrics. It just feels like I need a lot more time with the pondering....


Wednesday, April 13, 2022

Maybe The Solution Will Come To Me If I Take a Nap

I've been working on the border for the A-Tisket-A-Tasket quilt. Lots of hst's which are not difficult, just annoying.

Trimming the hst's
Before sewing them into rows and getting locked into something I don't want, I went ahead and auditioned some ideas for the next border after.

Auditioning some possibilities
Definitely loving the red and blue hst's, but the rest is slow going. I had this idea to use up a lot of that really light yellow oddball fabric. Maybe in random 9-patches etc., but noooo it's not working. So I switched to applique ideas which, funnily enough is not working either.

Nothing looks right
Will have to leave it be for a bit and come back later. In the mean time, I finished up all the hand work on the Orphan Annie tulip blocks. All 20 of them! They are looking very yummy I think. Those olive green colors used on the leaves are just enough different to make me smile.

Hoping these look good together in a quilt!
I finally remembered to check back with the inspiration pics for the Country Stars quilt. It's a blend of two patterns from my inspiration folders. Both published in the early 2000's?

Original inspiration
It was all started as a quilt for someone and so I used colors and a style that I thought they might particularly like. The hand work is 'next on the list' so here we go. Definitely wanting to move on to more intriguing projects!

Should have left it alone....
When I started stitching down the leaves everything in me just rebelled. Ughh! I just hate doing sharp curves and there would be so many? So without really thinking it through, I cut four of the leaves down to a more simplstic shape.

All the weird shaped leaves
Yeah, it was probably a bad, bad idea. I've only stitched down four leaves on the right side, 1 large one, 2 small ones and 1 large simple shaped one and it's looking pretty iffy already. My regret meter is pinging off the charts.

Might have to get the seam ripper out
I threw some berry shapes on the quilt top {oversized on purpose} and am not sure if it all looks better or just more train wreck. Why do I ever think it's a good idea to make things that I'm not feeling the love for? Somewhere the seam ripper is calling my name, all the while laughing its head off....

Loving these colors together
I've been hand quilting on the AHIQ Hourglass quilt lately which has made me think about all those languishing hourglass units. Hhmmmm....  I made that first batch the wrong size so had to start over. Yeah. It was a very fun and relaxing couple of hours pulling fabric to put with them. Not sure what's gonna happen there, but I could tell my heart was all in.
Preventative maintenance
One of the results of digging through all those marinating fabric stacks in the past couple weeks--totes and buckets of fabric soaking. There's a gorgeous green fabric that had just a little bit taken out of it, looked so bright and bold. Uh huh. It's been releasing dye for almost three days now. No worries. I only used it in my Coronacrazy quilt.*sigh 


Thursday, December 9, 2021

Bullseye Medallion is Finished Up!

Loving this latest finish! When the last stitches went into the binding I thought to put it immediately on our bed. Alas, too many blue markings that needed washing out.

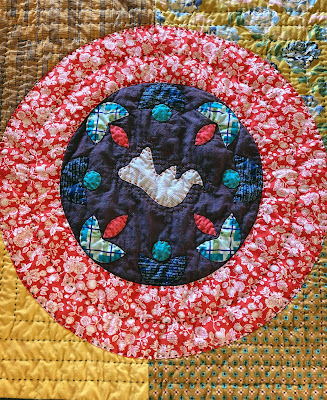
Love how the center turned out!
Thankfully it washed up very well and though there was a bit of dye in the Color Catchers, nothing seemed to make its way into the lighter colored fabrics. 

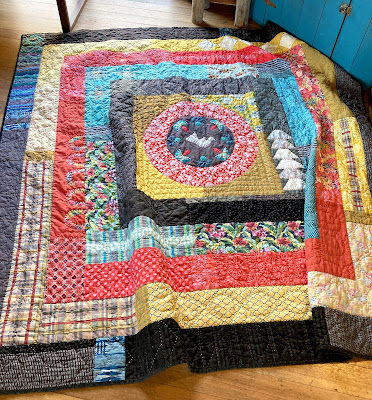
The colors seem so intense, it's hard to see it in the pictures
I'm obviously very drawn to the look of circles in my quilts. This center motif was such a simple look to pull off, though you'll probably notice the circle is not exactly perfect. What is around here? That red and white print has been in the stash totes for years. Not even sure now where it came from {or from whom?} but I love the impact it makes on this particular quilt.

Enjoying the look of the hand quilting
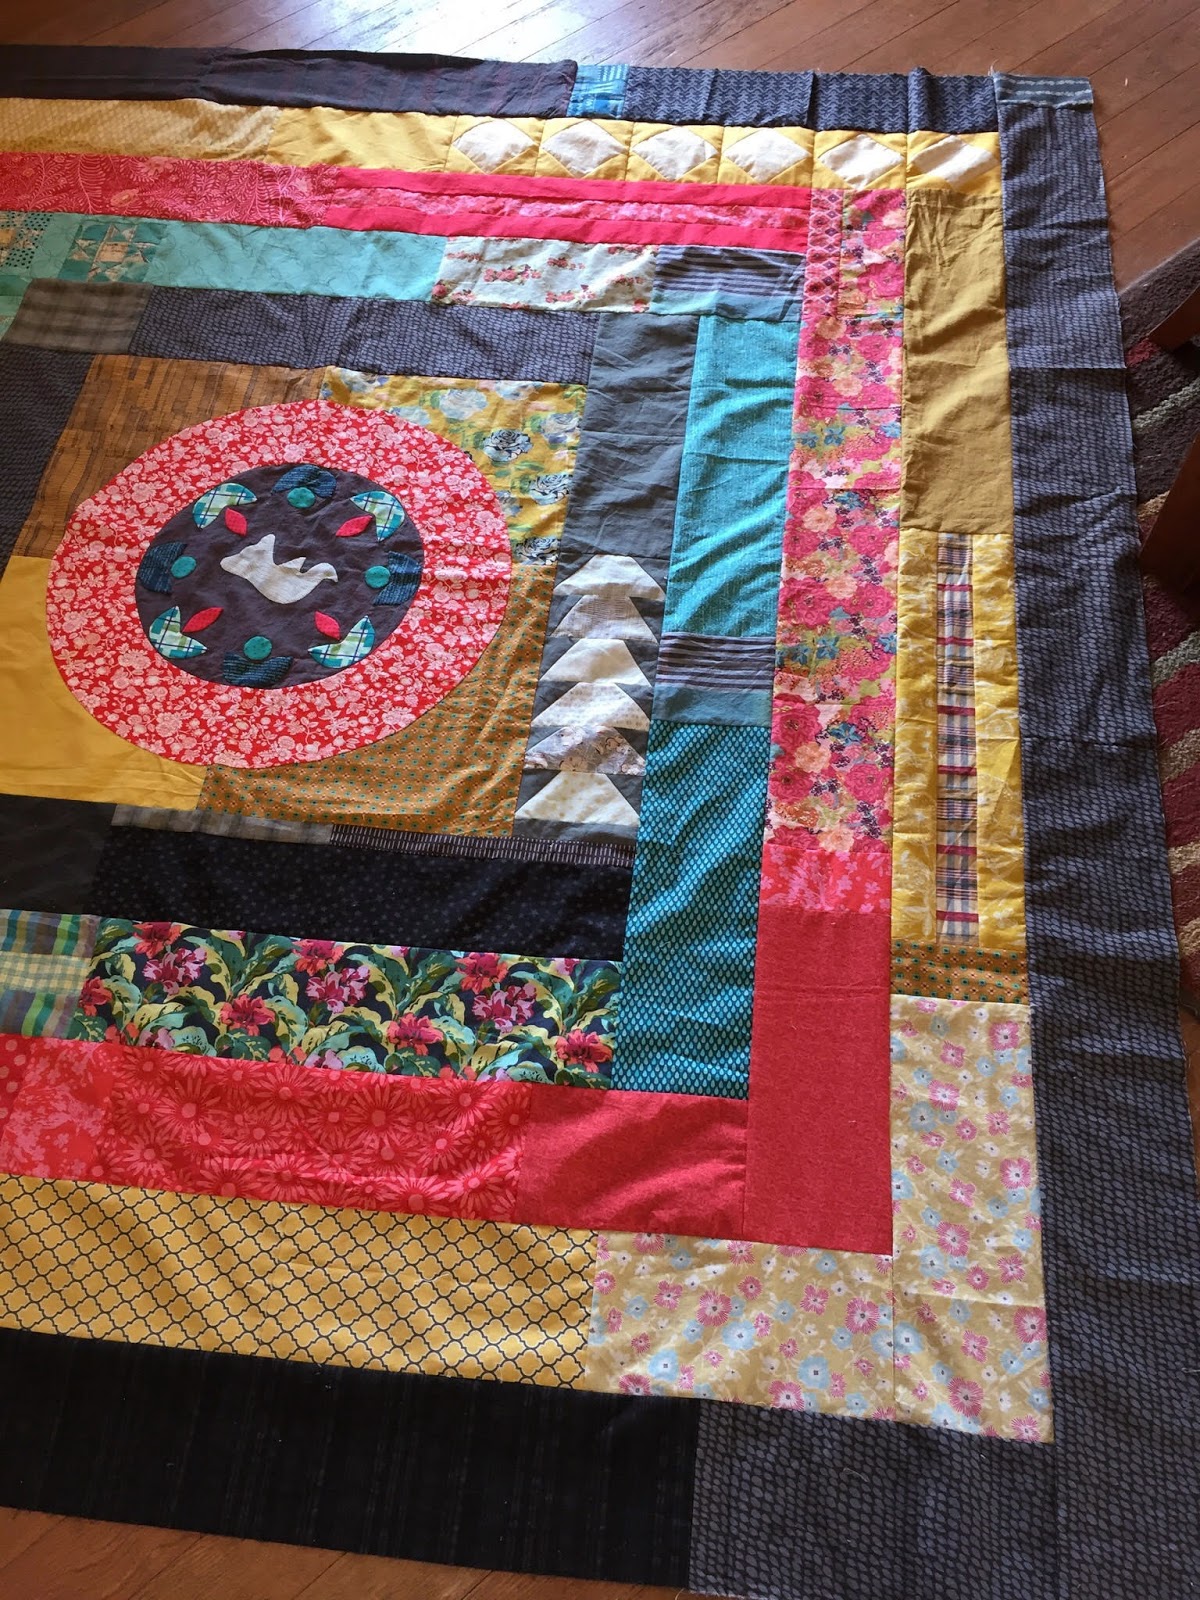
I saved the circle template and will try something else with it some day in the future. Mostly, I wanted to experiment with a wide, stripped down piecing look for the borders on this quilt and thought an applique center would help give the quilt some pizazz. Focus. A place to establish the overall vibe. Plus I wanted to play with an element I saw in an antique quilt years ago. You know how it is!

A different pieced or applique element for each border
The border width exact repeats was an interesting challenge. Having the colors change so dramatically each border helped give the quilt energy for sure. I really enjoyed trying to achieve a bit of a 'blend' from one border to the next in that area where the basket handles landed. Things like that always make me smile!

A couple pieces of vintage fabric!
As always, I started with a stack of fabrics that had been simmering and ready to go forever. These were pretty much chomping at the bit for their place in line! As each border developed, I tried to figure out ways to incorporate the most interesting fabrics into each border. It didn't take long before I realized that some fabrics needed a solid break between them as they didn't transition as smoothly as others. Simple to insert a rectangle of a completely different fabric and try to make that rough transition seem more 'purposeful'.

So fun to use up difficult fabrics....
The entire quilt is hand quilted with Perle Cotton #8 and #12 as per usual around here. When I ran out of the first variegated red Perle Cotton ball, I switched to the other similar red that I had available. Same brand, number etc., but this ball of thread went from red fading to white, instead of red fading into light pink. At first I was dismayed, but then quickly started preferring the more dramatic escalation of color and then lack of. So lovely to see it helping to 'pop' the texture on the black background! I can only assume the dye lots were different or perhaps I bought them at separate times?

The variegated threads are the best!
Obviously this isn't a super complex top, but I feel that I learned a lot making this quilt. It's always a bit of a thrill when a personal challenge project ends up working out so well. This was started in the month of January 2019 and took most of a year to plow through all the details, often involving a pep talk or two on the merits of keeping to the stated boundaries. There were definitely times that I wasn't at all in the mood to put the time in, push myself, or think outside my comfort zone. But that fabric!!! It just kept demanding that it needed to be used!

Finally got the last border on Crazy Daisy this week too. After cutting the strips out, there was just over an inch wide x 42" of fabric plus another small piece leftover from the border width. So close! This was one border fabric that clearly didn't need another fabric involved to spoil the look.

The floral fabric was a one yard piece that I had picked up on a clearance sale where you had to buy the minimum to get the 'deal'. So fascinating to see it finish off this Crazy Daisy quilt in the best possible way.

I love how the extra bit of pink saturation at the border helps make the blue background fabrics shine, which of course, is what I always intended from the start, sort of fallen short of the goal along the way, and then wallah! found my way once again.*sigh  Some quilts just wanna take the hard road! This is a busy, loud, bossy sort of quilt and I can't wait to see what the quilting texture will do for it later on.

Right when I was sewing on the final 12" or so of the last border, I found a frayed hole in the border fabric. Just a little smaller than the size of an eraser on a pencil, nevertheless, it was a  big problem. After a moment of contemplation, I admitted utter defeat and just spliced in the little tiny chunk of border fabric that had been leftover from the yardage. I hate, hate, hate doing that! So tacky looking! The fabric is so busy that it's not immediately obvious, but it does annoy me that it was necessary. So thankful that I caught it NOW and not while I was attempting to quilt it! One of the good things about pre-washing fabric!

A corner fix. Don't worry, everything lays
nice and flat after it's ironed properly...
There is a couple more projects that I'm trying to bring to 'completed quilt top stage' by the end of the year and hopefully one more true blue quilt finish as well. Since we had most of our Christmas with the immediate family at Thanksgiving, there should be a bit more time available for quilting during this holiday than what I normally end up with. Still have one more Christmas shopping trip to work into the schedule, but the husband is self employed and it seems that we're always waiting on the next check. Also, we gave in and bought a fake Christmas tree this year and then ended up with one with a cracked base. Had to send it back and now we're waiting on the replacement. Hmm... That's a little scary with all the supply chain issues these days but what do you do? Hope the new one arrives next week like it's supposed to!!

Wednesday, April 14, 2021

Extra Time Just to Get it Right

Do you remember the Big Kiss quilt? Over the winter I decided that it probably needed more attention and pulled it out of the finished quilt top drawers for further scrutiny. {Or maybe it wouldn't quit haunting me?} After much pondering, I finally decided to go for it. The applique that I decided on has been prepped and waiting for quite awhile, just patiently waiting their turn in the queue!

Big Kiss quilt top is finished! 

It's kind of a bold looking border, but very simple in terms of hand work. Then of course,  I made it more complicated by deciding to put a little crown on the top of the center flowers {for the pomegrante effect}, and then later, eight leaves on each border instead of four. Just can't leave well enough alone!

Close-up of the border work

I did something that rarely happens around here, with the fussy cut flowers on the ends of the vines. There was only a fat quarter of that particular fabric, so there wasn't a lot of cutting options to choose from. Some of the flowers look better than the others! It seemed like they needed to be cut out larger, but that wasn't possible either.

Fussy cut flowers

In the end, I just made that specific fabric work {regardless of its limitations} because it really looked to be the best option for the overall look I was aiming for! In the case of the flower below, I actually pieced four different pieces of fabric together from that same fat quarter. Super obvious up close, but not at all noticeable from a distance. Whatever. It works, right?

Very pieced flower

Though the border fabric looks quite black in some of these pics, the previous color is probably closest to reality, more of a dark gray. That charcoal-ish gray really makes the colors pop and lift up the entire quilt. On another note, I knew there was a bit of bias stretch in this quilt and wowsers! Adding the borders made that even more obvious. As I was sewing, that is. 

The Whole quilt

I carefully measured and pinned so that I didn't make things worse and in fact, it looks quite a bit better overall. Crossing my fingers that the hand quilting {which will happen later on} will ease out the worst of the rumples. It usually does! 

 So glad that I went with my instincts and tapered the vines down in a slight curve instead of keeping them in that straight line that I originally intended. Looks loads better this way! The only thing that I seriously regret at this point, is that I wish the little pomegranate crowns would have been pushed down further behind the flower. Oh well. What's done is done! The quilt top definitely has a cozier, more personal vibe than it did before and really, that's all that matters. We are all very happy campers now and this top is going straight back into quilt top drawers for a good long nap....

Loving the brighter colors!

Moving on to a different project, here's a few pics of the 1991 quilt that somehow snuck into the hand quilting line-up. It was never, ever my intention to hand quilt this one, but since the HST Medallion has been finished up, I've been gravitating to really basic hand quilting efforts.

An old project

Sometimes it doesn't even matter what is in the hoop, it just matters that the stitching can be done with a minimal amount of thinking, marking and effort! Call me crazy, but I just adore hand stitching through strips and log cabin type quilts are an easy pick-me-up.

30 years married in June!

This is such an oldy moldy quilt start, I almost don't even like the color palette anymore. Most of the blocks are from the early 2000's and all the house blocks were finished up by 2007. They represent the first seven homes my husband and I lived in after we were married, one of those 'good idea quilts' that never really gained enough traction to flourish.

Very soft colors

At some point, I did a Marie Kondo thing to the quilt room and purposefully got rid of many of the parts. This top is what happened when I decided to make a few comfort quilts from various orphan blocks here in the quilt room. Whether or not this ends up being given away though, remains to be seen. This quilt finish would have positively delighted me even ten years ago. Today, I'm working on much more exciting things, though of course, I'm happy to bring it to a proper finish.

Interesting to see it without the words...

Speaking of which .... Here's Coronacrazy, back for another day in the sun! It's trimmed down now, with a strong looking sashing added on. I loved the look of the edges before the sashing was sewn on, but alas, there's no way to finish up a quilt without adding fabric onto the sides, be it sashing, border or even a binding!

Working on the border

As per usual these days, I had to make-do the border, as most of the yardage I have is in too small of a piece for the entire surround. That's okay though, as the look is very appealing to me in it's rough form. Add a little bit of applique over the top, and I'm practically swooning!

All prepped and ready for hand work

See? There's always a silver lining if you care to look for it! I ended up using a striped green fabric for the vine and what you see in the previous picture is where I determined to sew it onto the border. All prepped and ready to go! One large applique flower is cut out and ready for hand work too. It had to be figured out before moving forward as the vine will be tucked underneath at both sides of the flower. 

The vine will actually only be sewn down within a couple inches of each border length {for now} as several parts of it will need to 'flow' from one border to the next. A little bit of extra time and effort trying to get this all figured out 'prior' to sewing the borders onto the centerpiece, but very worthwhile in the long run. Though it might not be obvious to the casual reader, I do actually expend quite a bit of effort trying to sew as much of the applique onto smaller pieces of the quilt, rather than try and work with a whole big quilt! If I wasn't such a make-it-up-as-I-go sort of quilter, things would probably go along much more smoothly. Hmm... maybe not. 


Monday, August 24, 2020

August Update

Decisions, decisions. It was either take the time to go quilt or take the time to actually write a post. Today I decided the post had to come first. 
Seedpod Flower quilt top is done!
What can I say about this quilt top? You already know that the flower itself was kind of an impulse, use-up-the-abandoned-bits sort of start
The full view
You also know that the inspiration pic was one that I fell head over heels in love with a very long time ago. Or did you? Regardless, I'm pretty impressed to actually see this interpretation finally come to reality. I do so adore a scrappy, utilitarian sort of look!
Scrappy goodness
I suppose this quilt would have looked fine without the Seedpod Flower center. Maybe. At this point I can't even imagine the quilt without it though. Once I wrapped my mind around how it all needed to fit together, then the top went together relatively easily. The anxiety and avoidance up to that point was stupid. Why do I always tend to overthink?
Trying to UP the 'busyness' factor with the prints this time!
All the economy blocks are the same size which means the horizontal rows are the exact same width. That was an important detail moving forward. The random placement thus relies strictly upon the differences in the various lengths of the connecting rectangles. 
A new color palette for me, but somehow it seems to work!
While they are not nearly as tall as the ones used in the inspiration picture, these started out from the scraps leftover from cutting the economy blocks. That was a good place to start. Hard to throw away the very narrow ones!  And so... determining approx. vertical measurements for the connecting rectangles became unexpectedly very simple. After all, I really didn't want the differences to be super extreme. A couple inches at most and there I was. Easy peasy.
Looking across...
Crazy how the bright, sparky applique addition to the inside border brightens everything up. I do wish the very slight, lighter blue outline above the curves still showed, but it ended up being turned under for seam allowance. This was just another one of those impulse rabbit trails that turned out to be a wonderful idea in the end. Sometimes it's nearly impossible to keep myself from traveling down the path of 'I wonder if x, y, or z would make things look better....'. 

Sometimes it works to the good and other times I find out that it's clearly wasted time. Never really know till you try though! I love how the yellow in the applique surround is more citrus than the rest of the yellow golds in the quilt. Yet it works as a very definitive framing for the Seedpod Flower, which of course, is the star of the entire quilt. Why not emphasize that even more!

This quilt top has a very distinctive mood, one that I can't quite put a proper label to. Is it retro? Vintage? Does it just convey fond memories of my grandmothers house dresses or perhaps it was the aprons she wore? Whatever it is, the mood as a whole, brings a smile to my face every time. 
Working on Spring Flowers
Another project that I've been spending time on in Spring Flowers. After seeing how washed out the flowers looked, I decided they needed a little bit of pzazz added in somewhere. After debating several different ideas {most of them ridiculously complex}, I ended up going with a very simple rail fence sort of block as the alternate. Lots of turquoise used to wake things up, but I also made sure to add insome clashy blue. For value and interest of course. There's just something about doing the unpredictable that always strongly appeals to me when it comes to quilting! The long narrow strips of the cream background fabric were added in after I realized that the flowers now needed some breathing room. So glad I had enough of that particular fabric because everything else just looked sloppy.
Auditioning border ideas
The brown and light cream striped fabric was something that I locked onto early on in auditioning border ideas. There's just something about a good striped border that speaks to me. Lots of ideas in play until abruptly I was completely done with dithering. The pink/rose fabrics were totally scrapped and simplicity became the name of the game. While I kept the strong chrome yellow, narrow, inner border {the blendy mustard gold fabric that seemed obvious was boring}, everything else got stripped down to basics. Will see how this border turns out in the end, but the thrill was just gone. Oh, and all the other orphan bits were dumped back into the totes too. So done with this particular project.Time to move on when it's not fun anymore!
Peachy Cameo in the hoop
The hand quilting is moving quite slowly on Peachy Cameo, but there's nothing very complex about what I'm doing. Sensing a theme here? One last hoop on the blue circle areas and then I'll be working on the two outside borders. I think they both will fit into one hoop {as far as width} so that's good. We're entering the long, long home stretch!
A closer look
As you can see, I often take the clamp off of one side when hand quilting. In this case, two of the blue 'circles' are right where the clamp would be, making it impossible to quilt in that area if it were to be attached. Honestly, I don't know if this is laziness or efficiency, but with this sort of quilting, having one clamp off is rarely a problem. The funny thing is, after all these years of working with only Perle Cotton thread and a long needle, my stitches are getting smaller. Still not super close together, but it's not exactly big stitching any longer. Oh well. Love the look regardless. All that instant texture is very addicting!

Will try to catch up with my emails and reading and/or commenting on other blogs in the next couple days. Have seen several posts in the Bloglover app that feel important to comment on, but the time simply hasn't been there. With time being diminished for quilting around here, often times there's really only one choice!

Tuesday, October 15, 2019

Crossing These Two Off the List!

We had a quiet weekend which was wonderful. Long overdue. I was able to bring two different quilt tops up to completed quilt top status. Yay! Sometimes it feels important to clear off the lists a little in order to create some new head space for creativity!
Patchwork Garden
After getting the applique work finished on gangly flower baskets, I wiffle, waffled around about the border. A three strip border made up of equal widths {as per the original pattern}, isn't always a favorite of mine. After much pondering, it became obvious the quilt needed something there on the borders. Nothing I was conjuring up seemed any better.
A completed quilt top!
Don't you just love those kinds of solutions? 'Well, it's better than nothing...'. Yeah. But actually, it really is in this case. I had a problem coming up with a good blue or green or even blue/green, but eventually settled on the one pictured. I thought to use a good lavender or violet but the quilt wasn't having anything to do with those possibilities.
A few changes to the pattern
This particular blue fabric has a darker blue print design that echoed nicely with the dark blue baskets. Because it came off as fairly moody, the white text print combined with the bold coral/red ended up being the best pick {from the stash} to complete the trio of border strips. Yes, it's very sharp and sparky looking, not at all what I started out thinking the border should be. In fact, the entire quilt all but vibrates now that all the parts and pieces are in one place!

The one thing that I really liked about this border pattern was that the inside strip was made up of offset side strips. Since this coral/red fabric is so very bold, I was careful to make sure that it in particular, ended in an appropriate area of the quilt. Didn't want it to compete unduly with the pretty applique flowers and so easily switched which side of the quilt ended up with the longer red strip.

As you know, I'm very fond of text fabrics and so was very happy to find a good place to use this one. I know it's super popular and will date my quilt like no other could, but hey, when it works, there's no sense fighting! And it was on sale the weekend of the quilt show earlier this year. I always have to buy a little something to bring home, you know, like a souvenir.*wink
The blue border fabric has some of that darker blue in it too
Overall I am very pleased with the outcome of the Patchwork Garden quilt effort. It definitely ended up with a slightly different feel than the prim vibe to the original pattern, which is perfectly okay to me! It's still cozy and country, a little charming, even when made up in a significant departure from original color choice. That's the hallmark of a good design in my book. Good bones make for a good quilt!

Did you catch that about the 'souvenir' thing? hehe The things we tell ourselves when we're trying to justify buying fabric! The second quilt top finished up is the Bullseye Medallion quilt. Though the black and the green/blue borders were a little bit hard to figure out, the red border went swimmingly. So well, in fact, that I couldn't wait to tinker around with the yellow border!
Bullseye Medallion quilt
I really didn't set out to finish this particular quilt top over the weekend, but once started, it just wouldn't let go. It helped so much to have large chunks of time with no interruptions. Just me and the husband rattling around in the house. Bliss! Ha! That's my absolute favorite part when the kids are gone. So much more quiet time. I mean, it's only for a weekend usually or maybe a week so enjoy it, right? But my man, it doesn't take long before he has to have the music playing, wanting to fill up the entire house.
Busy corner with a little touch of applique
Anyway, the yellow border took more time to cut out and sew together than it did to puzzle together. I waited a full twenty-four hours and then started attacking the {next} black border. My big empty floor space adjacent to the quilt room? Yeah, well.. ,the husband took that over sometime over the weekend. 'Sorting' stuff. I can see that I'm gonna have to dial back my expectations about that as well.
When a quilt is done, it's DONE. What can you do but listen!
The plan was to have a black border and then finish up the whole quilt with a final darker blue border. After the initial layout for the black border {sadly uninspiring}, I went ahead and laid out the blue fabrics in a potential mock-up last border. Ughh. Just awful. For awhile I even considered making the black border a very thin sashing-look border as it didn't seem to make any sort of meaningful impact on the quilt. And the blue was so wrong, it almost hurt. But that seemed like cheating. Doing the default thing without half trying.
So happy with all the different fabric prints used!
What is it that the men always like to say? 'Drop back ten yards and punt?'' Sometimes our plans just aren't going to work out and then it's time to make something else happen. Instead of giving up on the 5" border round idea, I decided to try combining the black and blue border into one. If the black was sucking up all the joy, maybe it just needed a lift. Thankfully, it didn't take any time whatsoever to see the immediate change in the quilt.
The wider 'different fabric' break in the red border is
one that actually acts as a spark in better lighting
It's really amazing sometimes to see how well a quilt can react to certain fabric/color additions. Or subtractions even. Whew! Scared me for a minute there. I thought the quilt was going to go from being bright and spunky to a defeated fit of melancholy! Trying to work fat quarter lengths into longer and longer border pieces was kind of tricky, but somehow it all came together. There are a couple lengths that are carefully pieced to make the length a smidge longer and not be super obvious about it. Other places I deliberately joined right into a different print fabric even though I had more of the same fabric if needed.

One of the challenges of using these shorter lengths is the choppiness of the piecing look. If you're not careful it all just starts looking blocky. I used a trick that I discovered while making my Big Tipsy Basket quilt--break up the shorter lengths with thin contrasting strips. Funny how making the breaks in border lengths more obvious can actually create a better flow overall! 

There were two places where I didn't get the look quite right and had to go back with the seam ripper and insert a different width fabric break, both wider and more narrow depending on the area. In the case of the the blue fabric breaks on the outside border, you can see on the left side of the quilt where I ended up chopping the busy blue print apart and sliding a strip of the gray in-between. I really liked the {necessary} energy of that specific blue fabric, but it wasn't showing up very well attached to the end of the blue striped fabric. Inserting a calm space in between helped that {kinda magical} fabric work harder.

There are applique additions in two different border areas of the quilt. The first is the basket handles on the red border and the second spot is the far top left corner where I stitched a not-quite-perfect gray circle cut from a homespun plaid. Both times it felt really, really satisfying to take a moment and do some hand stitching on the quilt--something not quite as 'rigid' looking as machine piecing tends to be. I'm not sure why that satisfaction was so deeply felt, but I'm not gonna question it. Maybe make a note for future quilting? The quilt looks {and feels} like a 'me' quilt now and that's really all that matters. So that's it! No more borders. The quilt said it was done and I can't see any reason to argue....