Friday, November 30, 2012

9-Patch Series #4 Now a Completed Quilt Top!

Ahhh....  It feels good to have another completed quilt top!  This one has been in the works for quite awhile now.  You can read more about this series here if you like.
9-patch Series #4
This quilt top measures 100" x 97"--the first quilt top I've ever sewn together that is actually wider than it is long!  Very odd measurements, I agree.  I wanted to add applique borders onto three sides, but not the top. It didn't seem to need anything more, plus it's already a HUGE quilt.  Works for me!

The black background makes for a very bold, striking quilt and I love how the penny rug type border makes the black bleed into the border just a bit as well.  So very glad I dreamed up this border as the main part of this quilt is a copy (same blocks, different colors) of a sampler quilt I found in 'Great Sets' by Sharyn Craig.  I wish I could get a better picture of this quilt, but my house is not well suited to display quilts of this size and I remain a very camera challenged quilter.

The thought of hand quilting this particular quilt makes me feel quite terrified because of all the 'empty' spaces to fill, but for now it's going into a drawer.  There are many quilts in line before I get to this one, so I'll have lots of time to contemplate what needs to be done with it.  Somehow I always come to terms with the vast gulf between what I think should happen with a quilt and where my experience and skills lie.*wink

Tuesday, November 27, 2012

Lots of Little Steps

Getting a finished quilt together is often a series of many, many little steps for me.  If I'm restless and afflicted with the can't-stick-with-any-one-thing syndrome, I'll jump from project to project like a grasshopper trying to find the perfect leaf to munch on.  As you can see below, for once I actually remembered to take care of the excess fabric behind the applique!  With hand quilting, this can be a frustrating detail to overlook.
Cutting the excess out from behind the applique....
I am not good at sewing on curved pieces.  Have I mentioned that once or twice before?  Slowly, patiently and with much resoluteness, the background pieces are being added onto the Big Star blocks.  It's a big project for me--one that needs not be rushed through.
Sewing on the background fabric to some of the Big Stars.
And then there is the eye candy.  The potential.  The endless possibility of something wonderful and unique. Playing with fabric is (by and large) what it's all about with quilting, right?
One stack reminds me of the brilliant fall colors.  The other one
has some funky green fabrics that are really stretching my imagination....
I love to stack fabrics together and play with them off and on for a few months, adding and subtracting as the whims determine.  Since I don't have a lot of money, I can't just go out and buy everything I want necessary for the next new project. Besides, it can be unexpectedly charming to mix in old impulse buys with a fresh new fat quarter or two!
And another fabric stack with less coral and more pink,
less gold and more subtle yellows....
Fabrics absolutely need to marinate and simmer for awhile before I dare cut into them.  It helps to be very sure of the fabric/pattern combination I've dreamed up too. This stack of browns, creamy whites, tans, blues and reds below has been very interesting. Honestly, I've totally given up on this particular mixture of fabrics once before and then later had to go digging them out of the totes again! Something tells me this combination could be quite the satisfying quilt for me.*sigh  I said for me.  Probably not for you though. lol
And yet another.....
Hmmm...  Could it be my next forever project?  It's so fun to have these stacks sitting around my quilting room teasing me while I'm working on the tedious details of a UFQ.  The theory is, if it's right out in the open, eventually my mind will hit on what the missing element seems to be.  Oh well.  It seems we all have a method to our madness!

Sunday, November 25, 2012

Hand Quilting on The Antique Medallion

It feels like a good day to link up to Kathy's Slow Sunday Stitching.  I have been working on the hand quilting for my Antique Medallion rather sporadically, but there is a bit of progress to show now.
Cross-hatching in the center.
 I tried to take a picture so you could see the actual stitching!  I went with a very simple 1 1/2" cross-hatch design for the center of this quilt--something that wouldn't detract from the applique work. I already washed out the blue marker, so it's got that great crinkly look I love already.
Figuring it out as I go.....
As I work from the center out, I am trying to go with what seems to be the most obvious solution.  You know, without getting all carried away with complicated designs!  I'm not a huge fan of marking my quilts, but when it's necessary, I will grit my teeth and do it anyway.   One of my previous quilts still has marking lines in it that refused to cooperate and go away!  That was a bad month (or year), but I'm trying to be more responsible and test, test, test first.  It's always a good feeling to feel like you've finally learned something.*wink

Tuesday, November 20, 2012

Prep Work For the Holiday and My Low Volume Blocks

I tried to get some prep work done in time for the holiday.  Not sure if I'll actually work on anything with so much family coming in, but it pays to be prepared!  I only have a little bit left to do for my borders on the 9-patch series #4 (less than a quarter of a panel left!) and then I will move on to this project.
Border work on Scrap Attack #2
I cut the trunks of the trees out on the bias because it gives just a bit of added interest.  I know, they are extremely small and the fabric is a very neutral colored plaid, but I will notice and appreciate the detail.  And hopefully the bird will actually look like a bird after I'm done with it too.*wink
Scrap Attack #3--Low Volume
Here are some of my Low Volume improv. blocks made last weekend.  I am considering ideas for how to set them into a quilt.  My quilting room looks like a tornado went through it with all the scraps, threads and shreds of cut-off pieces strewn about.  Proof that real work gets done here!
And a few more.....
These blocks are not perfectly balanced, but somehow I managed to sew 56 blocks straight out of my scrap bin!!  Color me amazed.  Honestly, I almost gave in at the last and raided my fabric stash.  It was getting a little hairy scary with all the itsy bitsy pieces!
56 blocks ready to go!
It's not gonna be fun to work with these blocks considering the off grain piecing, but I intend to use a lot of pins and be super careful with them.  Hope everyone has a great Thanksgiving weekend!  I know I have lots to be thankful for.

Saturday, November 17, 2012

Scrap Attack Addiction

I had so much fun with the red and blue improv. quilt made from my scrap bin.  I just keep thinking about that and wondering if it could possibly translate into the something good if I concentrated on 'low volume' instead.  Imagine my surprise when I was able to dig out a largish pile of light colored scraps! lol
Low Volume
So this weekend (when I should be concentrating on other more worthy projects), I am playing with this pile of scraps that has somehow taken over my rather small quilting room floor.....

Thursday, November 15, 2012

More Progress on the Big Stars

I've been plugging along the last couple of days.  Three more stars are sewn together.  These turned out a little bit better than the previous three.  Probably because I checked out a couple tutorials here and there!  Sewing curves is not something I'm very good at, but I am determined to learn.
A few more big stars.
Two of my panels for the 9-patch series #4 are finished up too.  They have been super easy to take with me and work on in the car etc. while I wait on my husband or whatever else is going on.  At first I worried that I had used too many medium and similar tones, but now I'm liking the bright, zingy vibe going on.  Hopefully they will do what I want them to for the quilt in question.  Fingers crossed!
9-patch series #4 panels
As I look forward to the holidays I'm wondering what I'll be doing for hand work during the times it's inconvenient to hand quilt on a large quilt.  I really need to get my next forever project figured out!  The thing is, I want it to be fascinating enough to hold my attention for years if that is what it takes.  Hmmm...  What to do, what to do...

Today is another half day of school for my kids and for some reason I can smell something burning.  It may be time to re-teach the kidlings how to properly cook mac and cheese again.  Always something going on around here to distract me from my quilting!

Monday, November 12, 2012

Antique Medallion Gets a Turn in the Hoop

Today is a lazy day.  The kids are all home except of course for our oldest who is attending a tech school in Oklahoma.  I miss that kid so much it's crazy and I still set the table for him sometimes without thinking.  We can't get him home for Thanksgiving, but we've already got his ticket home for the 3-week Christmas break!!  That ought to be just enough time for him to drive me insane with all his empty food dishes piling up in the bedroom.  lol  High school basketball practice starts today and it seems like we've barely finished up with Cross country track! Our oldest daughter placed 3rd in Districts and Regionals both, but then had a bad day at state.  We couldn't be more proud of her though because she did all the training by herself--no coach at all--since she was the only kid interested in cross country in the entire high school!  Seriously dedicated girl when she decides to do something!  
Newest Quilt in the hoop!
I can't stand having an empty quilt hoop during this time of the year, so I managed to take over the floor long enough to get this particular quilt sandwiched and pinned.  Next in line, it's been finished up since about 2008.  The name of the pattern is 'Antique Medallion' pattern by Cheri Ralston out of a Red Wagon Quilts book.  I think it's Red Wagon?  The book was on loan from one of my sisters at the time.  Plus, I changed the center out and replaced it with a pattern I found in American Patchwork and Quilting April 2001 magazine.  The Antique Medallion pattern also called for more applique between the green and the lighter black border which I eliminated.  With all of the floral stuff going on, more applique just seemed like overkill.
I'm still in love with the center of this quilt.....
The original pattern had a darker, more subdued look and for once I decided to brighten things up a bit!  The red florals, polka dot & the cream fabric were bought with a completely different pattern in mind--the one and only time I bought ALL of the fabric for an entire quilt all together, in a single quilt shop.  Then, for some reason, I couldn't make myself start the quilt and the longer I looked at my selection of fabrics, the worse it looked to me.  In the end, I peeled off a couple of fabrics and started in with a wall hanging (the centerpiece to this quilt).

Naturally, being me, I thought it would look fabulous if I tried to incorporate it into a bed-size quilt.  After much contemplation and perusal of various quilt patterns, I settled on the Antique Medallion pattern as my template.  Honestly, I had trouble figuring out the pattern (not an unusual occurrence with me) and somehow ended up with the sawtooth stars being too large to fit precisely into the lay-out.  Grrrr....  I made a major design decision and whacked off all of the points, then quickly sewed the next border on.  Turns out, it's one of the things I like best about this quilt!  The slightly chunky looking stars add in character and an unexpected 'prim' look to what could have been a very formal looking quilt.  Well, if it would have been made by someone else.*wink

Saturday, November 10, 2012

Getting Close to Another Finished Quilt!

The hand quilting is all finished up now on my Monkey Wrench quilt!  Hard to see the details because of the dark thread I used, but trust me, it's all there.  The binding color was a no-brainer for me this time around.  Plain old black seemed to be the only color that made sense, so why bother fighting it?
Monkey Wrench all ready to start binding.
I'm still not sure why I put the red sashing squares on the outside sashing strips like I did.  Probably because I still hadn't made any decisions about the borders at that point?  Someday I'm sure I'll get a better handle on my decision making skills.*wink
And now there are three!
Here are two more Big Stars that I have made (I previously posted a pic of the top left one).  This is a pattern out of 'Simple Pleasures' by Jan Patek, Alma Allen and Sue Spargo.  Karen over at Log Cabin Quilter recently made another sweet quilt out of this same book that I have considered making for myself.  After looking at the finished product up on my design wall, I'm thinking that I may need to sew a bit slower.  You know, for the smoother curved seam look.  Ahem.  Or maybe give it up completely?  hehe  Now if I can just dig up the courage to sew on the outside curved pieces for these big monsters.....

Wednesday, November 7, 2012

Little Bow-Ties Re-visit

Woohoo!  The election is now over.  Moving on....  I saw this little giveaway over at Reproduction & Antique Quilt Lover Blog that has completely intrigued me.  It consists of an on-line little quilt link-up, plus a little quilt giveaway, plus a cheddar fabric giveaway.  Super fun stuff.  I cannot will not resist!
Little Bow-Ties Quilt
This is the only little quilt I have managed to put together in well over a year!  It's still taking place of honor on my china hutch and I don't regret making it at all.  Many times I have walked past it and smiled because the little bow ties are just so sweet.
Custom fit to my China Hutch of course!
The strong, bold cheddar fabric in the giveaway is a little intimidating to me because of it's very boldness.  However, if I manage to snag a little piece of it, I will no doubt overcome my shyness toward it in no time at all.*wink  Definitely worth checking out all the little quilts on display if you're interested in that sort of thing and it goes without saying that Taryn's blog is always worth a visit!

Tuesday, November 6, 2012

Pre-election Jitters Quilting

I won't deny it.  I have been a very jittery poll watcher these last couple of days.  My family is rolling their eyes at me, because I just can't settle.  How could we possibly end up with an election that matters quite so much?  I decided I needed a fresh, shiny new project to distract me the other day (justification to start a new project is always so sweet) and somehow ended up working with these colors. lol
Wondering what I'm doing.....
The scrap bin is overflowing once again and when I was trying to clean it up a bit, I chanced to see a very complementary pair of fabrics laying on top of each other. That's about all the inspiration I needed to jump into yet another Scrap Attack project!  See?  Nothing subliminal going on at all!  hehe
The scraps that started it all.
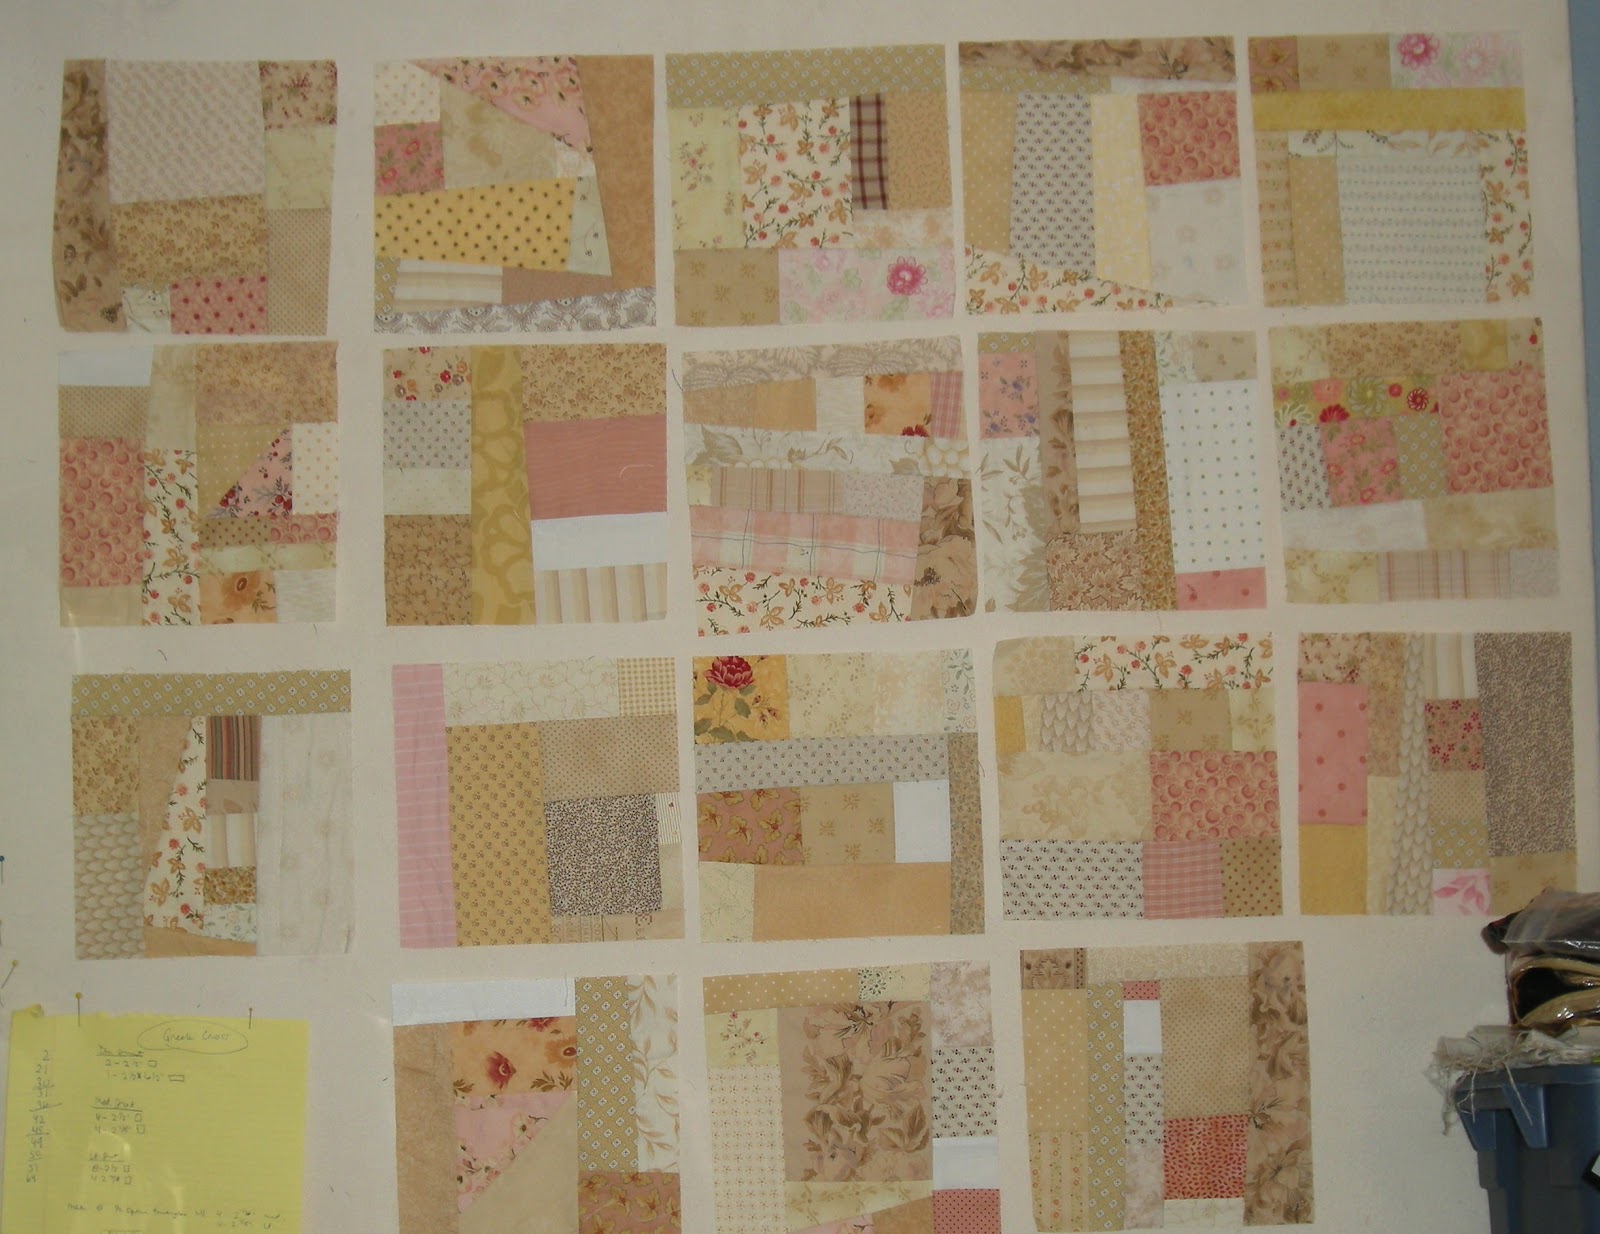
The little bit of Gwen Marston influence the other day undoubtedly influenced me as well.  I actually did spend about an hour combing through my books and patterns to see if I could find a very simple pattern that would transfer well to scraps.  Truthfully, that was a bit disappointing.  My mind was thinking of big things and the scraps are mostly about small stuff.  I finally came up with a basic scrappy log-cabin-like brick block.
What to do, what to do???
I managed to sew about four blocks before I ran out of time in my day.  Yay for the blocks!  Looking good.  Sort of.  I went to bed and then, of course, laid awake forever wondering what and how I was going to manage with my (by now) seemingly way too small amount of scraps!  See, it's all about perception.  First off, I was being over-run with scraps and then, after a few short hours, I was bemoaning my pitiful little offerings!
Fixed a couple blocks and looking at border fabric.
Just before I fell asleep (which I have discovered is the very best time to be making quilting decisions), I finally figured out how I needed to proceed.   The biggest challenge to myself was that I really only wanted to use fabric from my scrap totes.  I love challenges to myself.  Don't you?  It keeps things very focused and forces the mind into unbelievable contortions of what if? what if?
It's starting to look like a quilt!
And so that's how my alternate blocks came into play--block after block.  After I got the main part of the quilt together, I had to finess a few blocks for better drama until it finally looked 'together' enough to quit.  I did look at the rest of my scraps and contemplate a very scrappy, improv border, but I decided to relax my Scrap Attack mentality for the next step.  It worked out very well for the main part of the quilt, but I thought the border might need something different.

I always knew I'd been hoarding these muddy, purple-brown fabrics for a reason.  Every time I buy this color, I wince and wonder what strange reason makes me buy such a sad, sad color of fabric!  Let me just tell you that I might seriously question my reasoning, but I've learned to go ahead and just buy the weird, random fabrics for my stash.  They have been some of the most important fabrics I have ever used in fact!

Now I have dug through and found a few little orphan blocks to add for the impromptu border.  Yes, these are circles from the 9-patch series #4 quilt border.  No, I did not steal them from that particular project, as they are the LEFTOVERS.   And yes, there definitely can be leftovers even when that other project isn't even done yet. lol!  I know, it's complicated.  I'll just stop trying to explain now and leave you to enjoy the rest of your day.  Mine is a little better though after working through some of my pre-election jitters.*wink

Sunday, November 4, 2012

More Blocks For the Random Sampler QAL

Here's the latest blocks for the Random Sampler QAL over at Bloomin' Workshop.  I somehow ended up messing up on one of my Tree of Life blocks, but it all worked out okay in the end.  These are really sweet blocks to make, but I think I only need a couple of them for this particular project.
Tree on the left not quite like I intended it to be....
There was just a little bit left of each of these green fabrics, so I did a little piecing to make the blocks work.  I almost added in a second green fabric for each block, but then decided no, they're scrappy looking enough as it is.  Diane (over at Butterfly Threads Quilting) added a little bird to her tree block and I confess, I had to copy the idea!  It's an old fashioned look that totally gets me every single time--melts my heart through and through.
Ahhh, now it's looking better.
Then, because I was thinking about the end result, I decided to make a couple more basket blocks.  The original basket blocks we made are 8".  I'm thinking that having a couple different sizes will play very nicely with the whole 'Random Sampler' look we're aiming for, so I also made four 6" baskets and two 4" baskets.  These baskets are rather plain, but that's okay by me.  Not every block needs to be a star!
Extra baskets for the QAL.
There was a little trouble with the basket handles on the 4" baskets even though they were definitely cut out on the bias.  I probably should have made them just a smidge more narrow.   Live and learn.  And since I'm trying to cram as many links into this post as I possibly can, I think I better go ahead and link up to Slow Sunday Stitching over at Kathy's Quilts too.  Don't you think the basket handles count as hand work?

Thursday, November 1, 2012

Making My Own Quilting Template

I finally got the entire center of my Monkey Wrench quilted.  Then.., no compass, no motivation and a queasy feeling about drawing my own cable pattern pretty much stalled me out for longer than I'd care to admit to.  After nagging my husband about finding his compass, begging my kids to borrow one from school (yeah right, mom) and then combing Walmart and coming up zero, I almost gave up entirely on quilting a cable pattern for the borders of this quilt.
The left border is completely quilted.
Hey, I'm a just quitter at heart.*wink  Anyway, something I said one night apparently challenged my husband to look through Walmart for a compass on the way home from work.  He was gloating when he walked through the door with two of them.  I hate gloaters.  And why do men always think that if we need something, two will be better? (Ahem, it's always okay to buy two if it's chocolate or Pepsi.  Just saying.)

So, because I was really, REALLY busy, I put it off for another day and a half before I grudgingly pulled out my Gwen Marston & Joe Cunningham book. This is so not my forte.*whine....  I carefully followed directions and came up with one or two really small football cable things.  Great.  But how to make them big enough for the border?  And that's where I simply couldn't do the follow through.  Math was a grind for me at school.  A's and B's 'cuz I did all my homework, but no real spark of genius or intelligent life here.
The incredible homemade quilting aids.
I was so NOT asking the husband for help at this point. lol  I started folding paper and cutting out freestyle footballs (using up way too much freezer paper) until I had something that looked about right.  With a few little tweaks and measurement checks, I was able to finally come up with a tolerable template.  I used a file folder for the cardboard and my exacto knife to cut the slits.  (Nobody needs to know that the first two slits were terribly difficult because I was using my exacto knife upside down against the blade. hehe)

I decided to make myself a detailed visual aid so that when I was stitching I could have a clear reference point in the event I became confused.  Who, me?  This also seemed like the perfect time to try out my new 'Miracle Marker' my mother bought for me last year.  This quilt is fairly dark and so I need a light colored marker.  Yes--I did test it out previous to marking the entire border and it irons out in literally seconds! Thank goodness for that as I had already marked into my third cable before I realized that the footballs were not supposed to be joined at the ends, but linked together....  Duh!  Very prescient of me to make that visual aid, don't you think?:)
Trying out 'Miracle Marker'.
So, now I have one entire border stitched and I've started on a second one.  Things are moving along very well and I haven't had to remove very many stitches so far.  Apparently the template is a success!  Would I recommend this method to other quilters?  hahahahahahaha  Not if you're anything like me.  On the flip side though, I feel very accomplished and smart now.*wink
(I think) It's a completed quilt top!
On a different note, I added one more border to this particular quilt and now it's being crossed off of the list. I'm totally ready to call it a completed quilt top and stick it away in the drawer.  For now.  I may decide to add another border one day in the future.  Or not.