Showing posts with label Improv.. Show all posts

Monday, July 15, 2024

First Border Prompt for Bramble Blooms II

I've been doing a lot of thinking about how to present the second Bramble Blooms prompt. First and foremost, it needs to be said that it's your quilt. If you already have ideas spinning around in your head and fabric to back it up, just go do whatever it is that the quilt is requesting. Series work that starts gaining momentum doesn't need outside help. Feel free to follow the muse! 

Bramble Blooms II--A
If you're here for the next prompt because the quilt hasn't spoken yet, then I'm all about that too. This is a QAL after all! What we're trying to do with this particular quilt is introduce most of the same variables from BBI, but in a brand new format. The point is to mix and mash and basically just throw things at the wall until something inside us says, 'Oh yeah'. That's the thing. I kinda like that!' It doesn't have to be this huge welling of excitement. A positive hum is perfectly satisfactory.

1ST BORDER PROMPT FOR BBII: This specific prompt is all about choices. Personal choices. Where do you envision this quilt going? The 1st border can include piecing, applique or even a mix of the two. Don't panic yet! This will be easier than you think to decide. Go back to the first Bramble Blooms quilt and take a look as to what elements might look best carried over into this border round of BBII. You're not going to want it to be an exact copy, but you definitely want to strive to keep the essence of your previous make. Something is probably going to settle into your subconscious. Think connections. Associations. Correlations. Or even echoes?  It's important to keep to the theme, however loosely that comes about. Don't be afraid to stretch the obvious boundaries while redoing a previous prompt.

PIECING OR APPLIQUE?: If you choose piecing, the logical choice is to go with a patchwork look because most of us addressed the quarter triangle or quarter triangle {X block} in our newly completed centerpiece. If you choose applique, have it be a spin-off of what you used before in the first border round of BBI, not the center. Go bigger, smaller or even more improv-ish, but at least make an attempt to pursue a minor change to the general look of your border or even the applique motif.

By this point in the QAL, you should be a little more accustomed to first checking in with your marinating stack of pulled fabrics. See if any of those fabrics spark initial inspiration. Nope? What do you have an excess of? Maybe start there. Is any of it acting desperate to be used up or perhaps is super sentimental to you at the moment? Is any particular color speaking to you a little more loudly in regards to cozying up directly side by side with your completed centerpiece? Try making easy change-ups such as using a 9-patch block in this quilt even if you used a 4-patch before, etc. etc. The point is to keep the general look and feel of a patchwork border, which should definitely help with keeping good connections going between the two quilts. At the end of this QAL, the goal is to be able to look at BBI, BBII and BBIII and immediately pick out the similarities or at the very least--distinguish the evolution of the creative journey!

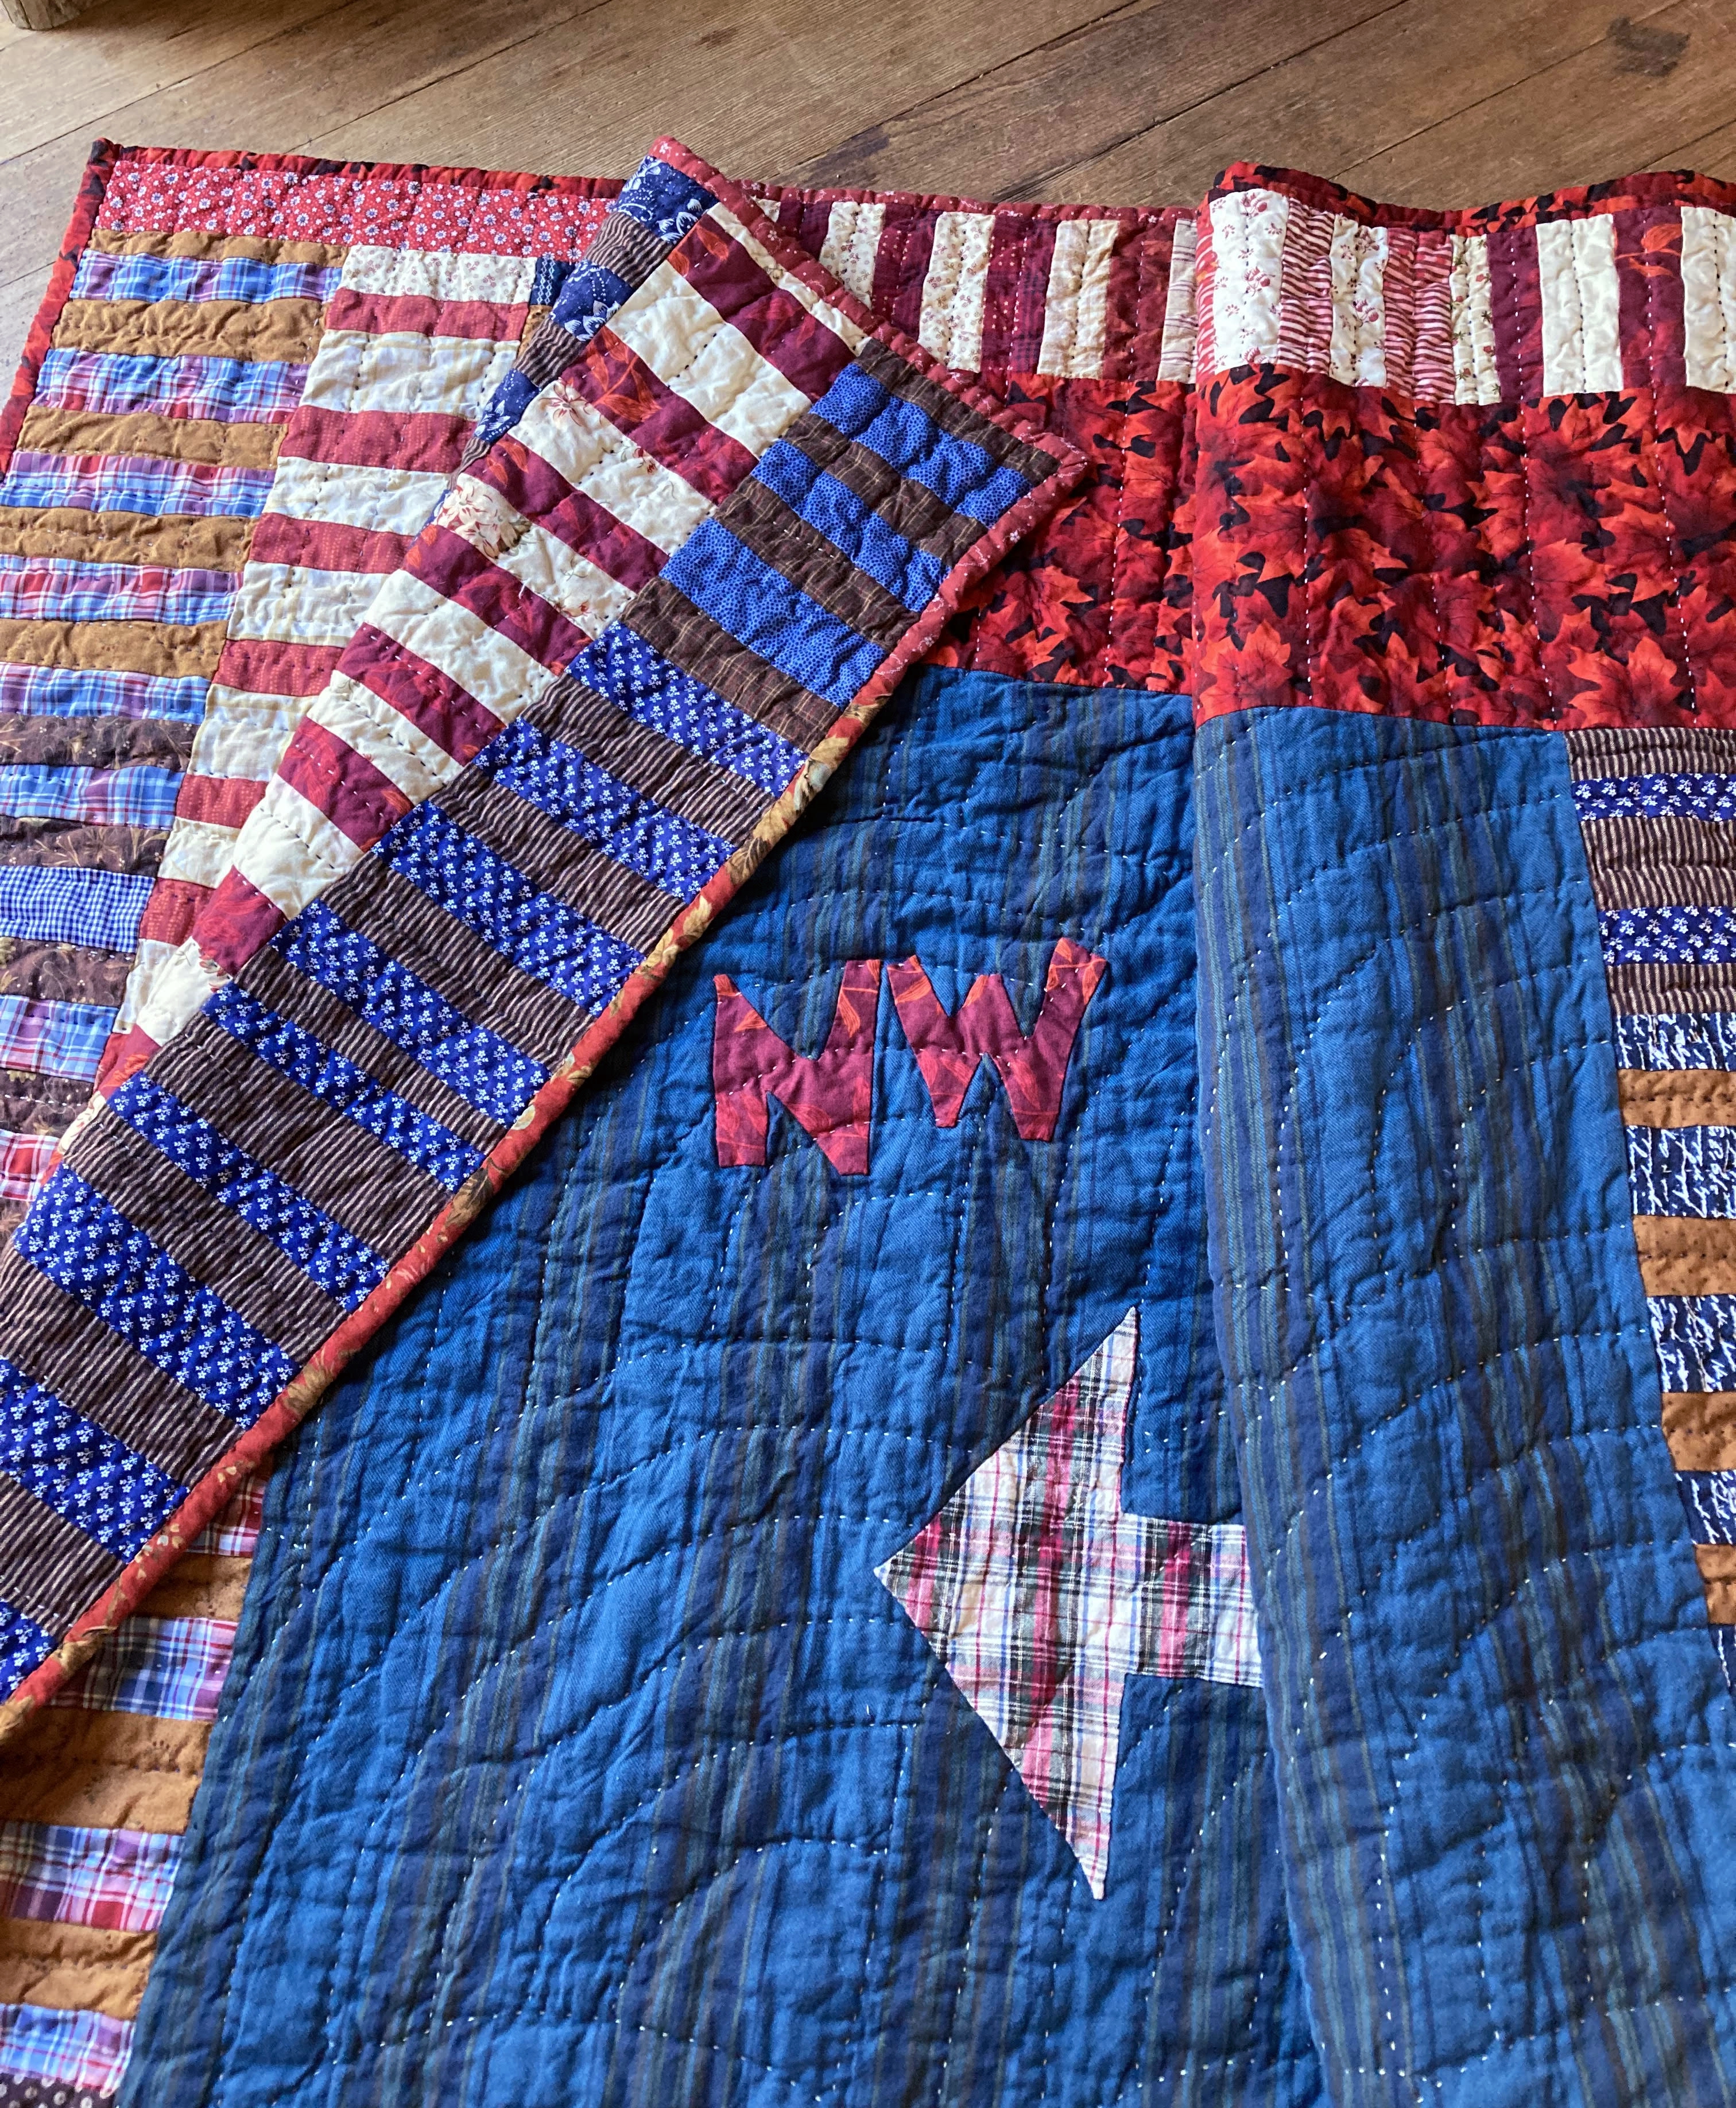
WORKING THROUGH MY OWN PIECED BORDER FOR BBII: What I thought made the most sense here {based on my odd, clunky looking centerpiece}, was to take the 2nd border prompt from BBI and re-imagine that. If you remember, that specific prompt was as follows: Put together a border that includes adding 4-patch, 9-patch, 16-patch or even larger patchwork blocks. You can set your blocks side by side {continuous block layout} or 'on point'. This border can be any width you like. It does not need to have the patchwork blocks throughout--use as few or as many patch blocks as you think will look good! Totally up to you if the blocks are improv. style or traditional-look.
A closer look at the piecing
So that's exactly what I did, using a stack of medium green fabrics that were just itching to be used up. The colors were not glaringly right for the centerpiece, but justification came quickly. I reasoned that they could work splendidly to create a satisfactory transition space for the next border after this one. Remember? I told you previously that the last border in BBII was going to have some vines? That is code for applique in my world.*wink  So try to save your previous centerpiece applique motifs for the next prompt if you can.

Seeing as how this border isn't terribly important {in the context of things}, then the whole thing becomes easier--at least in our minds. Whenever we're deliberately making a 'transition' border for a medallion quilt, we don't have to stress about it looking AMAZING. The entire point is to simply create neutral space. If the intent is to have one fabulous looking {more detailed} border later on, then go ahead and take it easy on this particular border. The eye is going to glide over this area to yet another area in the quilt anyway. It only requires a little bit of texture and depth. Don't make dramatic looking blocks and definitely avoid anything that could compete with the potentially complex border coming up. Do something that shows that we care about our quilt without expending so much energy that we lose interest in the final result.

Another way to envision this transition area is to think of is as something that encircles the previous sewn area and somehow manages to say, 'There's that. Now lets get prepared to highlight something a little more special.' Which all happens in a blink of the eye, really. Without that transition area though, the contrast between the two might just be a little too jarring for our eye to properly appreciate. And a one fabric border sometimes just totally kills the sought after vibe. Joy will go there to die. I'm serious. We've all seen it happen! To keep the blocks less busy looking and the feeling to be restful, keep your fabrics few and the colors fairly well blended together or at least flowing well from one fabric or color to the next.

GIVE YOUR MUSE FREE REIGN TO TAKE A DETOUR: Because it's important if you want to see personality shine through in your quilt! As you can see, I ended up having to add a few little pieces of applique to my border anyway.*sigh  Is anyone really surprised? The quilt basically stomped its feet and demanded it and that's my story. Thankfully I was still at the mock-up, auditioning stage with the 9-patch blocks and the green setting triangles. Figuring out 'flow' in the layout and basically yawning at what I was looking at. Somehow it just wasn't enough. My reaction, as usual, was along the lines of, 'What little, tiny change can I make that will have the most impact?' 

I didn't really want to add a lot more color, thinking that would work better in the next border. So, the next step {working within the current prompt} was to think about adding in some applique. Mixing things up. Not replacing the border entirely, but working to improve it. Applique over the top? Applique in lieu of some of the blocks? How many? Going back to BBI quilt, it had to be the bramble motif, but maybe more stripped down? A lot of times, the sensible answer works just fine, so I don't overthink it. In all honesty, if I take too much time with 'improving' this border, I'm gonna get too bogged down in the what-if's to make any real forward progress. 

Annoyingly, I had the little applique blocks cut out and ready for stitching when it occurred to me that actually, I wanted them in the size of the cut-out pieces after stitching. Grrr... Time to cut out a new, slightly larger set! Oh well. Much better than having to add endless applique repeats to the entire border. {Which was fine once, but I don't wanna do it again unless the quilt HAS to have that!}

You can't tell from the pictures, but I will also admit to making the on-point, pieced border waaay too wide. I did it sorta, accidentally on purpose, because experience tells me that it's a great way to play with proportion when you're dealing with improv. Make it too wide and cut it down. Make it too narrow and cry about lost fabric opportunities. I've done it both ways and this was the right choice for this particular quilt. Once I could 'see' how wide exactly the border needed to be, then I went about chopping off part of the previous cream floral sashing strips to better fit with my patchwork and.... otherwise making things fit well all the way around. It's always a work in progress and sometimes it's more seamless than others. No pun intended!

The applique demo blocks
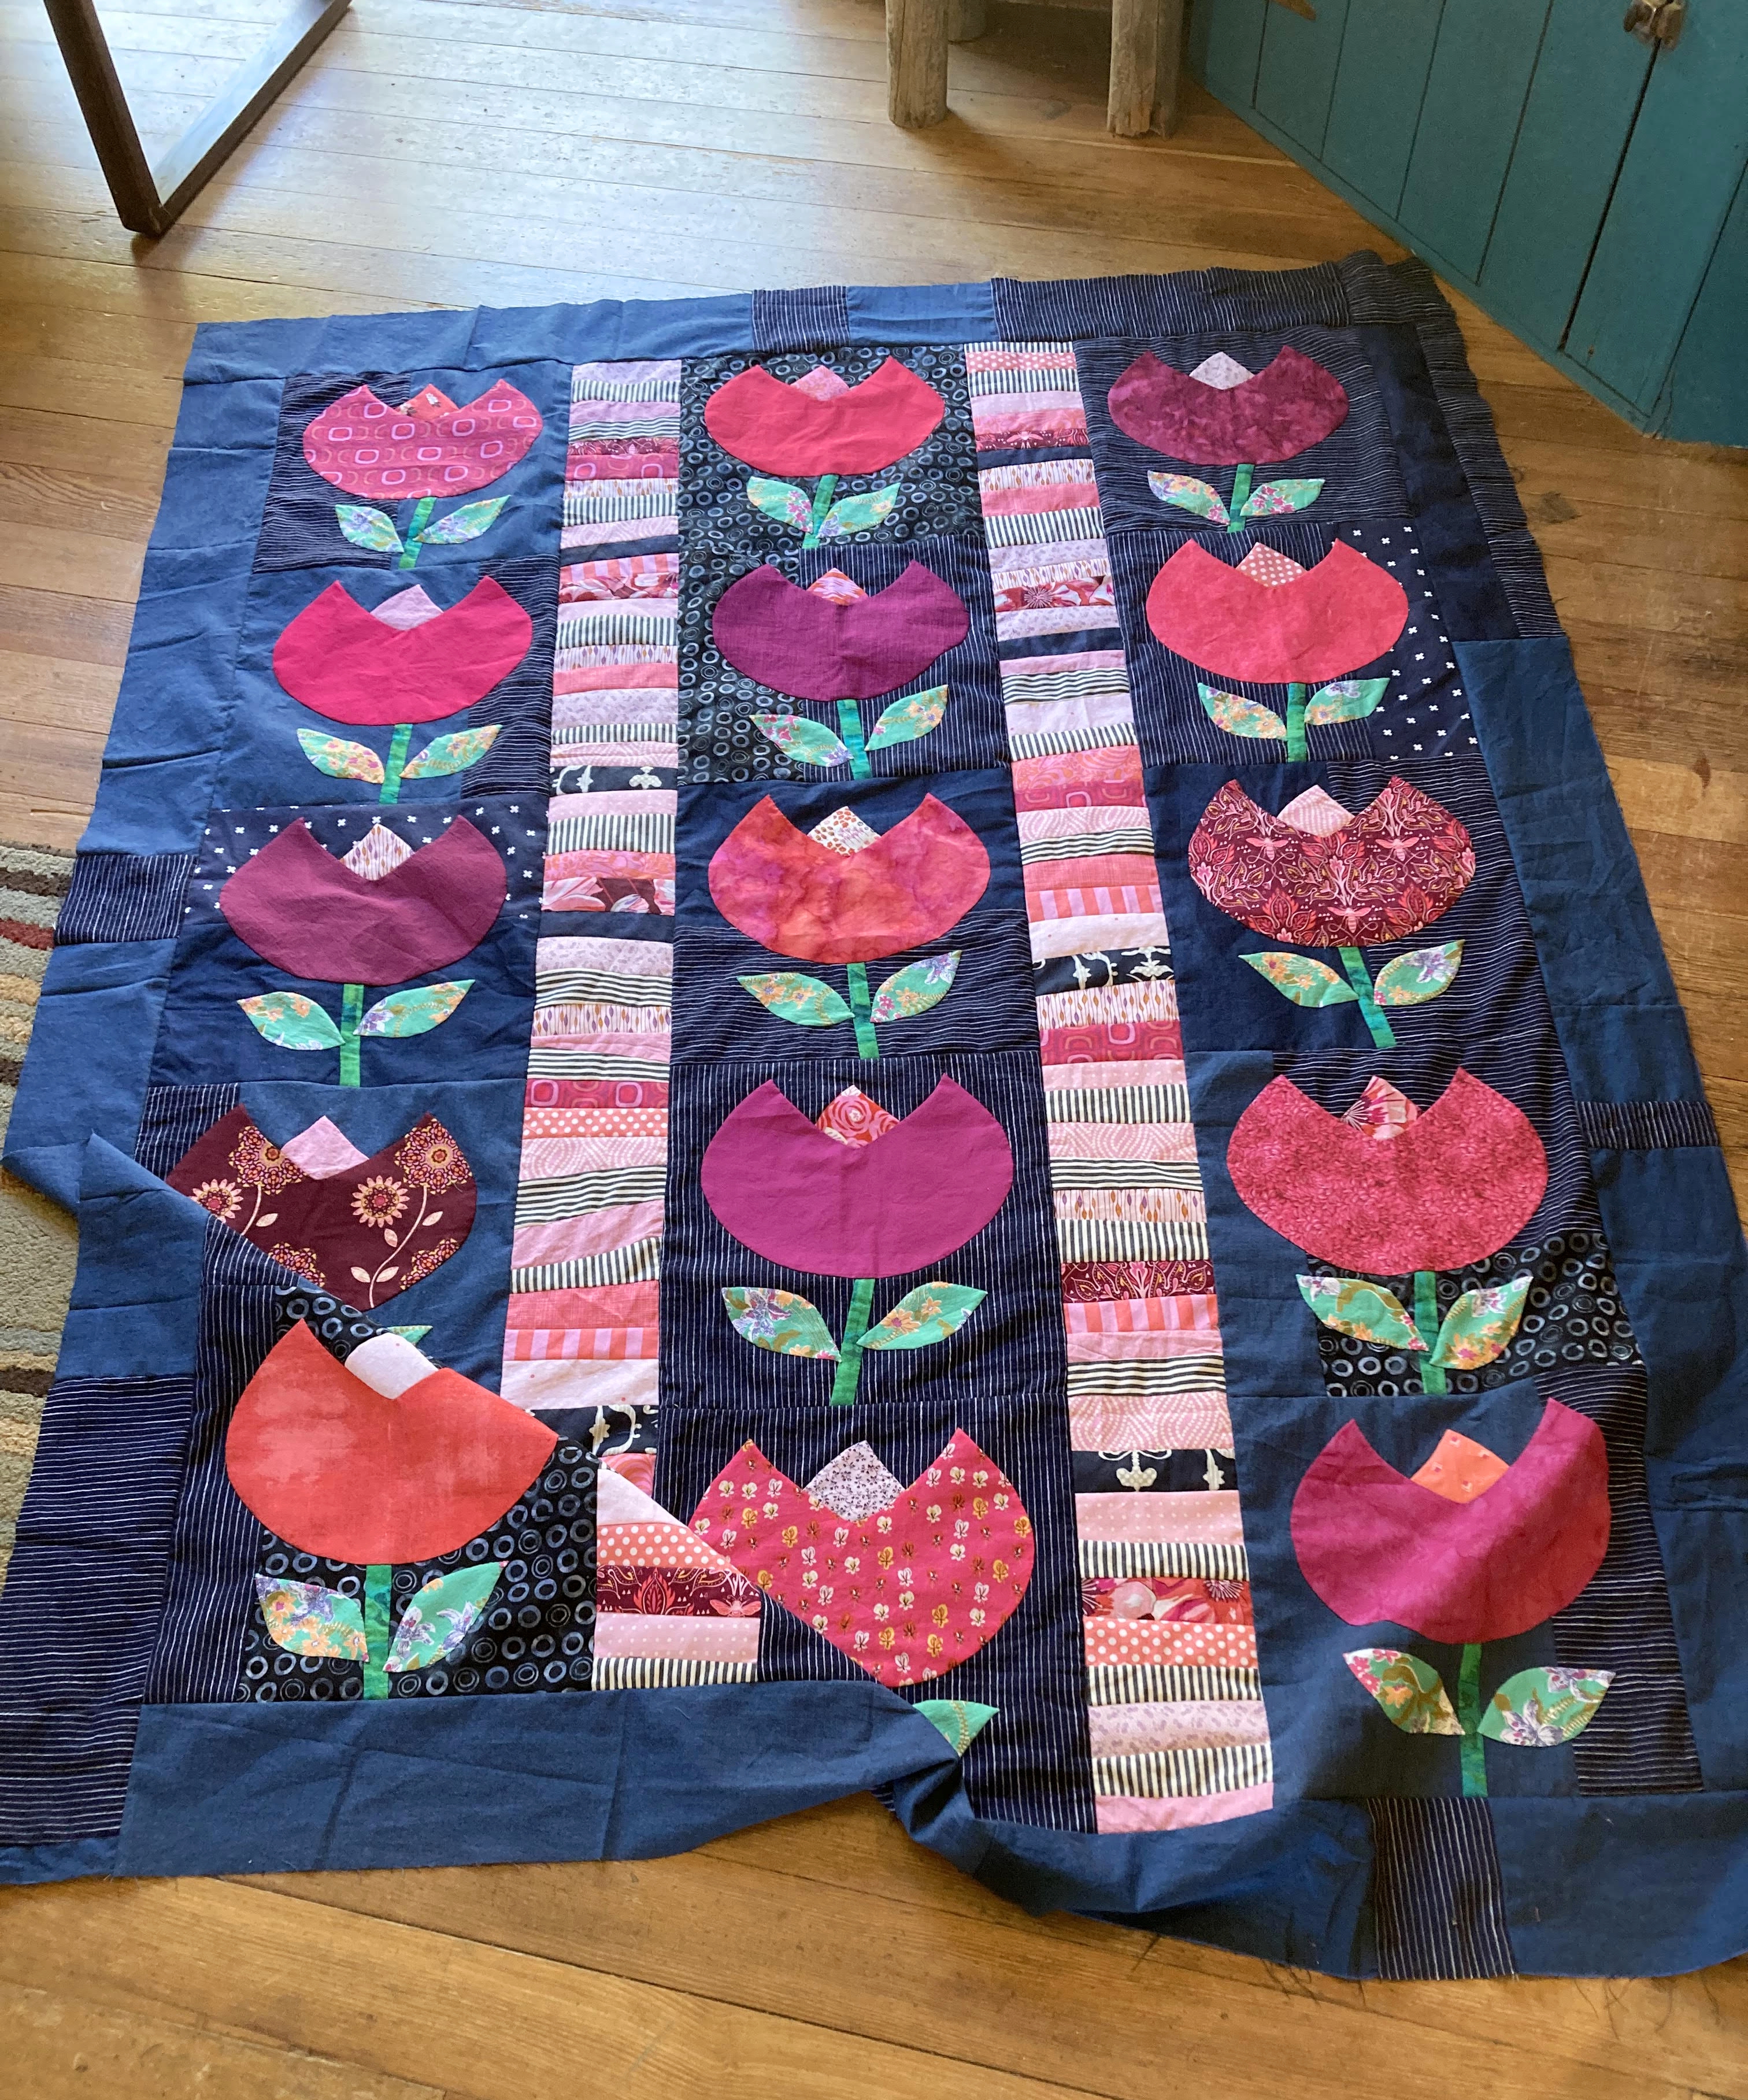
THE SECOND VERSION OF BBII: As you know, the first centerpiece for BBII ended up being a bit darker and heavy looking than I intended, even with the Sujata improv. pieced blocks. That propelled me to have another go at this part of the QAL, just to see if it might be possible to do something radically different with the same exact stack of fabric. There's just no stopping my curiosity sometimes! And that's why I ended up with the light colored, large X block for the 2nd centerpiece. I'm calling them BBII-A {see above} and BBII-B {see below}. 

WORKING THROUGH MY OWN APPLIQUE BORDER FOR BBII:  No, the previous border was not an 'applique' border. It was a pieced border with applique that inexplicably jumped on board. Totally different approach. So, for my 2nd version of BBII, I had a bit of a blank page to work with. Just a very simple, largish X block and nothing else there to help generate ideas. Hmmm...After carefully dividing up the potential fabrics for each version of BBII, then I started playing, all the while considering the overall vibe that I hoped to build on for this particular version.

The larger border background for my BBII--B
Keeping in mind the concept of trying to make this BBII-B quilt lighter and yes, quieter and maybe even softer looking? I had purposefully divvyed up the fabric pull to try and dictate just that sort of outcome. Yes, we can sometimes influence the outcome! Some fabrics might end up overlapping the two quilts here or there, but hopefully {crossing my fingers!}, it's the way the fabrics are placed that will make all the difference in the final look and feel.

All the applique pinned to the quilt, ready for stitching
I also hoped to generously expand out from the centerpiece. To try and make a much larger quilt area, especially before getting into the details of the second and last border. The easiest way was to just place chunks of fabric around the center until the overall blending {and flow} of fabric and color seemed almost organic. Which took several hours. Does it look like it did? Hopefully not! I was having too much fun to care! Though I mentally imagined sewing large patchwork blocks around, perhaps sewing a traditional-look border, it never completely fit with my feelings that this quilt needed a lot less formality and structure. I wanted blending and maybe some surprises in the joining up of fabrics. Purposeful, but not obviously so. Definitely more of a vintage utilitarian look than what was done in BBII-A.

As the play continued, over a series of several evenings, it became obvious that there needed to be a coping border around the X block center too. There was just no positive way to puzzle piece the larger border right up against the centerpiece background fabric without it looking somewhat awkward. That led me to experiment with introducing some darker fabrics for the coping border, and also think about intermixing a little directional fabrics for better energy. Piece by piece I finally got the layout for each figured out, and then it was just a matter of cutting individual fabrics to the proper measurements. Sewing it all together was interesting as once again, I put myself in the position of needing to do a little partial-piece sewing.*ughh... Totally worthwhile when I look at how it ended up, though! Really liking this quilt better than BBII-A at this point!

In a total surprise, the quilt decided that it didn't want repeat bramble motifs all around after all. I guess all that 9-patch sewing from BBII-A affected my thought process more than immediately realized. Next thing I knew, the larger, simple 4-patch blocks were making an appearance and taking over the 'applique' border. Clearly, I don't do 'either/or' very well these days! Don't you love how the lighter, almost white squares help to further lighten the entire appearance of the quilt? I'm just shaking my head how amazing that fabric choice is. One chunky bramble applique motif though and the quilt decided that was enough. Leave me alone. Still have to hand sew all the 4-patches and the berry bramble applique down, but this should go together lickety-split. I like it so much. Really hitting the sweet spot of cozy right now.

IN CLOSING: It just goes to show you that the Improv. method of making quilts is full of ups and downs, little detours and unexpected outcomes. Because our mind simply can't conjure up all the wonderful possibilities waiting in store for the adventurous quilter! When we let our instincts and curiosity lead the way, our improv. quilts become ever more personal and true. Remember, we're making a quilt that has never been made before! It's okay to take the time we need and give plenty of space for simmering ideas. If that's what is needed. Otherwise, do push on. {We will often feel a stubborn hesitancy when it's absolutely vital to take a considering pause.} In a totally unsurprising twist of fate, these quilts we are making will become distinctly ours in a way other people can begin to look at and immediately recognize. That's a Quilty Folk quilt or a Blue Elephants Stitches quilt or whomever it is that is doing the work. YOU. So much fun for all of us to see it happening!
 
So take these very open-ended prompts and let your feelings and instincts guide the way. Go be you doing your thing with the fabric. With the elements. With the gotta-get-this-prompt-done so I can get to the other side if that's what it takes. Whatever! However! In the DOING, you will find your way, I promise.

Next phase of the quilt will probably be posted sometime in September. That's what I'm shooting for but... yeah. We have two weddings to attend, plus another trip to Oklahoma and also, a mini vacay to Canada if it works out. All the distractions and busyness! Again, this next border will have an applique vine tutorial for anyone interested in learning the easy way to get all that figured out. No special tools required!


Wednesday, February 14, 2024

A Couple Good Finishes To Start the Year Out Right

So I actually finished two quilts in past couple weeks. Crazy days. The first one 'Positive Thinking', just needed the binding sewn on. It's been in that state for a couple months now and finally all the planets lined up or something. 

Bright flowers for the win!
This was an AHIQ challenge from 2020. I took the prompt and ran with it, using part of a biblical verse as inspiration. It had been pinned to my inspiration board forever, just waiting for the right moment to be included in a quilt.

Positive Thinking is a true blue finish!
With this particular challenge, we were encouraged to use some of our own clothing. It's something that I've been having fun with for quite awhile now, slipping a piece of my husbands or sons shirts into most every quilt. In this case, I used a couple of my shirts too. Some old favorites that had started to get a little worn around the collar or maybe too small.

Always a pleasure to look across a freshly
finished quilt
While I don't love sewing letters and words together, I absolutely adore the look in my quilts. A necessary evil I guess you would call them. It's well worth the time and effort to do any and all of the things that make a quilt sing for you!

Still wondering why these flowers didn't
need or seem to want leaves on the stems
I wanted a strong, lively border for this quilt and pondered quite a few different variations of appliqued vines and flowers etc. Then I contemplated a pieced border or two. Eventually, I stumbled upon an idea that was well past its time--a clamshell border. Hmm... I love the look so very much but have been pretty much terrified of the idea. Why? I'm not really sure. I've been pinning clamshell quilts on Pinterest for years. Drooling over most every one. 

A very cozy look
And this quilt jumped up and down for the idea and then wouldn't really allow anything else. Okay. Fine! Thankfully I found a tutorial or two that helped me get started. Once again, it wasn't nearly as difficult as my imaginations made it out to be. I didn't get it perfect or even close to perfect, but it works. It does the job. And I love what it does for the quilt.

The words here are so good
This has become one of my very favorite quilts that I've ever completed to date. Just so much to love about it! The hand quilting ended up being straight lines and a basic shadow quilting in the border. Nothing fancy. Nothing pretentious. Just a cozy, lovely handmade vibe throughout. Lots of old, languishing fabrics included in this quilt too! Weird colored blue fabrics that I was unsure if they could ever find a proper home. Isn't it so much fun to find the perfect pairing of inspiration, fabric and heart in one of our makes?

And another finish for 2024
The 'Improv. HST Medallion' quilt is the second quilt to be completed this winter. I have been slowly, slowly plugging along on the hand quilting for the past couple months. The center area of the quilt was a bit intimidating, so I went ahead and did a free hand {repeat} circle pattern. It's a little wobbly in a couple areas, but I think you have to be fairly critical to be bothered by that. I'm definitely not.

It's got the good vibes too
This quilt was started from {an almost expired} stack of marinating fabrics and a rebellious sort of inspiration. Do you ever get the urge to make a looser, wilder version of something you've already made?
Can't imagi8ne this one without the applique
I love when inspiration hits so sure and true for a certain stack of fabric. I mean, seriously, where else could these purple and cheddar fabrics have played so wonderfully well together? Without looking stodgy and staid like the unmarried aunties? This quilt is a perfect example of why I'm often so very reluctant to send oldish, simmering fabric stacks right back to the totes. What if they just haven't reached their prime together yet? What if there is something bright and shiny just waiting to burst into being and we're simply waiting on the key?

The little bit of pink makes it all better
I'm often blown away by the influence of working on older quilts and then starting the new ones. The fact that my skills, mojo, confidence, stubbornness, secret quilt longings and timing seemingly all come together to spark some of the best quilt ideas! It's not coincidence at all.

Winter light makes it look more blue
This quilt is also a recipient of my late crush on working with tulip motifs. Does it ever get old to hand stitch sweet little tulips to a quilt? I have to practically force myself to use alternate flower shapes, but then, unerringly, I come back to the tried and true, beautiful little tulip shape.
So glad for the outside border. This quilt 
definitely needed the last little bit of darker color
Because, why not? And looky, looky what they did for this bold, graphic look quilt? Almost instantaneously turned it into a 'me' quilt. Isn't that cool? Gotta love when our quilting voice comes through load and clear no matter the colors in the quilt. I may lean hard to the more mellow colors in most of my makes, but even the craziest color palettes can end up with this cozy, comfy, cuddle-up-with-me vibe that makes this quilty heart melt....


Thursday, September 14, 2023

A Late Summer Quilt Finish

 It feels so very, very good to finish up with this particular quilt: 'The Mountains Are calling'. Not only because there's been so few finishes for the year, but because it's really ran me through the whole gamut of emotions from feeling rather blasé about the idea until now, when I'm actually rather proud of the cozy, warm vibe to it. Who would have ever expected it to end up this way? 

The Mt's Are Calling is a true blue finish!
This was started in March of 2022, always intended to be a quilt for our youngest son. In an odd twist, the back of the quilt was sewn first. Mostly because I didn't have a very clear picture of what the front of the quilt should look like. Masculine looking quilts? Not exactly in my comfort zone.... 

So glad that I bought the blue woven fabric
for the centerpiece
Our son loves living in the northwest and has always had an avid interest in hiking the high mountain trails. Though I always sort of knew that this quilt should be more of a blue, green and brown quilt, fabric and color options are pretty limited around here the last couple years. A lot of the green fabric languishing in the fabric totes is more olive in tones and I've been trying very hard to use up what I have. {Or at least dig through and start from there!} Olive wasn't doing it for me and this was second choice, these primarily blue and red fabrics. 

Always wonderful to see the spirit and vibe I wanted to convey come through regardless of material chosen for the foundation of the quilt. If I've learned anything in the past several years, it's to try and try again and never give up on what's available right here at home. This time I caved and bought the blue centerpiece fabric because I needed the simplicity of a single fabric background, but nothing else was purchased for this quilt! Making do can give off an authentic look almost impossible to achieve by running out and buying brand new for everything. 

The trees are weird and quirky but just
simple enough to be fun
This quilt was a long hard struggle to get to completion stage. Anyone following along knew that a long time ago. My heart was never really in it like so many of the projects that get started around here. Though I'm happy and satisfied with it now, it never took my muse on a thrilling little adventure the way the more interesting quilts do. Just not the style that I most prefer to work with these days! 

Anyway, by the time I had the details figured out for making this happen, our son was engaged to be married! After a lengthy time pondering, I decided to just finish it up as a 'marriage' quilt. Thankfully my daughter-in-law likes to go on hikes with him too so she wasn't being completely left out. And I did add more pinkish reds to the improv. strips at the front of the quilt after she was in the picture. Definitely more her than him so that's something!

And the crooked compass works too
And.... she has also managed to talk me into gifting her with a much more girly looking quilt in the meantime. Uh huh. DDIL2 already picked it out and hauled it to their new home. You know. Because the 'marriage' quilt was going to be belated! Funny how I can never say no to any of our kids....

Home is where the heart is!*wink
I am especially relieved by the texture on the front of the quilt as wide open spaces always fill me with terror. So dumb. They almost always look amazing when filled with the simplest of quilting lines such as the Baptist Fan motif. The way the lines pop instead of sink into the piecing {such as in the back of the quilt below} should be a lesson to remember forever.

Backing made up of lots of older indifferent
looking fabrics and a few mens shirts too
Believe it or not, the back of the quilt looks much, much more cozy than it does in the picture. Quite honestly, I almost like the back better than the front, which is something that happens fairly regularly around here.*sigh  Improv. seems to fill some need apparently?

I'd curl up in this quilt in a New York minute!
Loving the crumpled, wrap-this-quilt-around-you-and-be-happy vibe to this quilt soooo much. I would have been ecstatic to have this as a finish about 10 years ago and now I'm just sort of bemused and smiling. Yep, I can do this! Even when I don't know what I'm doing. So exciting when the 'me' voice comes through regardless of all the doubting and off perfect color and fabric choices happen. That's where experience and trust in our intuition helps bridge the gaps if we lean into it.

Next up in the hoop!
Next up in the hoop is a palette cleanser of serene greens and lovely pink pops of happiness. It's not a special quilt in any great sense, but the quirky spark to it makes me very happy to have in the hoop.

Should look a lot better with hand quilting
Summer is not quite over here yet so I didn't want to dive into fall colored quilts if I didn't have to. Autumn just needs to wait for its turn. Thankfully my have-to list of quilts is caught up until mid November. Yay! Have I mentioned how grumpy have-to lists make me when it comes to quilting?
Working my way through the middle blocks
Getting back into the swing of things quite slowly, but I'm beginning to accept that it's just gonna be that sorta year all the way till December. We had both of our boys and their wives come see us last weekend {for a long weekend} and had such a great time with the granddaughters especially. They are growing up too fast! Our oldest is making noises about moving back to the state and we are just so incredibly thrilled by that. Crossing our fingers that things work out where we can see them on a more regular basis. Funny how quilting drops down the priority list real quick when it comes to kids and grandchildren time....

p.s. The Legacy of Gwen Marston Exhibition is now open at the New England Quilt Museum. Makes me feel like kind of a fraud, but they didn't send my quilts back with a 'sorry, these won't work' excuse like I half expected. So exciting to have two quilts on display there!  My head is just whirling it seems so surreal. Big thanks to Barb Vedder for spearheading and helping to organize this event. If anyone attends, I would love to see pictures!


Wednesday, September 6, 2023

Connecting to Creativity

Well, that month went by in a screaming hurry! I ended up spending most all of August with my daughter in Oklahoma. Waiting for her to have her baby and then helping out afterward. So thankful to have the time and opportunity to make it all work out.

The sweet new grandbaby
Meet Miss. Gracelyn May! We just love her so very much. She's a little sweetie and definitely kept us all hopping for the first couple weeks. You know how some babies just take a little more time getting adjusted to the real world. Gotta get the mom and dad trained up properly! The picture below is with Ellie, another one of our {four} granddaughters. She was sooo fascinated with her new little cousin. We loved having her help too!

Lots of love from her older cousin!
Finally made it back home to my tired and grumpy husband. It's the longest I've been away for all of our married life, but he was totally on board with what I thought was needed. He actually survived fairly well and the house wasn't too terrible. Our youngest daughter had kept tabs on that. {If I could add heart emojis here, I would!} Still, I had mountains of laundry to do and some things that needed set to rights. Still do actually, but one thing at a time!

Probably won't be using the scrappy circles after all
I didn't get hardly any quilting done during the month of August {tiniest bit of hand quilting}, so you can only imagine my longing to dive right back into quilting. After a quick perusal of the quilting WIP's list, I decided what was needed most was something completely carefree. 

Working on the centerpiece
On impulse, I grabbed a bag of orphan blocks, bits and bobs that I had grouped together a couple months ago. The entire bag was thrown together based on color compatibility and not much else. Basically, I just started throwing things on the wall, moving things around until there was some good energy.

Top and bottom border sewn on, working on the sides
Then I started figuring out how to sew it together! First the middle improv. strips went together. Lots of partial piecing and trimming up in order for it to lay flat. Had to introduce one similar-look light tan fabric and then later, a couple darker prints in the border, but otherwise, this entire quilt top is strictly made out of orphaned parts and pieces!

This is the completed background centerpiece minus a 
thin piece of purple I'm gonna add up on the right corner
After the middle part of the quilt was sewn together, then I made an executive decision to trim it to straight. I waffled about that for all of ten minutes or so and then finally flipped the top over and bit the bullet. Why flip it over? Mostly so I didn't have to worry about what was being cut off! ha! Just couldn't face trying to sew the outside borders onto the quilt if I had to do too much easing and coaxing. 

Adding the applique bits that look interesting
Now I'm in a frenzy {a very slow, methodical frenzy} to add leftover applique bits and pieces to the center of the quilt. The whole process has felt amazing. I can't really adequately explain what this has meant to me! Very free spirited and fun just because of the loose, open ended determination for the outcome. It feels like it has woke up my sleeping creativity in just the right sort of way. Not sure what it's supposed to be or do or even end up looking like, but I'm totally okay with that. How about that? We're all good over here in this corner of the quilt world after all!  Maybe by next week I'll have my head above water enough to finally go check out all the blogs I've been neglecting....


Saturday, February 11, 2023

Very Belated Look at Finished Quilts From 2022

It's way late to do a end of the year wrap up post so if this isn't your thing, please feel free to move along. It's mostly for my own records anyway, since quilts tend to get lost in the shuffle if I don't keep track. Last year ended with a respectable 15 quilts totally finished up. Not my best number, but definitely nothing to sneeze at. If I wouldn't have gotten so sick, there would possibly have been another to add to the list. Apparently it wasn't meant to be!

2022 Finishes (1)
As per usual, I find myself reaching for a mix of applique quilts to put in the hoop and then, maybe a totally machine pieced quilt just to change things up. As the years go by, there seems to be less and less quilts without some form of applique involved in the making. Hmm... I wonder what that says about me?

2022 Finishes (2)
I always keep a master list of completed quilt tops which is supposed to have the projects listed in order of completion. This helps ensure that I don't end up neglecting a quilt top well beyond the point of being impossible to drum up interest in quilting on it. This list is, of course, cheerfully ignored at whim. Mostly tops are pulled out of the drawers depending on whatever color and mood {or vibe} that I'm currently searching for. Or if a quilt is destined to be gifted. Sometimes that moves a quilt top up to the top of the list in a hurry!
2022 Finishes (3)
Quite to my surprise, the quilt top list shrunk last year--down to 20 unfinished quilt tops! And two of those tops were given to me by my sister a couple years ago, so really. They don't even hardly count.

So..., the 2022 Finished Quilt details:

  • 7 Lap Quilts
  • 7 Bed Quilts
  • 1 Comfort Quilt
  • 9 Quilts completely hand quilted
  • 5 Quilts mixed hand quilting and machine quilting
  • 1 Quilt completely machine quilted
  • 8 Quilts gifted, gently used or newly finished
Towards the end of the year I had quite a few ideas and goals for the winter quilting efforts and going into this year. All of that has been turned upside down and now I really don't know if I'm coming or going. I had to cancel the winter quilting meetings at our church after losing the entire month of January. Thankfully, everyone seemed very understanding. Am finally starting to feel somewhat normal again, but am still not at 100%. Have only left the house five times in fact since this all started, but I'm getting there! Which, frankly, is a huge relief. I'm asking everyone to please give comment amnesty for past posts. Have so appreciated the kind comments, but did not have the energy most days to try and 'catch up'. 

Cheddar fabric
I also wanted to give a shout-out to Lizzy at Gone to the Beach blog. She has a very charming blog that I have followed for years and years. At some point this winter, she had offered to send me some pieces of cheddar colored fabric to help out with a specific project where the stash totes were seemingly lacking. By the time we had made proper connection, I tried to tell her that I was actually currently too sick to be working on any quilt project. She insisted, I couldn't resist and these fabrics have been such a joy to me just to look at, even if only wistfully in passing. Really, really sweet of her to share fabric so generously! 

Still haven't done anything meaningful with that project yet, but you know me. It's only a matter of proper time and focus. If I have any big plans for 2023, it's to take time, try and be mindful and not be in a big rush to check things off a list. Thanks to all who keep checking in with the blog. I'm not ditching it, I promise! {Though the posting might be slow for a bit.} I am reading and trying to catch up on quilting blogs now and finding myself missing some older blogs that have totally drifted away. There are a lot of things still needing my attention before I can dive into quilting at full throttle and well, guilt free? At least I am slowly starting to get in a bit of hand work most evenings. Have missed it so very much.... 


Thursday, August 4, 2022

Flower Power is a Completed Quilt Top!

One of the things that I was determined to accomplish in the past week, was to get to completed quilt top stage with 'Flower Power'. There was an idea or two from the initial scribblings, but in the end, as usual, the quilt made all the decisions.

Improv. strip sets
First up, there needed to be some space between at least some of the applique blocks. It was easy to decide on some easy, breezy improv. strip rows. As you can see, I made short little stacks of sewn together, free cut strips. Not too off kilter, but just enough to give a bit of character.

The reason you cut strips longer than needed
The wonkiness can usually be increased or decreased depending on how the strip set is lined up for cutting. For these rows, I decided to let it be a subtle thing. In determining the colors for those rows, I have to say, it was mostly about percentages. Less than 10% of the darker blue and darker pink/reds and lots and lots of the very light pinks and blue/white shirting stripe. I wanted a very light, airy feel to that part of the quilt in order to help make the moody blues look richer, and hopefully, *fingers crossed!, make the tulips pop even more. Mission accomplished!

Not quite done it says.....
The entire color palette was based off of the floral fabric pictured below. Here I was auditioning the fabrics for a possible outer border. Such a bad idea. Uggh! The quilt practically screamed in agony. It was so sad. I seriously longed for a scrappy sawtooth border before adding the floral 'cuz it just seemed meant to be, but yeah. Sometimes you just have to move on.

This is not a good look
There was not going to be any floral anywhere and the sawtooth border idea flamed out quickly too. Name a single color that might possibly work well in the pieced border position without seriously challenging the tulips preeminence? Uh huh. I couldn't do it either.

Keeping the borders intersting
So there you have it. Super simple border addition or nothing at all. You know me, the gotta-love-a-good-border-gal. I had to do something! In the final ruminations, I impulsively started cutting up all the leftover blue fabric pieces. Anything that was 4 1/2" wide or better was cut and eventually joined into long pieces for the outer border. 

Feels good to use up the scraps
I like the subtle detail in piecing of the blue solids verses the one dark striped shirting. Just makes it a little bit more interesting than if it was cut and sewn on out of a single yardage. And I basically used up all of the leftover shirting too! Score!

Love the look of the improv. strips
In fact, there was a total of three upcycled shirting fabrics used in this quilt, which felt kind of awesome. The darkest stripe had to be soaked for close to three days prior to cutting anything out as it bled and bled and bled. Gotta watch out for that with the darker hues!

Looking cozy
In the end, this quilt ended up looking similar, but different, to the original inspiration. My border {almost not a border} makes the tulips float a little. It gives them space to breathe and feel comfy. I love how Flower Power definitely also looks like a sibling to LeAnn's lovely quilt. So sweet! We each took elements of the original to make up our own version, while striving to keep a lot of the first quilts joy and charm intact. Obviously, the strings in my quilt are in the sashing rows rather than the tulips, but the scrappy vibe still remains true. And no, we didn't come up with this idea together. We just both happen to have a great love for antique/vintage quilts and often use these as a jump start for our own projects.

Flower Power quilt top is finished!
53 1/2" x 68 1/2"
Another item checked off the list is the Lillabelle applique blocks. Only nine blocks total, so it didn't really take an enormous amount of time. Very happy to have them moved on to the next phase though, 'cuz I really am soaking up the yummy color palette on this one!

All ready for the next step!
Next up for a quilt top finish is the Roman Stripe quilt after the spontaneous applique renovations. I have been feeling so very blah about this top. No ambition whatsoever to get it in the hoop and bring it to a true blue finish. Now that this applique has jumped on, all of a sudden I'm thinking it might could be next in line?

Looking so much happier!
What? The applique is over the top, silly and really kind of awkwardly primitive looking. Still, it fills my heart with gladness and makes me smile just looking at it. Will others feel the same? Who knows. The important thing is, I feel lots better about getting it to a finish someday and potentially gifting it. Yay! 'Chrysalis' is starting to come into it's own!
Chrysalis applique detail
The current quilt in the hoop is actually Love Apples. I know. It's only been in the drawers for a year or so! I just wanted needed something virtually decision-free in regards to the hand quilting. This definitely does the trick. Free-style Baptist fans are such a good over-all texture to any quilt that won't necessarily soak up detailed, fussy looking quilting stitches. 

Latest quilt in the hoop
This is one of those quilts started in an attempt to use up something abandoned by another quilt. In this case, it was the peachy pink scrappy rows that didn't have a home any longer. Many of you would have probably dumped them entirely, but I just didn't feel right about that. Too many good fabrics involved! Before the hoop, the overall effect is a fairly gawky looking quilt, but wow! Look at how quickly things change with the Baptist Fans emerging. Now, all of a sudden, it's looking like it could be one of your best friends snuggled up for a good coze!

Love Apples getting sandwiched and pinned
Okay, on to those Individual Quilting History questions I'm trying to answer with every post this summer.

2. At what age did you begin to learn to sew? Do you remember at what age you began to piece? When did you learn to quilt? How old were you when you made your first quilt? Why did you learn at this particular time? Were there any special difficulties?

I learned to sew from my mother somewhere around the age of 10, perhaps younger. For sure, I learned to sew on buttons etc. before she ever introduced me to the sewing machine work. By the time I was a teenager, I could competently sew my own dresses etc. It was mostly due to her endless patience in answering my questions and always encouraging me to try every more complicated patterns! As explained in the previous question, I first started quilting when I was in my early 20's. The absolute first quilt was a baby coverlet and the very first, full sized real quilt, a rail fence style quilt. Then I promptly returned to making very simple baby coverlets.

I didn't truly learn to 'piece' until later on. In the late 90's, when I was 28 years old, a few ladies that I spent time with asked for pieced blocks for a wedding quilt. That effort mostly baffled and frustrated me, as I was still using scissors to cut things out. It did lead to making a couple small children sized quilts, mostly with big squares of denim, corduroy and/or flannel!  Then, when I was 29, there was a group of ladies in our church who started gathering to swap quilt blocks and/or make 'challenge' blocks in the winter months. 

Home Sweet Home
My mother promptly bought me a rotary cutter and rotary mat for Christmas. Woohoo!! Quilt piecing horizons were flung wide open! Except that I was a fraidy cat and kept all piecing efforts very basic for the longest time. So dumb. Squares and rectangles for me, thank you very much! 

The quilt in the picture above, was probably the fourth full sized quilt I had ever finished. This was 2001 when I was 31 years old. It was the first time for making the effort to piece blocks to join in with any swap or challenge blocks that I had won. And.... this was my first real attempt at making blocks that included triangle shapes. Well, I had to use a triangle shape to make my Home Sweet Home challenge block didn't I? And then, notice the house blocks in the borders? Yep! I was inspired to add little town houses and cottages along the edges of the quilt. Uh huh. The border stuff happened early on too. 

This is also when I started seriously dabbling in my love for applique. Playing with different techniques. Along with the little stars and heart block, every single house 'challenge' block has a little applique addition {or two} done by yours truly. Some people had already added a bit of applique, but I didn't let that stop me from adding more where I thought needed! I had to do it on the down-low too, 'cuz some of those gals would have been offended. My thinking was, 'The blocks are mine now. I can do with them what I want!'

I'm super glad that this quilt is still hanging around as it ended up being a showcase for everything that was being learned up to this point. Making and swapping blocks with others definitely pushed me to learn good coping strategies in regards to ending up with equal sized blocks. Also, it quickly pushed me into learning how to make individual block colors play nice with all the other tricky colors in a group setting. Getting those blocks wrangled into an interesting looking quilt pushed and shoved me to get the whole finished-quilt thing properly figured out.*whew!  No more sewing three sides of a quilt and turning it inside out and putting ties in to hold things down! How to make things lay flat and square. What batting to use. How to make and sew on binding! Things like that. Good times!