Showing posts with label Chrysalis. Show all posts

Friday, September 23, 2022

Another Good Finish, Much Better Than It Set Out To Be

 I've been buried in the back office lately, working on the paperwork for my husbands business. I'm always determined to better keep up on it. And then I don't. He's not a paperwork guy whatsoever, which makes my job harder. Whenever I try to get everything in order and wrangled onto the computer or into reports etc., it's a frustrating time for both of us. Sometimes I think we'd both be better off if he could just pay someone else to deal with it, but I know we really can't afford it, especially now with the 2022 economy.

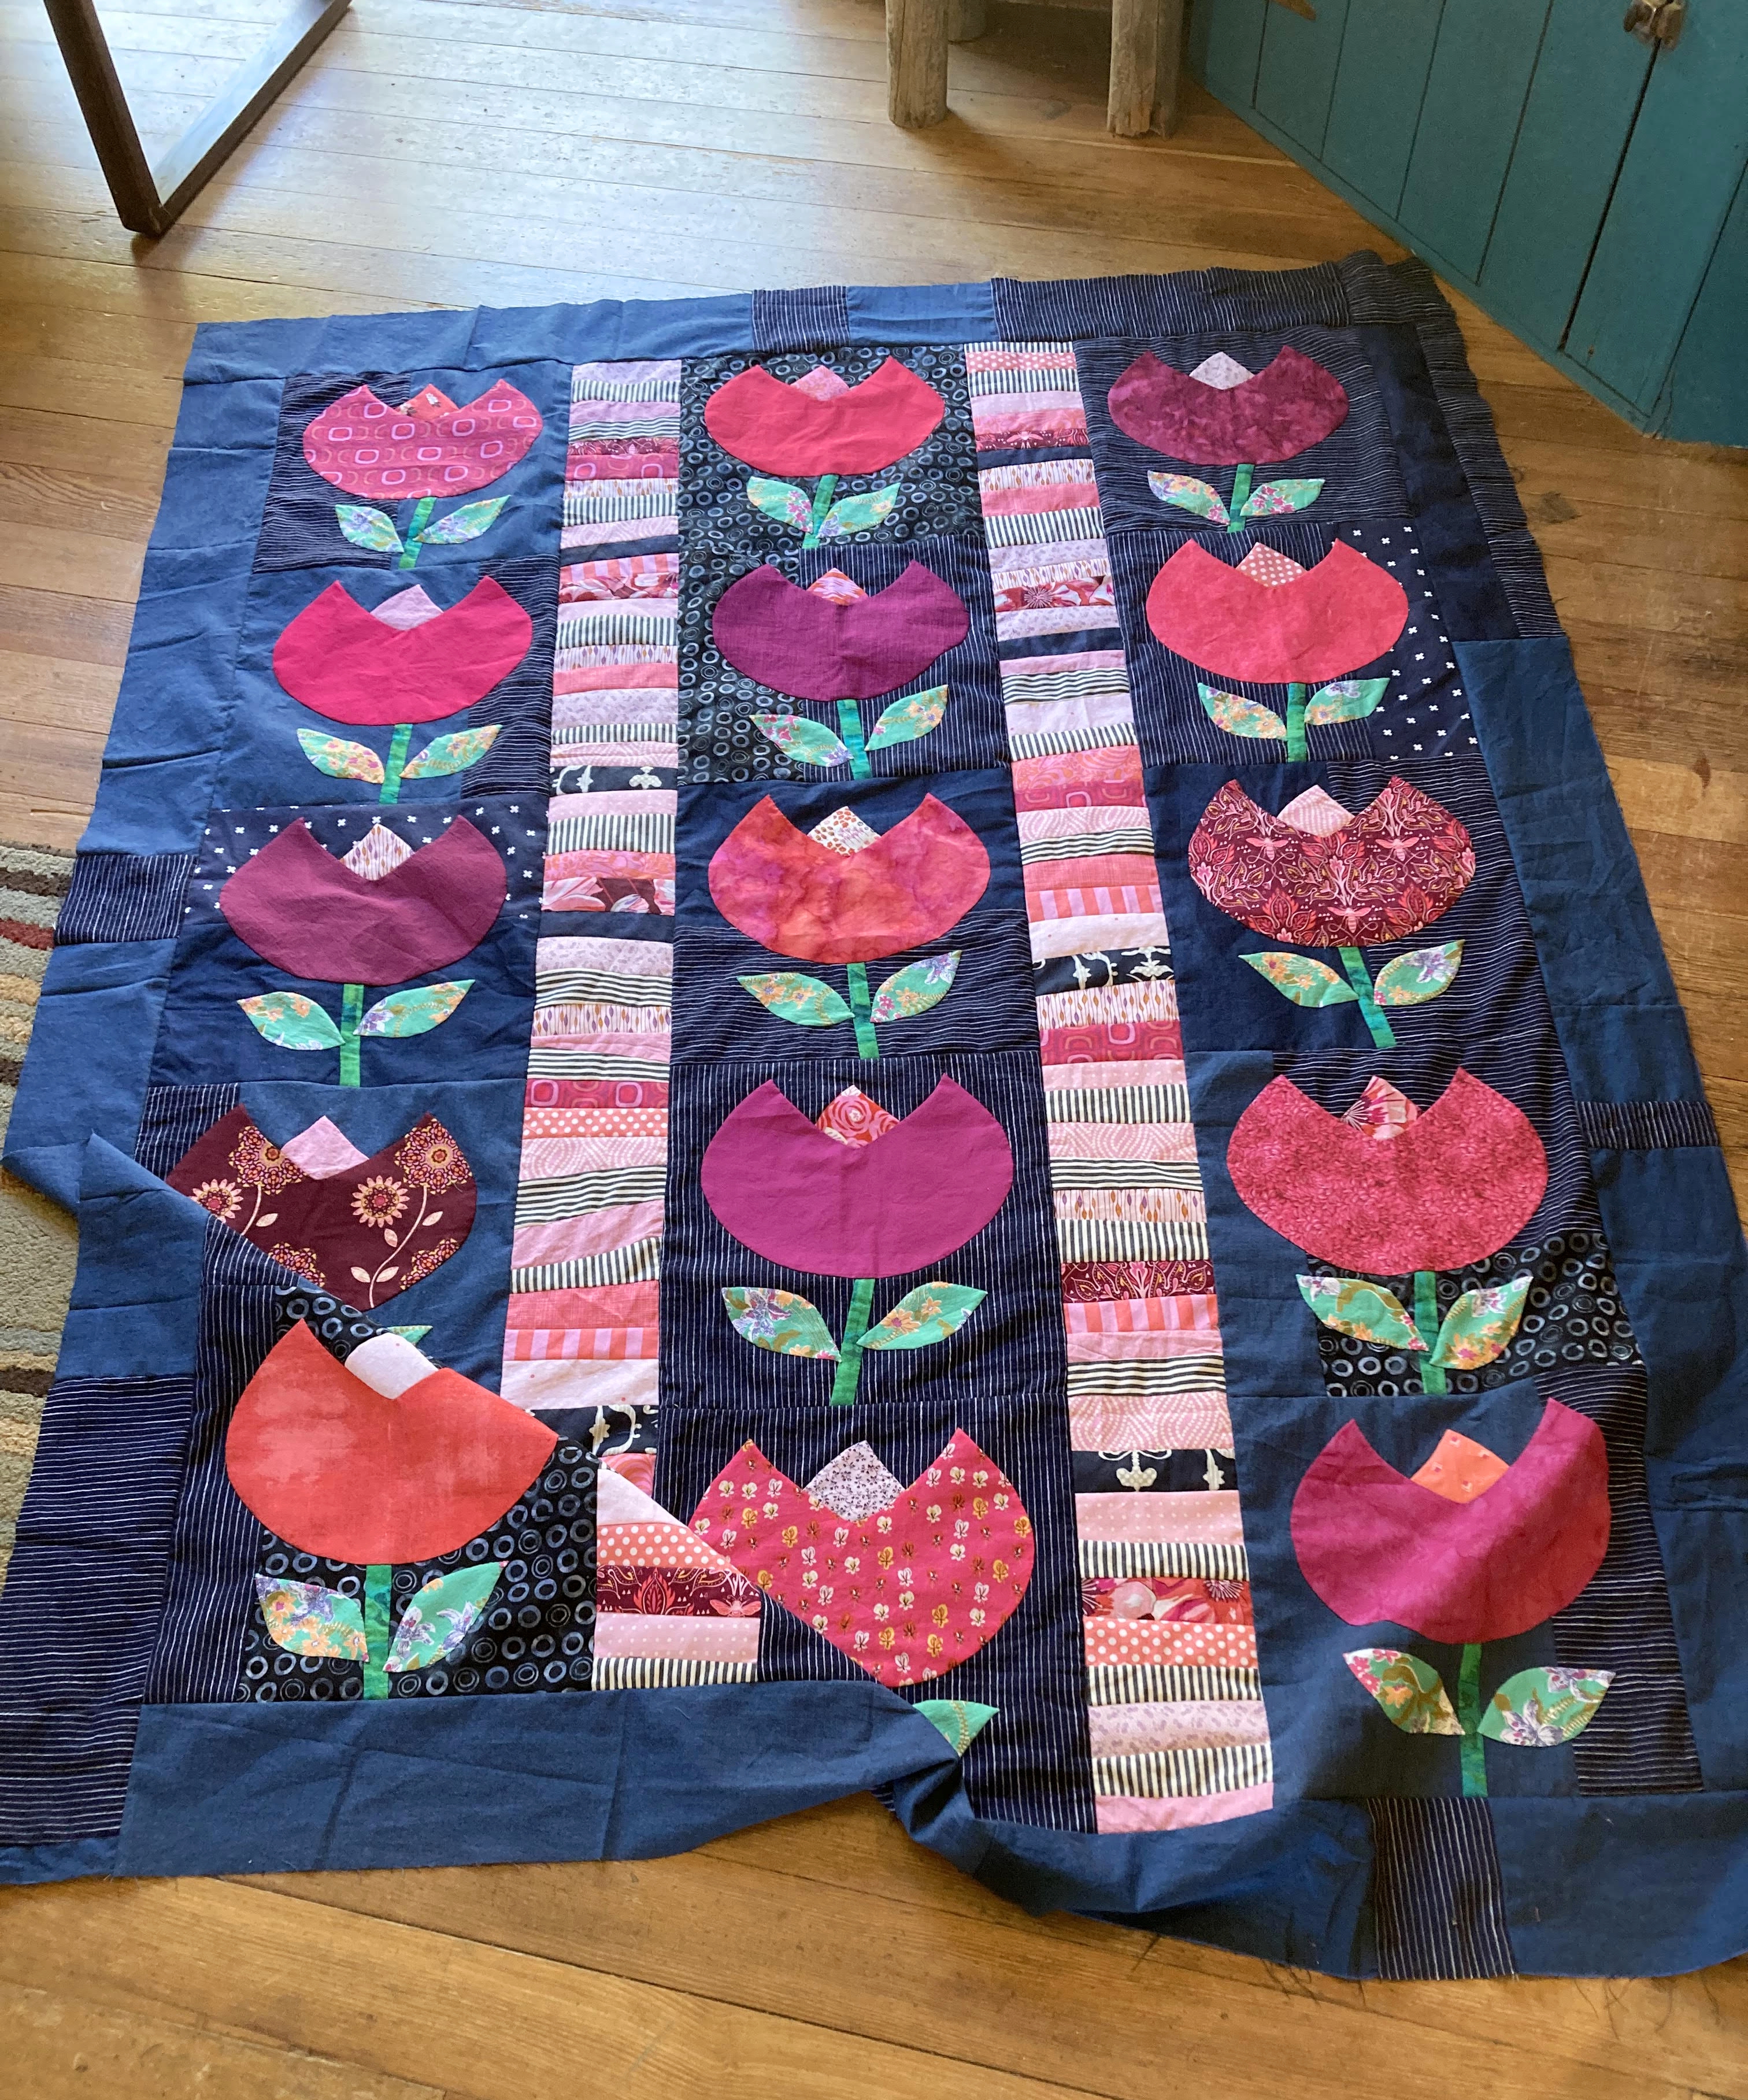
A little whacky, but so much fun!
Ughh. Anyone go to buy groceries lately? It's totally freaking me out, how high the prices are these days! Anyway, it feels like there hasn't been quite as much time for quilting lately. I did manage to get the binding sewn onto Chrysalis--all in scrappy reds. I'm always surprised when I use red for binding, but I do adore the look. It totally fits with the vibe of this particular quilt!

Loving all these colors together
This 2nd Roman Stripe quilt went together better than the first one. Of course I'm partial to the applique on it, and I did go ahead and do just a wee, bit more hand quilting on this one too. It really does make a difference!

Turned out very happy looking!
It's a super simple pattern and goes together very quickly. Would be great for a baby quilt I'm sure, will have to keep that in mind. It looks very soft and cozy now that it's washed and properly crumpled, like a good quilt should be! I'm actually very relieved to see this one rise above it's rather blah beginnings.*sigh  Some quilts are just more demanding about making extra time for.
Looks like a good one!
For now it's rolled up and languishing in a little basket in the corner of the living room. Weird I know, but I have a feeling this one is going to be used a lot in our living room!

Ignore the dust behind the basket, it's that time of year!
Speaking of which.... I went a little crazy this past week and sorted through all the plaid flannels that I tend to live in during the late fall and winter months. There was a whole stack of shirts in good condition that felt a little too snug, too short or even in the case of a couple of them, way too wide and boxy. Those extra wide ones were the Walmart ones I think. Just never felt like an attractive or comfortable fit at all. Shouldn't have even bought them, but I fell in love with the colors! And I don't know if anyone else has noticed this issue, but the nice Eddie Bauer button-down shirts that I've bought {for years and years and years} tend to shrink badly anymore. I'm getting very tired of it. I've gained a little weight since 2020, but the shirt shrinkage is very real. For the moment, I'm on a shirt buying hiatus from Eddie Bauer and searching out other brands, mostly second hand. 

De-constructing/ Re-constructing flannel shirts
I sewed up almost 2 inches at the sides of the largest, boxiest shirts and now they feel and look much better. You'll probably think this odd, but I took one nicely-made flannel shirt {rarely worn because the buttons looked like eyeballs} and replaced those buttons with other, plainer looking buttons. Rescued from previous upcycled shirts I'm pretty sure. Amazing how much better I like the shirt already! 

I took one of the 'too-small' shirts and cut some of the bottom half off in order to make a contrasting ruffle to one of 'too-short; flannels {one of my comfy faves}. The 'too-small' one was tailored very well with great, double stitched seams throughout. I thought these details would help to make the ruffle length look better than it might have otherwise. After that was done, it looked like it needed a contrasting pocket too. That was sewn on with the fabric edges exposed so that they will fray and look pretty shabby eventually {just like I want them to}. Overall, I was super happy with the look, though my daughter kind of smirked at my enthusiasm for the 'boho boutique' look. Probably won't do any more like that, but it was kind of fun to try my hand at something new!

Both the red and the green flannel shirts {in the above picture} have had extra flannel sewn into the sides of the shirt--under the arms--kind of a gusset I suppose. One of the flannels used for the addition was another 'too small' cut-up shirt, and the other, just some fabric that rescued from the flannel stash tote. There are at least 4-5 other shirts that I can play with still, but that has definitely took a chunk of my time these past several days. Great for distraction from the bookwork! My sewing is not the absolute best, but it's getting the job done. 

There's something incredibly annoying about wearing too snug-under-the-arms shirts around the house. Just can't handle it! I seem to have lots of hot flashes off and on these days and the unfortunate thing I've noticed is, wearing tops that won't swing and move easily with my everyday motions tend to set me off extremely easily. I have went and changed clothes after wearing them for less than half an hour before! One of my sisters has teased me quite a bit about wearing oversize tops, but what to do?  This was an easy fix, playing with these shirts, and hopefully it will get me through another winter without having to buy much else.
Hand quilting on the border
Still getting a bit of hand quilting in during the late evenings. Went ahead and marked out a rough crosshatch grid on the border of the tulip quilt after all. Just didn't have the inspiration for anything else so why not?

Gonna answer a couple quick questions for the 'Reasons for Quitlmaking' and then close up for the day! 

4. How do your family, friends, and community feel about your quiltmaking and your quilts?

I think my immediate family and probably even my siblings and parents are proud of my quiltmaking efforts. The broader family gets that my quilts are not just cookie cutter replicas of mass marketed patterns, but don't really understand all the reasons why that might be. Which is totally fine. We all have our fascinations! Overall they just seem to enjoy getting to be the recipient of any of my random quilt gifting. They often have a joke at my expense, something to do with 'watch out for your shirts' kind of thing and laughing at my constant prodding to my husband about leaving time in the schedule for quilt store stop offs! Which he does not do very often these days. Somehow we're always leaving too early or too late on the longer trips. Wonder why that is? lol

My daughters and husband have heard me babble on about the creative process {and all of my various challenges} more than they have wanted to through the years. That being said, they are probably the most invested in making sure that I don't ever give away quilts unnecessarily or to anywhere they might possibly be 'under appreciated'! Kind of frustrates me on occasion but it is super sweet of them to feel so possessive. I argue with them on occasion that I am not some exceptional quilter in the whole world-wide scheme of things--they are just looking at me through a very narrow lens! It's wonderful to have carved out a good spot in the cozy, come cuddle-up-with-me quilting niche though. Once in awhile I'll share a sweet blog comment with them and they always seem to appreciate the love and support.

 As to the community? Some people know that I quilt of course, especially after they saw the Fire quilt. It's just not that big a deal around here. The artsy people live up the valley and actually make money off of their interests! Which, to be fair, years ago I was offered a chance to sell quilts in a shop up the valley. Just don't think that's something I'm interested in doing at this time of my life.

5. What are your feelings about quiltmaking compared with other household activities?

Ha! I think we all know the answer to this one. Quiltmaking is vastly more entertaining and interesting than almost anything else around here! I have to work hard not to get frustrated and upset when life throws a curveball at my quilting 'schedule'. Unless the grandkids are visiting. That's a whole 'nother ballgame!

**On a different note. I have gotten a few requests again for making a hand quilting with perle cotton tutorial. At first I just thought 'No! Don't have time for this!' But then, I reluctantly reconsidered. It's something that I have probably gotten more requests for than anything else. Have been writing down some notes and thinking it through. Will make up my mind here in the next couple weeks about whether or not it's something I feel that can be properly or adequately done. Have always hesitated and decided against because I didn't feel like I was the right person to address this subject. Lots of little quirks, just doing it because I love the look and the process. Not the expert!!

Thursday, August 4, 2022

Flower Power is a Completed Quilt Top!

One of the things that I was determined to accomplish in the past week, was to get to completed quilt top stage with 'Flower Power'. There was an idea or two from the initial scribblings, but in the end, as usual, the quilt made all the decisions.

Improv. strip sets
First up, there needed to be some space between at least some of the applique blocks. It was easy to decide on some easy, breezy improv. strip rows. As you can see, I made short little stacks of sewn together, free cut strips. Not too off kilter, but just enough to give a bit of character.

The reason you cut strips longer than needed
The wonkiness can usually be increased or decreased depending on how the strip set is lined up for cutting. For these rows, I decided to let it be a subtle thing. In determining the colors for those rows, I have to say, it was mostly about percentages. Less than 10% of the darker blue and darker pink/reds and lots and lots of the very light pinks and blue/white shirting stripe. I wanted a very light, airy feel to that part of the quilt in order to help make the moody blues look richer, and hopefully, *fingers crossed!, make the tulips pop even more. Mission accomplished!

Not quite done it says.....
The entire color palette was based off of the floral fabric pictured below. Here I was auditioning the fabrics for a possible outer border. Such a bad idea. Uggh! The quilt practically screamed in agony. It was so sad. I seriously longed for a scrappy sawtooth border before adding the floral 'cuz it just seemed meant to be, but yeah. Sometimes you just have to move on.

This is not a good look
There was not going to be any floral anywhere and the sawtooth border idea flamed out quickly too. Name a single color that might possibly work well in the pieced border position without seriously challenging the tulips preeminence? Uh huh. I couldn't do it either.

Keeping the borders intersting
So there you have it. Super simple border addition or nothing at all. You know me, the gotta-love-a-good-border-gal. I had to do something! In the final ruminations, I impulsively started cutting up all the leftover blue fabric pieces. Anything that was 4 1/2" wide or better was cut and eventually joined into long pieces for the outer border. 

Feels good to use up the scraps
I like the subtle detail in piecing of the blue solids verses the one dark striped shirting. Just makes it a little bit more interesting than if it was cut and sewn on out of a single yardage. And I basically used up all of the leftover shirting too! Score!

Love the look of the improv. strips
In fact, there was a total of three upcycled shirting fabrics used in this quilt, which felt kind of awesome. The darkest stripe had to be soaked for close to three days prior to cutting anything out as it bled and bled and bled. Gotta watch out for that with the darker hues!

Looking cozy
In the end, this quilt ended up looking similar, but different, to the original inspiration. My border {almost not a border} makes the tulips float a little. It gives them space to breathe and feel comfy. I love how Flower Power definitely also looks like a sibling to LeAnn's lovely quilt. So sweet! We each took elements of the original to make up our own version, while striving to keep a lot of the first quilts joy and charm intact. Obviously, the strings in my quilt are in the sashing rows rather than the tulips, but the scrappy vibe still remains true. And no, we didn't come up with this idea together. We just both happen to have a great love for antique/vintage quilts and often use these as a jump start for our own projects.

Flower Power quilt top is finished!
53 1/2" x 68 1/2"
Another item checked off the list is the Lillabelle applique blocks. Only nine blocks total, so it didn't really take an enormous amount of time. Very happy to have them moved on to the next phase though, 'cuz I really am soaking up the yummy color palette on this one!

All ready for the next step!
Next up for a quilt top finish is the Roman Stripe quilt after the spontaneous applique renovations. I have been feeling so very blah about this top. No ambition whatsoever to get it in the hoop and bring it to a true blue finish. Now that this applique has jumped on, all of a sudden I'm thinking it might could be next in line?

Looking so much happier!
What? The applique is over the top, silly and really kind of awkwardly primitive looking. Still, it fills my heart with gladness and makes me smile just looking at it. Will others feel the same? Who knows. The important thing is, I feel lots better about getting it to a finish someday and potentially gifting it. Yay! 'Chrysalis' is starting to come into it's own!
Chrysalis applique detail
The current quilt in the hoop is actually Love Apples. I know. It's only been in the drawers for a year or so! I just wanted needed something virtually decision-free in regards to the hand quilting. This definitely does the trick. Free-style Baptist fans are such a good over-all texture to any quilt that won't necessarily soak up detailed, fussy looking quilting stitches. 

Latest quilt in the hoop
This is one of those quilts started in an attempt to use up something abandoned by another quilt. In this case, it was the peachy pink scrappy rows that didn't have a home any longer. Many of you would have probably dumped them entirely, but I just didn't feel right about that. Too many good fabrics involved! Before the hoop, the overall effect is a fairly gawky looking quilt, but wow! Look at how quickly things change with the Baptist Fans emerging. Now, all of a sudden, it's looking like it could be one of your best friends snuggled up for a good coze!

Love Apples getting sandwiched and pinned
Okay, on to those Individual Quilting History questions I'm trying to answer with every post this summer.

2. At what age did you begin to learn to sew? Do you remember at what age you began to piece? When did you learn to quilt? How old were you when you made your first quilt? Why did you learn at this particular time? Were there any special difficulties?

I learned to sew from my mother somewhere around the age of 10, perhaps younger. For sure, I learned to sew on buttons etc. before she ever introduced me to the sewing machine work. By the time I was a teenager, I could competently sew my own dresses etc. It was mostly due to her endless patience in answering my questions and always encouraging me to try every more complicated patterns! As explained in the previous question, I first started quilting when I was in my early 20's. The absolute first quilt was a baby coverlet and the very first, full sized real quilt, a rail fence style quilt. Then I promptly returned to making very simple baby coverlets.

I didn't truly learn to 'piece' until later on. In the late 90's, when I was 28 years old, a few ladies that I spent time with asked for pieced blocks for a wedding quilt. That effort mostly baffled and frustrated me, as I was still using scissors to cut things out. It did lead to making a couple small children sized quilts, mostly with big squares of denim, corduroy and/or flannel!  Then, when I was 29, there was a group of ladies in our church who started gathering to swap quilt blocks and/or make 'challenge' blocks in the winter months. 

Home Sweet Home
My mother promptly bought me a rotary cutter and rotary mat for Christmas. Woohoo!! Quilt piecing horizons were flung wide open! Except that I was a fraidy cat and kept all piecing efforts very basic for the longest time. So dumb. Squares and rectangles for me, thank you very much! 

The quilt in the picture above, was probably the fourth full sized quilt I had ever finished. This was 2001 when I was 31 years old. It was the first time for making the effort to piece blocks to join in with any swap or challenge blocks that I had won. And.... this was my first real attempt at making blocks that included triangle shapes. Well, I had to use a triangle shape to make my Home Sweet Home challenge block didn't I? And then, notice the house blocks in the borders? Yep! I was inspired to add little town houses and cottages along the edges of the quilt. Uh huh. The border stuff happened early on too. 

This is also when I started seriously dabbling in my love for applique. Playing with different techniques. Along with the little stars and heart block, every single house 'challenge' block has a little applique addition {or two} done by yours truly. Some people had already added a bit of applique, but I didn't let that stop me from adding more where I thought needed! I had to do it on the down-low too, 'cuz some of those gals would have been offended. My thinking was, 'The blocks are mine now. I can do with them what I want!'

I'm super glad that this quilt is still hanging around as it ended up being a showcase for everything that was being learned up to this point. Making and swapping blocks with others definitely pushed me to learn good coping strategies in regards to ending up with equal sized blocks. Also, it quickly pushed me into learning how to make individual block colors play nice with all the other tricky colors in a group setting. Getting those blocks wrangled into an interesting looking quilt pushed and shoved me to get the whole finished-quilt thing properly figured out.*whew!  No more sewing three sides of a quilt and turning it inside out and putting ties in to hold things down! How to make things lay flat and square. What batting to use. How to make and sew on binding! Things like that. Good times!