Showing posts with label Playing With Scale. Show all posts

Thursday, January 2, 2020

Wrapping Up 2019 So We Can All Move On

I always think this end of the year retrospective should be a quick post, but somehow
it never quite works out quite that way. Oh well. Time for a glimpse of whatever finishes 
managed to come to fruition during the past year! It always surprises me how it stacks
up. Never quite what I imagined somehow!
2019 Finishes (1)
It's been a surprisingly productive year. So many times it felt like I was just sort of spinning my wheels, or at times, chasing after ever single squirrel that popped around the corner. Some of the oldest quilt tops did get checked off the list, but it felt arduous at times. 'I don't wanna' was not an uncommon feeling at the start of some of these quilting/stitching finish-it-up endeavors.
2019 Finishes (2)
A surprising amount of larger quilts were completely hand quilted. Well, maybe not so surprising.as it was a terribly stressful year here on the home front. So happy to see 2020 roll around with the all the possibilities of a fresh new year! When life's troubles start to get extra heavy, I tend to have a habit of ending every evening nose deep in the quilting hoop. Well, right after finishing off the popcorn and catching up on Blogger and Instagram.*wink  Helps me sleep ever so much better, that hand work. Seriously therapeutic. If I didn't have so many hot flashes, I'd probably pile on about six quilts every night when I go to bed. Just bury myself in them. You know, for the good vibes?
2019 Finishes (3)
Lots of baby quilts were made and finished up, plus quite a few little bitty ones. Very fun, fast quilting sessions which felt kind of rewarding. I don't think that would be good for me full time though. The feeling lasts only a little while and then it's gone. Poof! Almost like it never happened.
2019 Finishes (4)

So now it's time for the stats. 23 Total Quilt Completions last year! Woohoo! {If you count the Barbie quilts.} But lets not. Leaving off those smaller, quickie quilting projects, it's really more like 18 for the true total. Not too shabby. And because I like to break things down even further....

  • 9 Bed sized quilts finished up
  • 5 Lap quilts
  • 4 Baby quilts
  • 5 Doll, Table Runner or Barbie quilts
  • 9 of these quilts were completely hand quilted
  • 8 quilts were completely machine quilted
  • 5 quilts were a combination of both machine and hand quilting
  • 1 quilt was a combination of machine quilting and hand tying
It was a good year. Also a good year for giving quilts away! 20 different quilts, including the 5 mini quilts, but not limited to completed-in-2019-quilts, were gifted to a hopefully happy recipient.Two or three other quilts should have been given as well, but I'm sort of dragging my heels about those. Not quite ready to give them up just yet. Still having pangs about a couple of the quilts I gave to my daughters!

Some thoughts about looking ahead:

I'm still very invested in keeping lists as per usual. The most important one is for the quilt projects that have been started, but are still in the works. These are ongoing, in many different phases, but most importantly, they have fabric cut out though not yet a completed quilt top. Its not just a fabric stack of dreamy potential! I'm committed, hopefully engaged and generally always pushing forward toward a conclusion. 

There is also a list for the finished quilt tops that are not as yet quilted. Totally separate lists for different categories of UFO's. That's because the 'in progress' quilt project list fluctuates all year long. What I've finally found to be an optimal balance {for the way that I work} is somewhere between 6 to 10 projects. Anything over that and it inevitably starts stressing me out. Anything under that and I start feeling incredibly bored. Good incentive to cross projects off the list and then promptly dive right into the new!

The 'finished quilt top' list has been slowly shrinking from a high of 28 several years ago, to this past year where I seem to have regressed. These tops are listed in order of when they were completed with a vague idea toward quilting the oldest one firsts. Ha. For now I'm going to ignore the fact that quilt tops are multiplying like rabbits and just keep on doing my thing. I really don't know what else to do.I tried severely limiting quilt starts, but that was stifling. There's only so much a person can do to put the breaks on creativity/new starts/inspiration before all momentum comes screeching to a halt. Some day maybe I'll be able to afford having a few tops long armed again, but what probably needs to happen is for me to work a little harder at {being open to} combining machine and hand quilting. That's where I seem to gain the most ground.

Last year saw me taking an even more intentional look at the fabric stash. Many of you know that I truly love digging deep and coming up with interesting or unexpected combinations of fabrics and colors. I'm super pleased to have a 20-30 plus year range of quilting fabric colors/prints, but to be frank, some of those fabrics are stale dated now. Over time there are fabrics which have somehow become bland or completely and totally uninspiring. It's kind of sad, but mostly it irritates me because every single time I've tried to earnestly address these dated 'colors', the ideas crash and burn. The quilting plan seems lackluster and pointless so I give up.

On a whim late last year, I tore through the green fabric totes and pulled out most of the worst offenders. Some of them really aren't that bad. Truly. They're just dated. They've sort of gotten lost in the trends of colors changing. Marketing.That sort of thing. When digging through for fabric choices, they are easily pushed aside and ignored because they don't always play nice with the new additions and then, of course, the situation compounds itself through time. Take a look at the Sherwin-Williams 'Color Through the Decades' to see what I mean. I'm totally stuck in the 70's, 80's, 90's and 2000's in regards to over half of the fabric stash! What to do?

At somewhat of a loss, I took these annoying {green} fabrics and put them in largish clear plastic bags and purposefully left it all out where I couldn't fail to look. See. Be reminded and think about solutions. Eventually I came up with a personal challenge that involves using these 'So Tired' fabrics. The first phase of that saw me making a really weird {okay, it's ugly}, purple and green comfort sort of quilt top, and since then, I've incorporated quite a few of these less-loved fabrics into the Christmas quilts. Other than the first quilt {totally an experiment}, I don't really intend to waste a lot of time making ugly quilts though. Finding a good place for them is the ultimate goal. That and using them up so they aren't in the way anymore!

The most awful of all these fabrics have already been sewn into a large quilt backing for one of the recent Christmas quilts. Extra time, but hey, the fabrics were put to good use and I save money on a backing. One way or another, I totally intend to sneak these troublesome colors/fabrics into quilts and find a way to love them again. Maximize their potential. Then I'm going to move on to a different color and start all over again. Yes! Loving this challenge so much. Look for the 'So-Tired' label at the bottom of  posts moving forward. This challenge could last for a long time.

If somehow the hours can be found, {crossing my fingers}, I plan to put together a 'Hand Quilting with Perle Cotton' tutorial this year. Yikes. So intimidating. Several people have inquired and seem to want to know how to get the 'Quilty Folk' look and feel to their quilts. Deep thoughts here. Please don't get in a rush expecting anything. My life is full of crazy ups and downs and I often barely have time to proofread current posts for misspelling, much less organize an intelligible tutorial.

Yay. This is also the year when I will be turning 50 years young. See how excited I am? Just loving the gaining-weight-at-warp speed and experiencing my lack of mind/mouth coherence due primarily to hormones. How is it that I'm thinking a specific name in my mind, but what comes out is totally different and sometimes I don't even realize?*sigh  My kids think this is hysterical and I just feel stupid. This has turned my thoughts to perhaps making a celebratory quilt such as Lori and Barb both did in years past? Why not make turning 50 into a good thing? I want to walk more and take better care of myself for sure. Will keeping thinking about Jubilee quilt ideas though. It's not a terrible idea.

And last but not least, I plan to keeping on making interpretations of antique, utility style quilts and also, continue to follow along with the AHIQ prompts. Both of these challenges, while difficult at times, seem to feed my creativity in a way that helps me to flourish as a quilter. As a maker. Very important during this particular phase of our life! Thanks so much for following along with me along the way. It wouldn't be nearly as much fun without you....



Wednesday, June 5, 2019

A Finish and More Progress on the Applique Baskets

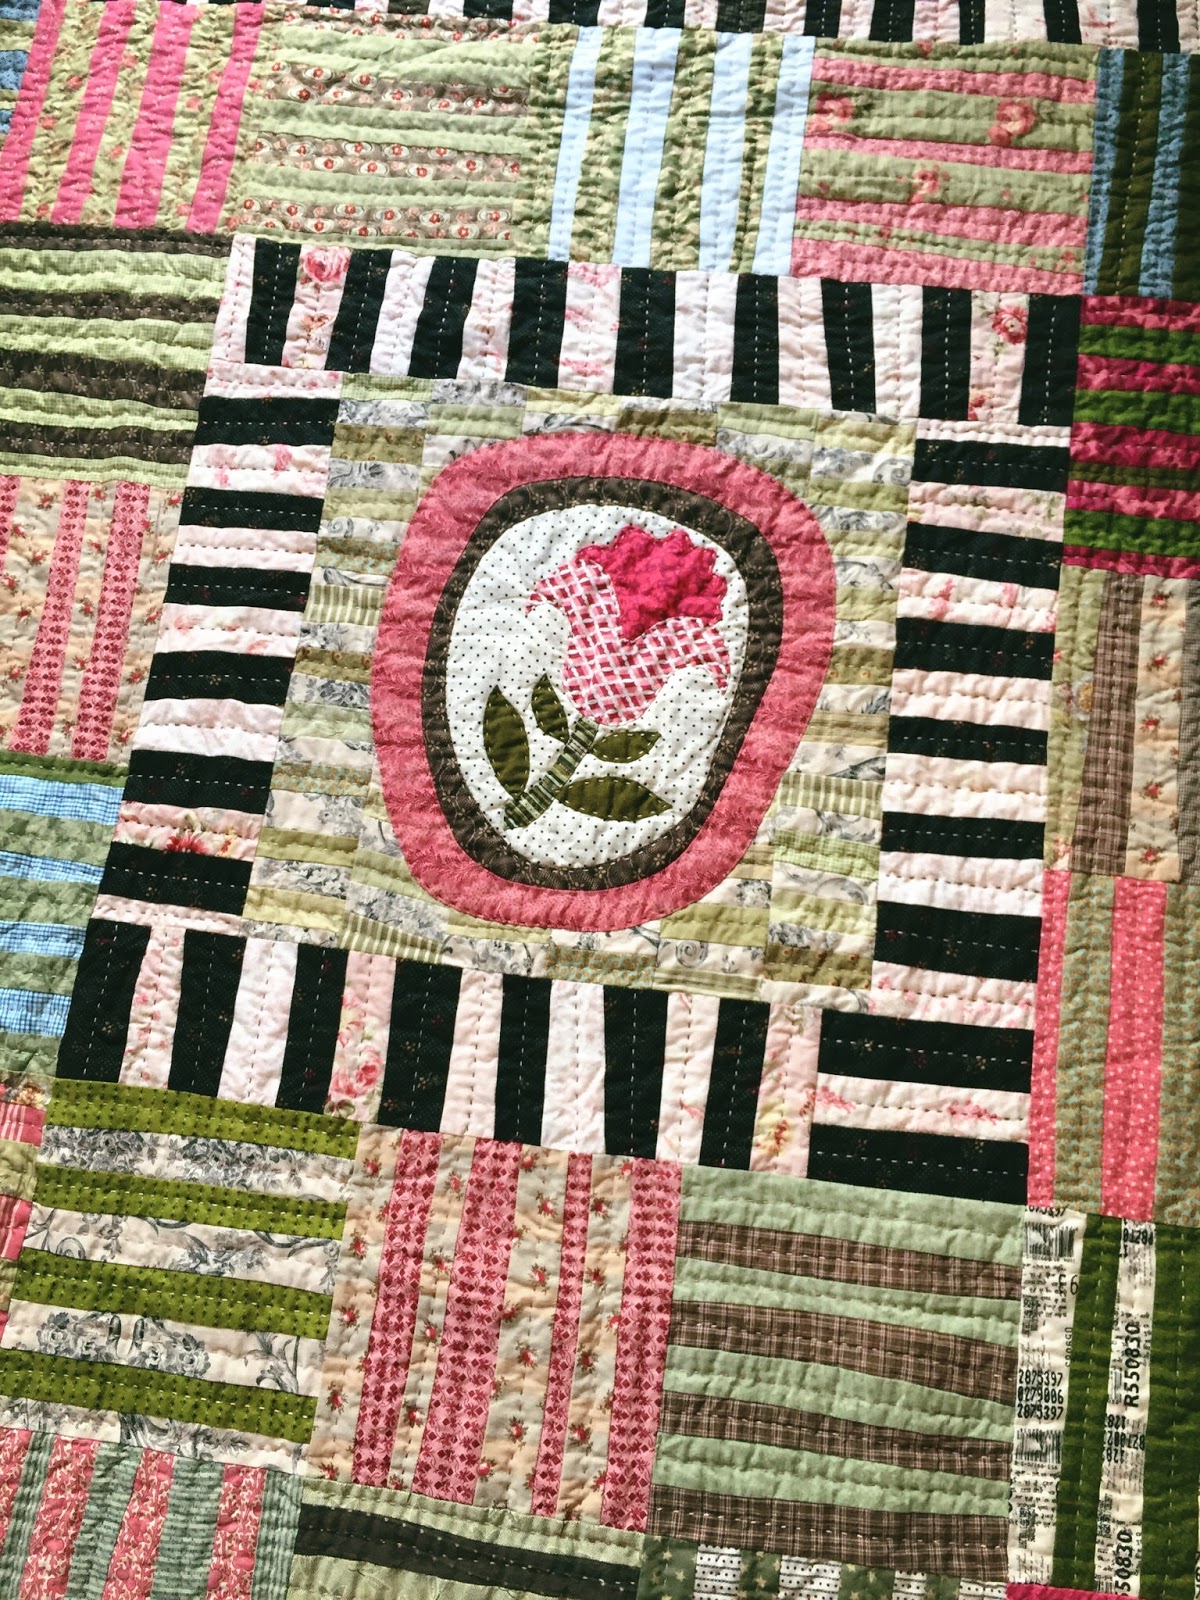
Playing With Scale is totally completed now! It was one of those Adhoc. Improv. challenges that really stretched the brain waves. In a perfectly relaxed sort of way of course....
Playing With Scale a finished quilt!
It's probably not something you see all the time out there on the Net, these colors and prints combined with the free-cut strips, but I find it ridiculously charming all the same. People who stick with solid colors just don't know what they're missing!
So glad I added the flower into the mix
The {oh-so-obvious} different widths of the free-cut strips are especially appealing to me. Must be part of the old fashioned, utility quilt look that consistently seems to melt my heart.
Interesting to have a graphic look with these subdued fabrics.
I had determined that this one was going to be machine quilted and then at the last second, dumped it into the hoop instead. There was this very real fear of massive puckering from those feed dogs pushing and pressing the off grain strips.
Loving the hand quilting texture
I am so, so glad as the hand quilting bumps it up a notch in my opinion. Plus, this one was a breeze to hand quilt which means it's full of all kinds of feel good vibes.
A snugly looking quilt!
The color palette is not one that I'm instantly drawn to or even have to return to again. Nevertheless, it filled the need of helping to empty out the stash totes of some lingering, but very good fabrics.You know how it goes when fabrics aren't being used up fast enough and before you can even blink, there are newer, shinier fabrics flirting with you instead.
So many different shades of green...
I wondered about the amount of hand quilting. Is it enough? Was I cheating the quilt? And then when the quilt was flipped over and I could see all the stitching on the back, it was totally fine. Big sigh. I want the backs to look 'full', not have large pockets of un-stitched areas.
Always interesting to see the back...
It was tough to get really good pictures of this one. The pale pink fabrics sewn next to the black and very dark brown fabrics wanted to wash out and tended to look white in all the pics, no matter which filter I tried. They aren't. Every single fabric in those areas is a very, very pale pink. The lightest colors have been intriguing me lately and it's always such an interesting challenge to try and make the most of their subtlety. Always so much to learn!
When the centerpiece isn't centered at all...
The first thing I did when finally getting back in the quilt room was to make a new stack of fabric. The yellow/gold stash tote has been overflowing for much too long and so I started there. Had myself an amazingly relaxing evening picking and choosing fabrics that tickled my fancy. Big surprise on the colors that ended up being picked to be added in! Somehow I always end up with this particular blend of colors though I find these quilts hard to give away. Not everyone enjoys a predominantly yellow quilt. Why? I need answers to this important questions! lol
A new stack of goodness
Instead of doing much hand quilting this week, I've been working on the applique for these sweet little baskets. They are approximately 7 1/2" inches but will be a 12 1/2" block when the cheddar hsts are added onto them.
Sweet Tart Baskets all lined up...
As you can see, all the baskets are slightly different as far as placement. I don't think it's very obvious and I wouldn't care anyway. The 'eyeball' placement is what I do best and an attempt at anything else just drives me insane. Completely ruins the enjoyment of the quilting process and so then I just quit sewing, which of course interferes with my ability to get anything done!
Hope this works the way I want it too!
The middle fabric is super sweet, but looking a little bit spotty from a distance. Oh well. Most quilts around here are used, not hung up on a wall to be admired. All 126 hst units have been trimmed up now and so hopefully there will be time to get the basket blocks all sewn up and ready to go. It's always a dilemma, isn't it? Catch up on the blog or spend time in the quilting room....

Tuesday, April 23, 2019

Diving Into the Hand Quilting

Spring has been hectic around here. Nothing unusual about that. I've been finding great pleasure in opening up my hand quilting bag late in the evenings to stitch on this sweet quilt. Ooh, there is always a big exhale and then instant bliss.
Next up in the hoop
It was started as a response to one of our challenges over at Adhoc. Improv. Quilts. This challenge was 'Playing With Scale'. I started with a {freehand applique} floral centerpiece and made that background with coins or string sets. Then I moved to the border around that and decided to go ahead with the string look, but make these in a chunkier look/style.
Always a little applique
Since I was working with a stack of fabrics that had mostly been languishing in the stash totes for years, I decided to throw caution to the wind and make even more string sets. This time I went skinnier, but longer. This used up a boat load of old fabrics, but as usual, I ended up having to dig even deeper in the totes and come up with some fabrics to help ease the blending.
Sandwiching and Pinning
I made a conscious decision to try and use up every strip, thus the blocks with multi-color strip sets. Somewhere along the way I grew dissatisfied with the overall look and determined that it also needed the additional piano key borders, those horizontal, chunky pink and black/brown rows. Kaja is the one who helped me to realize that the bottom portion of the quilt would look better with two piano key rows rather than just one. I thank her for that as it really bring the whole quilt together for me.
Playing With Scale
There's definitely a utility style look and feel to this quilt. Kind of a plain Jane, I-used-up-all-the-ugly-fabrics feeling. Which, yeah, means they aren't all exactly ugly. Even after all these years, most of them still appeal. There's just something about florals! But maybe not as much as they did when I first bought them. You know how that goes. I'm loving, simply LOVING adding in the hand quilting stitches to this one. Does that surprise you? It makes me so very happy--almost beyond explaining.I pull this quilt out and my heart does a little happy dance every. single. time.  Something about utility style quilts and a soft color palette apparently combine to bring a lot of peace.
Third layer of petals for Melon Patch pieces
Last weekend we ended up making a quick trip down to Oregon to visit relatives. Kind of a last minute thing as we determined to attend the funeral of our daughter-in-laws grandmother on Monday and it seemed like a good time to visit an ailing uncle etc. at the same time. Such a good time visiting with the family over the holiday! We stayed up late every evening laughing and telling the stories of our life. Somehow it also ended up that we got to help out with our granddaughters at the funeral as our daughter-in-law was singing with her sisters and cousins. That was a sad occasion of course, but holding the baby and taking care of big sister made it kind of sweet too.

I took my hand work {of course} but only ended up sewing 9 out of 80 petals. This is the third layer and after that will be one more. I try not to think about how much sewing this really is, but just take it as it comes. It's the current 'forever' project and has been in the works since February of 2018. Wowsers, it feels like I've been working on it for much, much longer than that....

Tuesday, May 8, 2018

Playing With Scale is a Finished Quilt Top!

Well, the Playing With Scale quilt top is done! So labor intensive sewing all the rows together. All those stitched, then cut-to-size strip blocks needing reinforcement along the edges. 
Looking at the centerpiece
I was very intrigued by the January challenge and had all sorts of ideas and intentions. Then as the centerpiece developed, the quilt took on a life of its own. Didn't turn out looking like most of the ideas floating around in my head at all! As per usual when playing with improv., the first thing needing to happen is a gathering of fabrics. This stack of fabric was a direct result of wanting to de-stash some of those older sage greens that had accumulated years and years ago.
Playing With Scale is a finished quilt top!
Working with these mellow greens as the basis of my color palette, all the other colors just sort of fell into place. The blue arrived when I was looking for a 'spark' and didn't work well in the first place it was added in. I really like how it works in the large strips blocks now. There's just a little bit of blue here and there in the quilt--not too bright and distracting--but doing its part to help to keep everything from blending a little too much.

Later on I also added in some darker, brighter pinks and greens as well. Just had to. Things had started looking a bit too mushy and tho I didn't want to lose the subtleties of the 'weave'. I also wanted to emphasize some of the energy and motion going on and thankfully, intensifying the color range seemed to take care of that beautifully. Did you notice that some of the blocks are not adhering to a strict weave {or rail fence} pattern after all? It's something you might not notice right off the bat, but I like it ever so much better for not playing by ALL of the rules. Whatever those 'rules' may be. {Don't think we really had any here for this quilt!} It's a bit of whimsy that we often see in antique utilitarian type quilts and something I love trying to capture in my own quilting efforts.
Not all the blocks follow the proper rail fence look....
The 'playing with scale' part should be obvious. The background of the centerpiece is small coin strips and then the brown/light pink border and subsequent rows are slightly larger with chunkier strips. When I settled on the idea of making large strip blocks for the main background of the quilt, the plan was for even chunkier strips to happen. Turns out, my natural inclination while free cutting is to go more narrow when cutting longer strips. And after awhile, I just quit fighting and cut whatever and however it felt right. Remember, I most often cut from fat quarters or remnants of fat quarters. Wonder if that might make a difference in how I instinctively want to cut into the fabric?
It's a long one....
All along, I was hoping for an old fashioned make-do look. I wanted a very simple repeat of a single element, but something with the ability to take blendy, almost boring printed fabrics and make them shine. Proponents of saturated solid fabrics would say its just not possible and that I was wasting my time! Uh uh. I am such a printed fabric fan! I say there are always hidden depths within a good mix of printed fabrics!

A big thanks to Kaja for her suggestion to consider adding two brown/lt. pink border units at the bottom instead of the one. As soon as I read her suggestion, the idea was practically set in stone. Just made so much sense in regards to how busy the quilt was beginning to look. Those two border units grouped together give the quilt a perfect spot of focus and really, it's much more graphic and impactful this way!
Loving the finish!
The quilt top ended up being about 72 1/2" by 107", a crazy size for a quilt. And tho I tried {more than once}, there was no getting rid of one row of blocks between the centerpiece and the double brown/pink border units. With one row removed, the proportion of the quilt looked really 'off'. So be it!

Overall I really enjoyed this challenge. It's another one of those learning/processing/just-doing parts of the creative journey that should make me a better quilter in the long run. Attempting the making and building of a project from this completely different place makes such an impression. I have many more ideas percolating. Little granules of 'playing with scale' inspiration will no doubt be working their way into future quilts whether I do it consciously or not!
Yay!
In other news, look at my early Mother's Day gift from my kids! A brand new roll of Hobbs 80/20 Heirloom batting. They really love me! And hint, hint, want more quilts from mom.....

Wednesday, March 28, 2018

A Little Bit of Improv. Progress

So I spent so much time on the Vintage Lily quilt that I basically ran out of time to spend on the other Improv. quilt projects. There are a lot of different ideas for moving forward with my Playing With Scales quilt but nothing seems absolute.
Auditioning ideas
Which in my book translates into just get started cutting and sewing and see what happens! I'm really on this fence about letting this turn into a medallion quilt, but that being said, it felt like it needed one border surround. And as soon as that was in the works, these little strips of blue jumped directly onto the quilt.
Trying to see what works
I played with a couple ideas for the pink and brown border and eventually settled on what is pictured below. Okay, that's it--carry on. Right?
All sewn together
Well maybe not. After sleeping on it, I thought this particular border needed just a touch more energy. The lighter ends on the top and bottom border especially bother me, how they just sort of drift off into blah, blah, blah. I tried auditioning extra strips on the sides, turned in the opposite direction thinking that could be a bold move. Yuck.
Auditioning again....
And then you know how it happens, I basically went back to the original {sewn together} border audition. Maybe with just a slight 'off row' alignment? Now to just get the seams unpicked and the new segment cut and sewn in. Right now it's just resting on top there in that bottom right hand corner.

Sorry for those of you who will greatly dislike them, but the blue 'tabs' on the applique centerpiece are completely sewn down and there to stay. There is just something about them that intrigues and won't allow for their removal. At least at this particular moment. If, at any time, my opinion changes about their value to the rest of the quilt, it really is an easy fix to get the seam ripper out and discard them--minutes is all it will take. It will be like they were never there. Much easier to sew them on now while the quilt is little, than to try and add them in at the monster quilt stage!
This could be the one...
And as for the Improv. Postage Stamp Basket quilt, there is definite progress being made, albeit slowly. Thanks for all the great suggestions to help make the baskets look more like baskets. It really made me think. For the time being tho, I'm fairly content to let that be an abstract thing and just soak up the colors. This blue,green and blush pink color palette is making me feel very happy and I don't want to over think the quilt to the point that it loses it's simple charm.
Improv. Baskets
'Cuz that can happen. I've been there, done that. Striving for a lost element can make us totally forget to enjoy the good things already going on in the quilt. Linking up to Kaja and Ann for AHIQ #31.

Tuesday, February 27, 2018

February Adhoc. Improv. Play

The next AHIQ challenge is an interesting one. It's all about playing with scale--in whatever manner we'd like to interpret. I've been contemplating the idea of making a quilt with rows of simple blocks and/or shapes. Something in subdued colors and just playing with value changes to see if I could make something with an antique 'utility' look.
Playing with Scale--The start
It was an obvious choice for incorporating scale changes as I already had the fabric pull and rows can be easily tweaked for size. As I went digging for inspiration, I kept coming back to the idea of having a centerpiece though. There's something about the idea of a pretty center with radiating piecework that just appeals to me. So of course it had to be applique. Everything lit up when I saw this on my Pinterest boards {sorry Lori for not linking directly to the pertinent post}.
Sewing together the foundation piece
So as things go when we're making things up as we go along, I doodled some quick ideas until one looked about right. Not an exact copy, but something with similar vibes! Then it was time to start making the drawing happen in fabric. I started with rows of small strings or coins for the background. Just a mellow blend of sagey greens and a piece of cream/black toile. I deliberately left the middle of the foundation free of pieced units as I didn't want to cut any of that fabric out of the back of my applique. It's really not large enough, but I also needed enough foundation to securely sew the applique 'circles' to.

To get the appropriate sizes for the applique, I re-drew my doodle drawing onto a perfectly sized piece of freezer paper. Then I carefully cut out each circle, ironed it onto the chosen fabrics and cut out with plenty of seam allowance--especially the inside brown circle as it's easy to move overlay applique a little too far in one direction or another. At that point, I sewed the outside seam of the brown applique with a quick straight stitch on the sewing machine. Who cares. Nobodys ever gonna see that seam! I trimmed the pink circle a little bit, especially at the bottom where it was too flat looking and hand stitched the outside edge of the circle. I cut the cream {applique foundation} circle out and carefully slipped it inside and underneath the brown circle. And yes, I deliberately chose a fabric with a smaller scale of print! Ooh... gotta love layers of interest!

And so I stitched the brown circle to the cream applique background and then the pink circle to the brown circle. On and on until it was time to cut out my flower pieces, still from that same freezer paper drawing! {So efficient!} It was tough on my fingers stitching over areas with seamed rows, but like I said, NOT going to cut the background out on this one. Too much fear of raveling. It's a good start to my 'playing with scale' quilt and for now I'm mentally calling it 'The Quiet Quilt', the centerpiece notwithstanding.  Lots of the fabric pull are soft, quiet and a little blendy. We'll see where it goes from here. At some point I definitely intend to start with some vertical rows, but just had to establish the beginnings to get a feel for the rest!
Adding some applique details
I was hoping to be farther along with the Vintage Lily quilt, but these snowball blocks have been soooo tedious to sew. Easy as pie, but just yawn inducing. All are sewn now, but next up is the ironing and trimming.*ughh  Not my favorite part of the quilting process! Robin is doing something similar with her scale challenge, so it should be interesting to see both of our quilts progress. My snowballs are a little different than hers as I wanted the corners on mine to end up looking very scrappy and a bit messy. You might remember the look from my Scrappy Tulips finish?
Improv. Snowball blocks for Vintage Lily
So the other adhoc. improv. work in progress are these postage stamp baskets. Originally I had plans to mix them with my pineapple applique, but that flew out the window in a hurry. These baskets are just a little too strong to mix with sweet looking applique shapes. First I laid them out next to each other and tried every which way to be happy with the look. I'm certainly intrigued at the intersection where each basket joins up, but it's so not me. It just feels like a waste of all that time I spent stitching on the basket handles!
Improv. Postage Stamp Baskets
On to other plans! There's not much I can do to make these look more like basket blocks and less like loops with stripey corner units. I contemplated adding 'feet' to the basket like someone suggested the other day, but it just made a muddle at the point where the baskets met. There's probably oodles of different things that could be done with these basket blocks, but what appeals to me right now is giving them lots of breathing room.
Auditioning a layout
So yep. The're going to get the good old, classic sashing treatment. Kind of a fall back around here, but when you like something, there's not point in trying to reinvent the wheel! I cut up all the rest of the pale background fabrics {had barely enough} and started auditioning placement. Two brighter blocks got tossed out immediately and the rest seem to be cooperating. For now, I'm using little fussy cut roses I cut out of a fat quarter for all those inside sashing squares. There's not enough for the outside squares, so that and the setting triangle fabric still remain a mystery. 

Overall, I'm quite pleased with where this quilt is headed though I admit to being a wee bit disappointed when the original plain went south. It's not a bad thing to be surprised by a quilts independence though. Just makes us more determined to try and get it right! Linking with Kaja and Ann for AHIQ #30. Are you having fun yet? 'Cuz I certainly am.....