Showing posts with label So-Tired Fabrics. Show all posts

Tuesday, January 14, 2025

Are You Still Following Along With the Bramble Blooms QAL? Here's the Third Part--BBIII!

Okay, I've finally figured out how to do the BBIII part of the QAL! Life happenings are a little uncertain around here for an undetermined period of time and this approach will best match the posting requirements from me.

Fabric pull for BBIII
Bramble Blooms III Prompt:  Now that we've established the basics of our series, it's time to get more personally creative! Make a fabric pull, whether from the original, older fabric color palette you've already been using for the QAL or a bright, shiny new one that feels more inspirational. Think about all of the elements you've previously incorporated into your BBI and BBII quilts. Take the time to consider which elements have felt especially good to play with. Have any of these blocks, motifs or color blends unexpectedly piqued your curiosity? What if you tweaked them just a little? What if you really pushed the boundaries and made them much bigger/smaller or even potentially a lot more improv. and quirky? Which elements do you particularly dislike? Perhaps it's time to drop those and move on.

Now take out some paper and an ink pen and draw up a potential design for BBIII using any or all of the previous elements. Consider this a 'doodle', not something that has to be perfectly in proportion or laid out exact as to measurement on graph paper. Let your ideas flow as with the ink from the pen. Draw one or several drawings and then choose your favorite or the one that looks most intriguing at the moment. Perhaps you will pick the design that your fabric pull will feel most at home with. Or would you rather choose the design that will feel the most challenging to combine your fabric pull with? Either way is totally fine. Finally, sew up your design and get ready to see it in quilt top form. You can totally do this!

Design doodle #1
Don't feel like you have to use every single element from before, including the medallion layout. Go somewhere that feels fresh and interesting to YOU. Do keep at least one of the elements though, and concentrate on keeping some similarities there. This will add interest when comparing BBI, BBII and BBIII.

Design doodle #2
Add applique or not. In my case, I am somewhat obsessed with the flower, leaf and yes, even the bramble-ly thorn motifs. So of course that's where my imagination continues to take me! What if I do this? What if I do that? Make notes for clarification rather than trying to draw a 'perfect' design. You can always come back later and fine tune the one that you've chosen out for making.

Design doodle #3
Don't worry about the proportions of each individual part of the design and how it might all fit together properly together or not. Just doodle what your mind is envisioning in a very simple and basic way. Draw relatively quickly and let it be primitive. Your rough lines should easily convey the general feel of your idea as it's being created in real time because your hands are in fact, connected to your brain. It might feel forced or tricky, but believe me, this works. 

Design doodle #4
Don't be afraid to draw several doodles and maybe even throw the worst of them away. {It actually feels really good to crumple up a terrible design into a ball and throw it away!} As you are drawing, things will probably occur to you to that might not even fit into the current doodle. Finish the one you're working on, and then go ahead and explore the next idea directly after. 

If your brain feels fuzzy and sluggish {because of the implied pressure to be creative}, make yourself draw at least one overly stilted and perhaps unimaginative doodle, and then just walk away. {It is oddly helpful to force out one pitiful rendering rather than nothing at all.} Let your brain cogitate and ponder over the next couple hours or even, days. Then, whenever a random QAL design idea pops into your mind, hurry up and draw it out on paper immediately so you don't lose it.  

Keeping the odds, ends & orphans just in case
When you've got a design that feels right, then feel free to dive into the making part of the equation. Don't rush into micromanaging how you're going to implement every single, little part of the quilt! Simply start from the center like we've done before with BBI and BBII. Basically, I'm urging you to FORGET about the other parts of the quilt until you get there {except for maybe assigning potential colors to those areas}. Please don't stress to the point of positively paralyzing yourself! And remember, there are lots of tips for border making in this post here. You can also check here for a list of all the posts in the QAL if you need to refer back to other tips and tricks I might have dropped.

Start by making the center or possibly making blocks. Concentrate on that alone. Now, how does that section look and feel? Good? Move on. If not, fiddle with it for a bit. Does it need a coping border? Applique? An addition of improv. piecing? Remember, auditioning is your friend. What's next? Decide on the components and colors for the next phase, and then sew up each and every part of the quilt as it connects to the previous portion. Listen to your quilt and pay attention to the feelings in your gut of 'something is needed' OR 'something isn't right'. Take plenty of time for pondering if you're unsure. 

All the leftover fabrics to date from the original 3 quilt fabric pull
Enough fabric left to easily make a couple more in this series!
It's very important to understand that your chosen 'doodle' isn't set in stone. Ever. Consider this just a starting place! At any point along the way, you can change things up or even eliminate part of the design. Play with how to interpret your design so that it has the very personal vibe and voice of YOU. That could be as simple as choosing out special fabric prints or mixing areas of formality with make-do backgrounds. It's completely up to you how closely the lines are followed in your original drawn design.  And yes, if you really, truly, positively want to make up one of my designs, then feel free. Go ahead if you have to! Give me the design credit of course, but seriously, wouldn't it be so much more rewarding to make a YOU quilt?

The tentative plan is to host the BBIII link-up party sometime in the middle of June. This will give five months for putting together a quilt top. I will be posting about my own Bramble Blooms progress along the way, along with any other quilting progress made around here as well. As the link-up time gets closer, I will try to post a heads up as to the actual posting date for the third part of the QAL. Don't know how many people are actually interested in this particular part of the QAL, but everyone is welcome, whether they have completed BBI or BBII quilts or not. Lets dig into this from a slightly different approach and see where we all end up. I bet some of you are going to be surprised! 

For myself, I can already see that I'll probably have to make more than one of these designs eventually.*sigh  Will probably continue to hang on to all the leftover fabrics from these Bramble Blooms quilts until I can get this series properly worked out of my head. {Could be interesting to see how much of this fabric could actually be used up and how many quilts that would be?} 

Thanks so much for coming along on this oldy, moldy fabrics adventure with me. Some of you have even left a tip in the tip jar! Not necessary, but very sweet! The more I play with older fabrics, the more intriguing it is to see if I can truly end up with a quilt top that looks 'intentional' as to fabric choice, and not just a sorry use-it-up story. The resulting quilt tops from all of you has been absolutely fascinating to see. I love how much personality I'm seeing, the random bits and pieces you've gleaned from my tips about making your fabric work for you! Love it! And hearing about your struggles with the process. We've all been there before or will be eventually. It's all good stuff. Hope you've learned a valuable tip or two in the journey to making your own very personal and unique quilts. It's a lovely, sweet thing to know our finished quilt is the only one like it in the whole entire world! Fingers crossed this hasn't been a huge waste of time for anyone. I know I'm still learning something with almost every quilt made....


Monday, March 4, 2024

2nd Border Prompt for Bramble Blooms QAL {BBI}

Are you ready for the next prompt in the Bramble Blooms QAL? So fascinating to have others along for the journey and see where people end up, even when we all start at exactly the same place! Life is full of interruptions around here as usual, especially now that my husband is feeling just good enough to be antsy, though still not quite good enough to be back at work. We're getting there! This post ended up being miles too long. Consider yourself warned. Just too much information that I keep thinking someone might need.

Back to the reason you dropped by today! For this specific phase of the BBI Medallion quilt, the challenge is as follows: Put together a border that includes adding 4-patch, 9-patch, 16-patch or even larger patchwork blocks. You can set your blocks side by side {continuous block layout} or 'on point'. This border can be any width you like. It does not need to have the patchwork blocks throughout--use as few or as many patch blocks as you think will look good! Totally up to you if the blocks are improv. style or traditional-look.

The first Bramble Blooms quilt top is done!
That's it. Now go forth and create! I deliberately used these style blocks as they are a simple, time honored use of unexciting fabrics and also, they adapt well to the make-do look. If you're wanting a little more information, maybe stick around for a walk-through of my own Bramble Blooms creative process. I'll attempt to thoroughly bore you and ultimately, share some border guidance tips and tricks as well. To be perfectly clear, I'll be happy with any and all of your quilts that deviate from the prompt. Your creativity should always supersede whatever guidelines I suggest throughout the duration of this series.

GETTING STARTED WITH BORDER #2:

Most of us started with a pre-determined fabric stack that we specifically set aside for BBI. At this point in the project, you'll probably be noticing a specific color in that stack that hasn't been used very much. Unless the quilt is adamantly demanding a specific color for the next go-round, try starting with the left-behind color {or colors}. You might not even have to spend a lot of time auditioning, as we know the fabric in the initial stack already looked relatively good together. All the remaining pieces have the potential to fit into this quilt somewhere. In fact, this could very well be your last opportunity to include it into the quilt.

Starting with the patchwork blocks
Now, you can dither for a while and possibly overcomplicate things, or you can just dive in and test out a couple patchwork blocks. For the purposes of this prompt, these are blocks made up of equal sized squares, usually sewn up in units of 4, 9, or 16, depending on what size the finished block is intended to be. 
 
I generally start with some basic questions such as: Do I want smallish blocks or larger ones? How many squares needed to make this block hold its own in the border? Is a 4-patch too simple? Can I make a 9-patch block work out properly in an on-point layout if I only use two colors? Hmm.. I'm not sure that I want to use every single color in the blocks. Will a 16-patch be too busy for this particular quilt? Do I want scrappy or something more controlled merely using two or three fabrics? And on and on. It's all very stream of consciousness and you'll find yourself automatically narrowing down your preferred look in no time at all. Don't worry if you don't have all the answers. Just go with your gut.

THINKING ABOUT MAKING AN 'ON-POINT' LAYOUT:

Eventually you find yourself with a tentative plan. For me, it was this: Scrappy look border using only 2-colors {pinks and creams} in the blocks, but many different fabrics. A 16-patch traditional cut block with a finished size of 8". On-point setting. Mixed fabrics in similar tones of rusty browns for the setting triangles. Still considering whether there is enough larger fabric pieces to cut out enough setting triangles. Might have to consider doing something else?  

A quick check in with the chart below {from my quilt book 'Great Sets' by Sharyn Craig} and I could see for sure that the diagonal measurements would work. No doubt your plan will be totally different, as it should be.

A helpful tip for determining a pleasing width for an on-point border: The blocks in the on-point border shouldn't be much larger than the width of your previous border. They can be smaller, that seems to look great. Any larger and the border tends to get a little awkward looking {proportion-wise} very quickly. Of course this is just an opinion, not a rule or anything! My decision to sew up 8" blocks means that I am making the patch blocks exactly the same width as the previous border. The diagonal measurement {using the on-point layout} will then be 11 3/8". It feels like a good balance to me, but of course your discriminating eye might want something totally different.
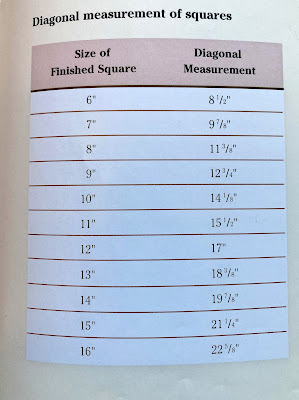
A quick chart for diagonal measurements
Armed with this knowledge and a tentative plan, I cut out and sewed up a handful of 16-patch blocks. Just enough to do a good, solid auditioning. You can absolutely cut out and sew up all the patchwork blocks you think are needed. Dive right on into the deep end if you're ready. Go for it! Sometimes that's what our instincts are shrieking at us to do--to have confidence and own it. 

Other times, we'll find ourselves with the feeling that hmm... ' I'm not sure yet. Maybe it would be good to leave space for those variables that might possibly need adjustment?' Listen to that. Do not ignore! Even if it's the smallest niggle. It invariably means that our subconscious has picked up on something that hasn't been quite realized yet. We still have to forge ahead in order to get anywhere, but maybe with a more cautious commitment. Often it simply takes auditioning the blocks. That's all. We have to actually see it with our eyes, not just our imagination, and then we'll be feeling confident in our choices once again. The plan is ON!
A quick chart for cutting setting triangles
If you've made up your mind to do the on point layout, reference the chart above for help with cutting out corner and/or setting triangles. I use it all the time. Or you can check out this blog post at Spruce Crafts for further information. No one should ever be afraid of an 'on point' layout.

If your fabric choices are running low from the ordinal BBI fabric stack? You clearly have to address that. Dig around in your stash fabric for more options. Don't shy away from expanding on the chosen color palette if needed, going lighter, darker or brighter. You might need to go shopping. Or, may I suggest deliberately making everything a bit scrappier? 

For instance, making the uncomplicated choice of adding corner triangles to all of the patch blocks, instead of only cutting out larger setting triangles, has a lot of advantages. These advantages include making the math easier by virtue of squaring up all of the blocks, being able to cut into much smaller {previously unusable} pieces of fabric, and not least, easily making a limited fabrics and/or color palette stretch even further. Giving your quilt more depth and interest. How? One seemingly out of place fabric looks very wrong, two--kind of questionable and three or more--like it was purposeful. Do the purposeful and 'make-do' like you mean it!
Starting to audition setting triangle fabrics & color
WHEN THE PLAN STARTS TO FALL APART:

If the plan starts to fall apart, like mine did, don't worry. Working improv. is a process full of seeds of inspiration. You just never how they will present themselves. We tend to look at our plan 'failing' as a problem needing a solution. In reality, it's our brains way of saying, 'Hey, something else might look a lot better!' It's our instincts kicking in. Many of us like to say, 'The quilt is talking to us'. Don't worry, it always lets you know before it's too late to make proper adjustments and it hardly ever yells.

In the case of my Bramble Blooms, it was the color choices that started looking wrong first. It just crept up on my awareness. Here I was, busy adding fabrics and 16-patch blocks to the design wall and then, the quilt started saying, 'Yuck! Things are starting to look really mushy. Why is my lovely applique border starting to disappear?'  Ugghh. Not gonna let that happen! Being me, {we all have our default}, I threw some dark fabric up on the wall between the borders. The thought was, 'Ok, that clearly defines the edges of both borders. Problem solved!' Right? {I'm all about the coping borders as a first run at fixing those borders arguments.}

If I was deeply invested in the on-point layout, there could have been new patch blocks made out of different colors and probably cream fabrics used for the setting triangles or whatever.  Any number of choices are possible at any given phase in a quilt. You gotta remember, there are normally always way more than one or two ways to resolve things in a satisfactorily manner. It's not like you're trying to find a single grain of brown rice in a bag full of white rice.
Maybe a coping border will make it all better

CONSIDERING MAKING A CONTINUOUS PATCH-BLOCK LAYOUT: 

On to the continuous block layout. Because why not? It might have been in your plan from the beginning, but I just sort of stumbled on it for my own Bramble Blooms. I admit to being fairly tunnel-visioned about using the on-point layout. At first. It just seemed obvious that it had the potential for infinitely more room to use the leftover pink, cream and rusty brown fabrics in my stack. Sometimes we get an idea in our head and it crowds out any other thinking. Don't mistake what I'm trying to get across here. That resolved version {with the inclusion of the darker coping fabric} would probably have resulted in a satisfactory looking quilt. It wasn't wrong

Still, the prompt did mention two options. Of course I was curious! I went ahead and auditioned the patchwork blocks the other way--in a continuous border formation. Uh oh. No one was more surprised than me. The whole quilt lightened up and gave me the sort of instant warm glow that makes my heart feel all warm and fuzzy. Darn it. Cannot ignore the warm and fuzzies no matter how much I wanted the on-point layout!
This layout is the one for me afterall
And that's exactly how good, personal-to-you changes happen. You just switch plans midstream because the quilt has spoken. And it speaks to your heart. In order to make the 16-patch block border fit properly to the larger quilt, I only needed to add a single extra row {not a full block} on the left and right side borders. This made it possible for the cornerstone blocks to fit exactly in pattern with the every-other pink/cream patchwork look. See the picture below? Ta da! It seemed serendipitous. Always a great feeling.
Looking at the corner blocks in the correct pattern formation
It was a simple matter to measure the outsides of the quilt and count out how many more blocks were needed. Then I took a few minutes to mourn the lack of using the rusty, tan fabrics in the stack and second guess myself. Is this really how I wanted to continue? Which very quickly led to a lightbulb switching on. Hmm...  How about cutting out and sewing up similar, but darker, cornerstone patchwork blocks? 
And then I looked at them like this...
Which is how those came to be. As you can see, the red in the cornerstone blocks is much more distinctive looking than the lighter pink and ties back into the centerpiece very nicely too. I loved the red squares echoing the X lines from the previous border, a very unexpected result. Once I noticed that, I couldn't 'unsee' it. Uh oh. How to get the pattern to work out properly in the border surround?
The close-up view of the cornerstones 
As you can see from the close-up picture above, there is an odd, awkward looking area where the dark red squares meet up with the lighter colored pink ones. The pattern is interrupted for sure. I could have perhaps flipped the borders on the top and bottom, but do I honestly care? 

The weighted look to the corners just make me happy for what it does for this particular quilt. It doesn't have to make sense to anyone else! The echo of the X blocks there in the corners, subtly creates energy and encourages the eye to move around the quilt. I also like how the pink squares form a diagonal line across the corners of the quilt, at the juncture of those corner blocks. Is there any part of this look/feel/vibe that I am willing to give up in order to 'abide by the plan or stick with the pattern formation'? This is what improv. does for us. It frees us from the have to's and gives us permission to think outside of the box. Be curious. Let yourself be surprised!
The completed BBI quilt!
Okay, here's all the tips and tricks you've been searching the post for. Hopefully one of these suggestions will resolve an issue for you and your quilt.

TIPS FOR FITTING A CONTINUOUS PATCHWORK-BLOCK BORDER TO THE QUILT:

Improv. comes with its own challenges and one of them is making new border lengths fit to odd quilt measurements. Do not be discouraged. There are several different ways this disparity can easily be overcome. For the best fitting borders, always measure the sides of your quilt and plan on attaching a border in the same exact size, pinning well before sewing together. 
  • Add an extra row {or two} onto the length of a short border. Does not have to be the full size of a block.
  • Remove an extra row {or two} from the length of the too-long border. Does not have to be the full size of a block.
  • If the border length measurement is too long to match up with your quilt, by less than the width of a single square in a patchwork block, go back and sew some extra large seams. Spread it out over the length of the border--doing it to several seams. Don't sew the extra large seams side by side or the 'fix-it' will be a little more obvious. Usually moving the needle over one or two spots will be enough to take up the extra length necessary. Keep measuring your border until the length has been corrected.
  • Can easily split the difference if the overage on a border length is only 1/4" or less. Trim 1/8" {or less} off of each end of the border length. Nobody will even notice.
  • If perhaps the border length is 1/4" too short, simply pin the quilt and border together at the middle points and gently stretch to make up the difference. Warning: Anything more and you're likely to have a wavy border and a sloppy looking quilt!
  • Add precisely measured Coping Borders to make your patchwork block border fit perfectly. A little more work, but sometimes it feels important. See tutorial here for guidance with that.
*****************************************

TIPS FOR FITTING AN 'ON-POINT' PATCHWORK-BLOCK BORDER TO THE QUILT:

These are similar to the tips that were given in the first border challenge, but I will list them here for continuity:
  • Sew an extra block to a border of pieced blocks and chop off the extra. Very utilitarian
  • Add little narrow strips of fabric between each pieced block to stretch the row in order to make the length fit with the quilt. Add wider or narrower strips at the very ends of the pieced blocks, as needed, to finish up and get to the correct border length.
  • Deliberately piece less blocks than needed. Add on extra fabric at both ends of the border length until you have the correct length.
  • Make quite a few less pieced blocks than necessary, then arrange them tight together at one side of each border, say at the left side of each border moving around the centerpiece. Sew on a long piece of fabric to only one side of the blocks, making up the extra till it fits the centerpiece measurement. Do this similarly for every border length. There will be pieced blocks on every side of the quilt, but the arrangement will convey a certain symmetry.
  • Sew all of your blocks in a row {per border side}. Then add in a precisely measured coping border cut for the express purpose of fitting perfectly between the centerpiece and your newly pieced border length. See this tutorial for guidance with that.
JUST A COUPLE MORE PICS FOR THE VISUAL LEARNERS:
When the on-point blocks have corner triangles
Sometimes the on-point border layout is easier to play with if you can add corner triangles to the patchwork blocks, instead of trying to wrangle large setting triangles. The square-in-a-square blocks are just easier to move around and find a 'make-do' solution if/when the quilt measurements aren't being particularly cooperative. If you feel uncomfortable with these make-do solutions, that's okay. We're all wired differently! Just be prepared to do a lot more math and pre-planning before you end up with a finished quilt top. 

The cool thing about improv. is that it's wonderfully receptive to 'fix-it' solutions. Consider it a 'work around' for dealing with the side effects of flying by the seat of our pants. The more of it you attempt to do, the easier it is to find the coping strategies that make sense with the way your exceptional brain works. As long as your quilt lays flat and you're satisfied with the look? Who cares about the details?
Another border idea
Along with the tips and tricks mentioned above, a 'mirrored' block arrangement can often be a really fast and easy solution to the on-point border arrangement.--for those times when you don't want to spend time figuring out the math for setting triangles. It's not cheating, it's improv.! And it doesn't take very many blocks set 'on-point' to give the quilt the same kind of energy. 

It usually looks better to arrange blocks in unequal amounts per corner. In the picture above, there are two blocks on top and three at the left side, not counting the corner block.  With this arrangement, I would add fabric to finish out the needed length of the border, keeping the pieced blocks relatively spare. You can repeat this look at the lower bottom right of the quilt only, {reversing the unequal block positions as to sides for the mirror}. OR you could do every single corner. An arrangement like this definitely needs to be auditioned, as it can make all the difference in the world where the last block falls alongside the previous border. 
So happy with the cozy look to this
WRAPPING IT UP:

Okay, that's it. Let's go get creative! This will be the end of the prompts for Bramble Blooms I quilt. Getting this top together will hopefully give a better idea of how the process will work with Bramble Blooms II as well. This first quilt sets the tone for rest of the series. It establishes a common color palette and/or elements that we will change up and tweak here or there as we move along on our adventure together. 

The idea is that we start with a base of ideas and let our innate creativity expand, flourish and grow from that particular place. As each quilt progresses, we will try to push a little bit more, drawing from our well of experience with the previous Bramble Blooms {whether the experience feels successful or not}. We will probably not LOVE every single quilt that we make in the series, but hopefully we will end up with at least one quilt that rocks our foundations. Wowsers, did I really make that? Out of a stack of fabric that I'd grown so tired of? 

Wrapping this us, please remember that this is YOUR quilt. If you feel that it needs another border or two, then absolutely feel free to continue on with your journey.  Look for a Link Party for all the completed Bramble Blooms quilt tops towards the end of April. Shortly after that post will be the start of Bramble Bloom II. Looking forward to seeing all of your wonderful progress!

Thursday, October 26, 2023

Getting Started with the Bramble Blooms QAL!

Welcome to the Bramble Blooms QAL! Right from the start, I want everyone to know that this is an informal quilt-a-long, meaning there will be no hard dates for posting from phase to phase. It could take anywhere from a year, to possibly a year and a half to complete. If that drives you crazy, then maybe rethink joining up! Beyond any other measure, this will be a process based QAL, as that is where I believe creative quilting truly grows and flourishes.

Not sure who wrote this, but it says everything!
Everyone is welcome to play along, beginners, intermediate and experienced quilters alike. For those who have more practice in the improv. approach to quilting, feel free to skip through the wordy babbling and get straight to the heart of the matter! 

THINGS TO KNOW:
  • This is a structured, yet unquestionably, Improv. style QAL with the intention of using older, languishing fabrics from the stash.
  • It will be presented in the form of series work with emphasis on process--three quilts being the ultimate goal. Why three quilts? Engages the curiosity, plants seeds of creativity and makes it easier to see the results of playing off of similarities and differences as each successive quilt takes shape.
  • Every quilt will involve some sort of applique, piecing, medallion quilt layout, and an intuitive approach to decision making. Traditional or improv. piecing are both acceptable. 
  • Your quilts will have the ability to look almost exactly like mine, but also the potential to look much more like a YOU quilt if so desired.
  • Expected quilt size is intended to be in the range of a throw quilt. Small or large? We'll see, but that's ultimately going to be your choice based on decisions made along the way.
  • There will be a Bramble Blooms page at the top of the blog linking to all relevant QAL posts in the event you fall behind or need more time for ideas to marinate.
  • There will hopefully be a link party at or near the finale of each quilt top {3 total}.
  • There will be a Bramble Blooms {QAL participants} 'link list' at the sidebar here at Quilty Folk. The focus of this entire exercise should be the personal journey and not a competition for 'best of'. Visit who/what strikes a chord and don't feel compelled to visit everyone in an endless loop. Due to the lengthy nature of this QAL, it seems best to support and inspire without excess obligation involved.
  • Above all, my hope is to practice mindfulness, make space for personal voice and let go of pre-determined outcome wherever possible {bearing in mind the predetermined medallion quilt layout}.
  • This project is absolutely free though I intend to set up a tip jar for the pdf's that will be shared throughout the QAL. I get that some of you might not want to dive into the deep end of making your own applique templates and that's totally fine. Hoping I can inspire a few of you to try though!
The fabric stacks for three quilts in the series
 GATHER FABRIC STACKS FROM OLDER STASH FABRIC:
If you'd like to try for the goal of three quilts in the series, dig through your stash and gather together three fabric stacks that are similar to each other in color palette. They don't have to be similar in color to my fabric stacks at all, feel free to do your own thing! If you'd like to begin with a fabric stack for one quilt rather than three, that works too. Just don't have such a large fabric stack that you get easily overwhelmed. Don't worry about how much yardage per stack, this is mostly just a starting place. We can always search for more later! For those interested, these stacks are made up of primarily whole and partial fat quarters, third of a yard cuts and random larger pieces of yardage. Very, very few pieces of larger cut fabrics, which yes, sometimes becomes problematic in the outer borders of a quilt top. We'll cross that bridge when we get to it!

Try to focus on the color palette as a whole {per fabric stack} and don't worry about how uninspiring individual fabrics might be. With older, stale dated fabrics, it really helps to zero in on how the fabric colors work together rather than how boring it might feel. Make sure there is a good range of light, dark, medium and bright fabric in each stack as this will provide the needed spark to help make things work well overall. Be sure to have a good mixture of fabric prints as well, really don't want all polka dots or whatever your fave is. And try not to have stacks of truly hideous stuff! Do throw in a newer fat quarter or two to make it more palatable as needed.

This is the fabric stack for Bramble Blooms I
IT'S ALL ABOUT THE PROCESS:
I've found that series work is an excellent way to use up oldy moldy fabrics because inevitably, the structure encourages focus on the elements at play, rather than the fabric itself. There is a momentum that naturally happens as we meet each particular quilt challenge, greatly helping to kick in our curiosity as we move along. We start out with a basic, almost going-through-the-motions sort of quilt idea for quilt #1. Then, if we follow small moments of interest, usually something a bit more interesting and personal begins to come into being as we gain confidence in trying to implement our ideas. 

Pairing series work with using up long neglected fabric also helps takes the initial pressure off of us to try and make something impressive. How many times do we start with the assumption that our project needs to be 'worthwhile' for the amount of money that we've hitherto invested? This distraction, if you will, lets us focus in on color or value for purposes of design rather than how dull a fabric might be. It increases our odds of being willing to take risks and gives permission to cut things up willy nilly or perhaps 'waste fabric'? meh! Who cares! It wasn't being used anyway!

I encourage everyone to dig deep, try extra hard to MAKE-DO and always be open to surprising possibilities for the older fabrics. No doubt there's something lovely and comforting about a few of these pieces that inspired us to buy them so long ago in the first place? That being said, please feel free to go buy something brand new later on if your quilt is adamantly insisting on something special in regards to color or fabric print. If you need to. No judging or shaming here!

GETTING STARTED WITH THE FIRST QUILT IN THE SERIES {BBI}:
First off, you'll need to prepare a background for the centerpiece of the first Bramble Blooms quilt. Grab the first fabric stack and tuck the other two away. This will be the foundation for your first quilt in the series--your base and your color story. In regards to color for a background, I'm going with a fairly reliable {old-faithful}, kind of a pinkish, cream color. You can start with whatever color strikes your fancy, doesn't have to be traditional at all. Cut out something in one piece of yardage, or perhaps piece together some smaller pieces like what is pictured below. Whatever you do, don't sew it out of four identical sized pieces of fabric! An odd number of fabrics generally works much, much better in this instance.
These odd, not so blendy fabrics make
for a decent looking background
This centerpiece can be whatever size you want to start with. Seriously. There are absolutely no 'have-to' measurements it needs to be. Simply ensure that it is something that looks and feels right to you. Think about how large of a quilt you might end up with if you start very large, or perhaps how very small it might end up if you begin in the miniature.  I recommend something around 20-25". After sewing, my centerpiece {below} measures at 22 1/2" x 26". See how I did that? Already breaking the rules!*wink  Do you want to end up with a square or a rectangle shaped quilt? Much easier to make that choice right now than try to fix something later on, though of course it can be done.

It's okay for there to be a slight value change 
in your choices. Gives instant depth to your quilt!
If you're very new to this approach to quilt-making, it might feel a bit fake-ish to purposely cut and sew together for a make-do background like shown above. I remember that feeling so many years ago, of thinking that I was trying a little too hard. In this case I honestly didn't have to expend much effort at all. One fabric was used 'as is', another made it easy to take advantage of the skinny remains, and the other fabric simply made up the difference needed to get to a good measurement. {Part of the bottom fabric was tucked under while I was auditioning the look.} The thing to remember is that 'make-do' is oftentimes a great start for a quilt purposefully built around limitations. Don't overthink it.

If this feels a little too open ended, this might not be quite the right QAL for you. I'm trying something a little different with this invite, and it probably makes some of you want to break out in hives! However, if you're looking to join me for a journey of creative play and doing things the Quilty Folk way? That's the way this entire QAL is going to be, a little loosey-goosey as to measurements etc. Might as well start out the way we're going to keep going! 

There are almost definitely going to be times in this particular QAL when you will run out of a certain fabric and have to make substitutions. Why do you think I start with a fabric stack and not exact yardage? Hmm? Self imposed limitations can make for very interesting quilts! Why not start now with a good strong vibe committing to the art of making do

Next up will be a post about free-style applique. {Probably in a couple days to a week from now.} You had to know what this centerpiece was for! After your first post showing off your fabric stacks or centerpiece background, let me know so I can add your name to the Bramble Blooms QAL participants Link List. It looks like I can link to Instagram accounts too, so doesn't have to be a blog. My email is audkateaster at gmail dot com. Always give me several days to respond as life gets pretty busy around here.


Wednesday, February 22, 2023

Diving Back into the Deep End

It felt like a slow start getting back into some sort of quilting groove. My brain was very foggy and I struggled to focus properly. Looking at my quilting list just caused instant blankness and a general apathy toward all current projects. It was really quite sad.  Finally, I had no choice but to start a brand new project.*wink

Herbs and Berries quilt project
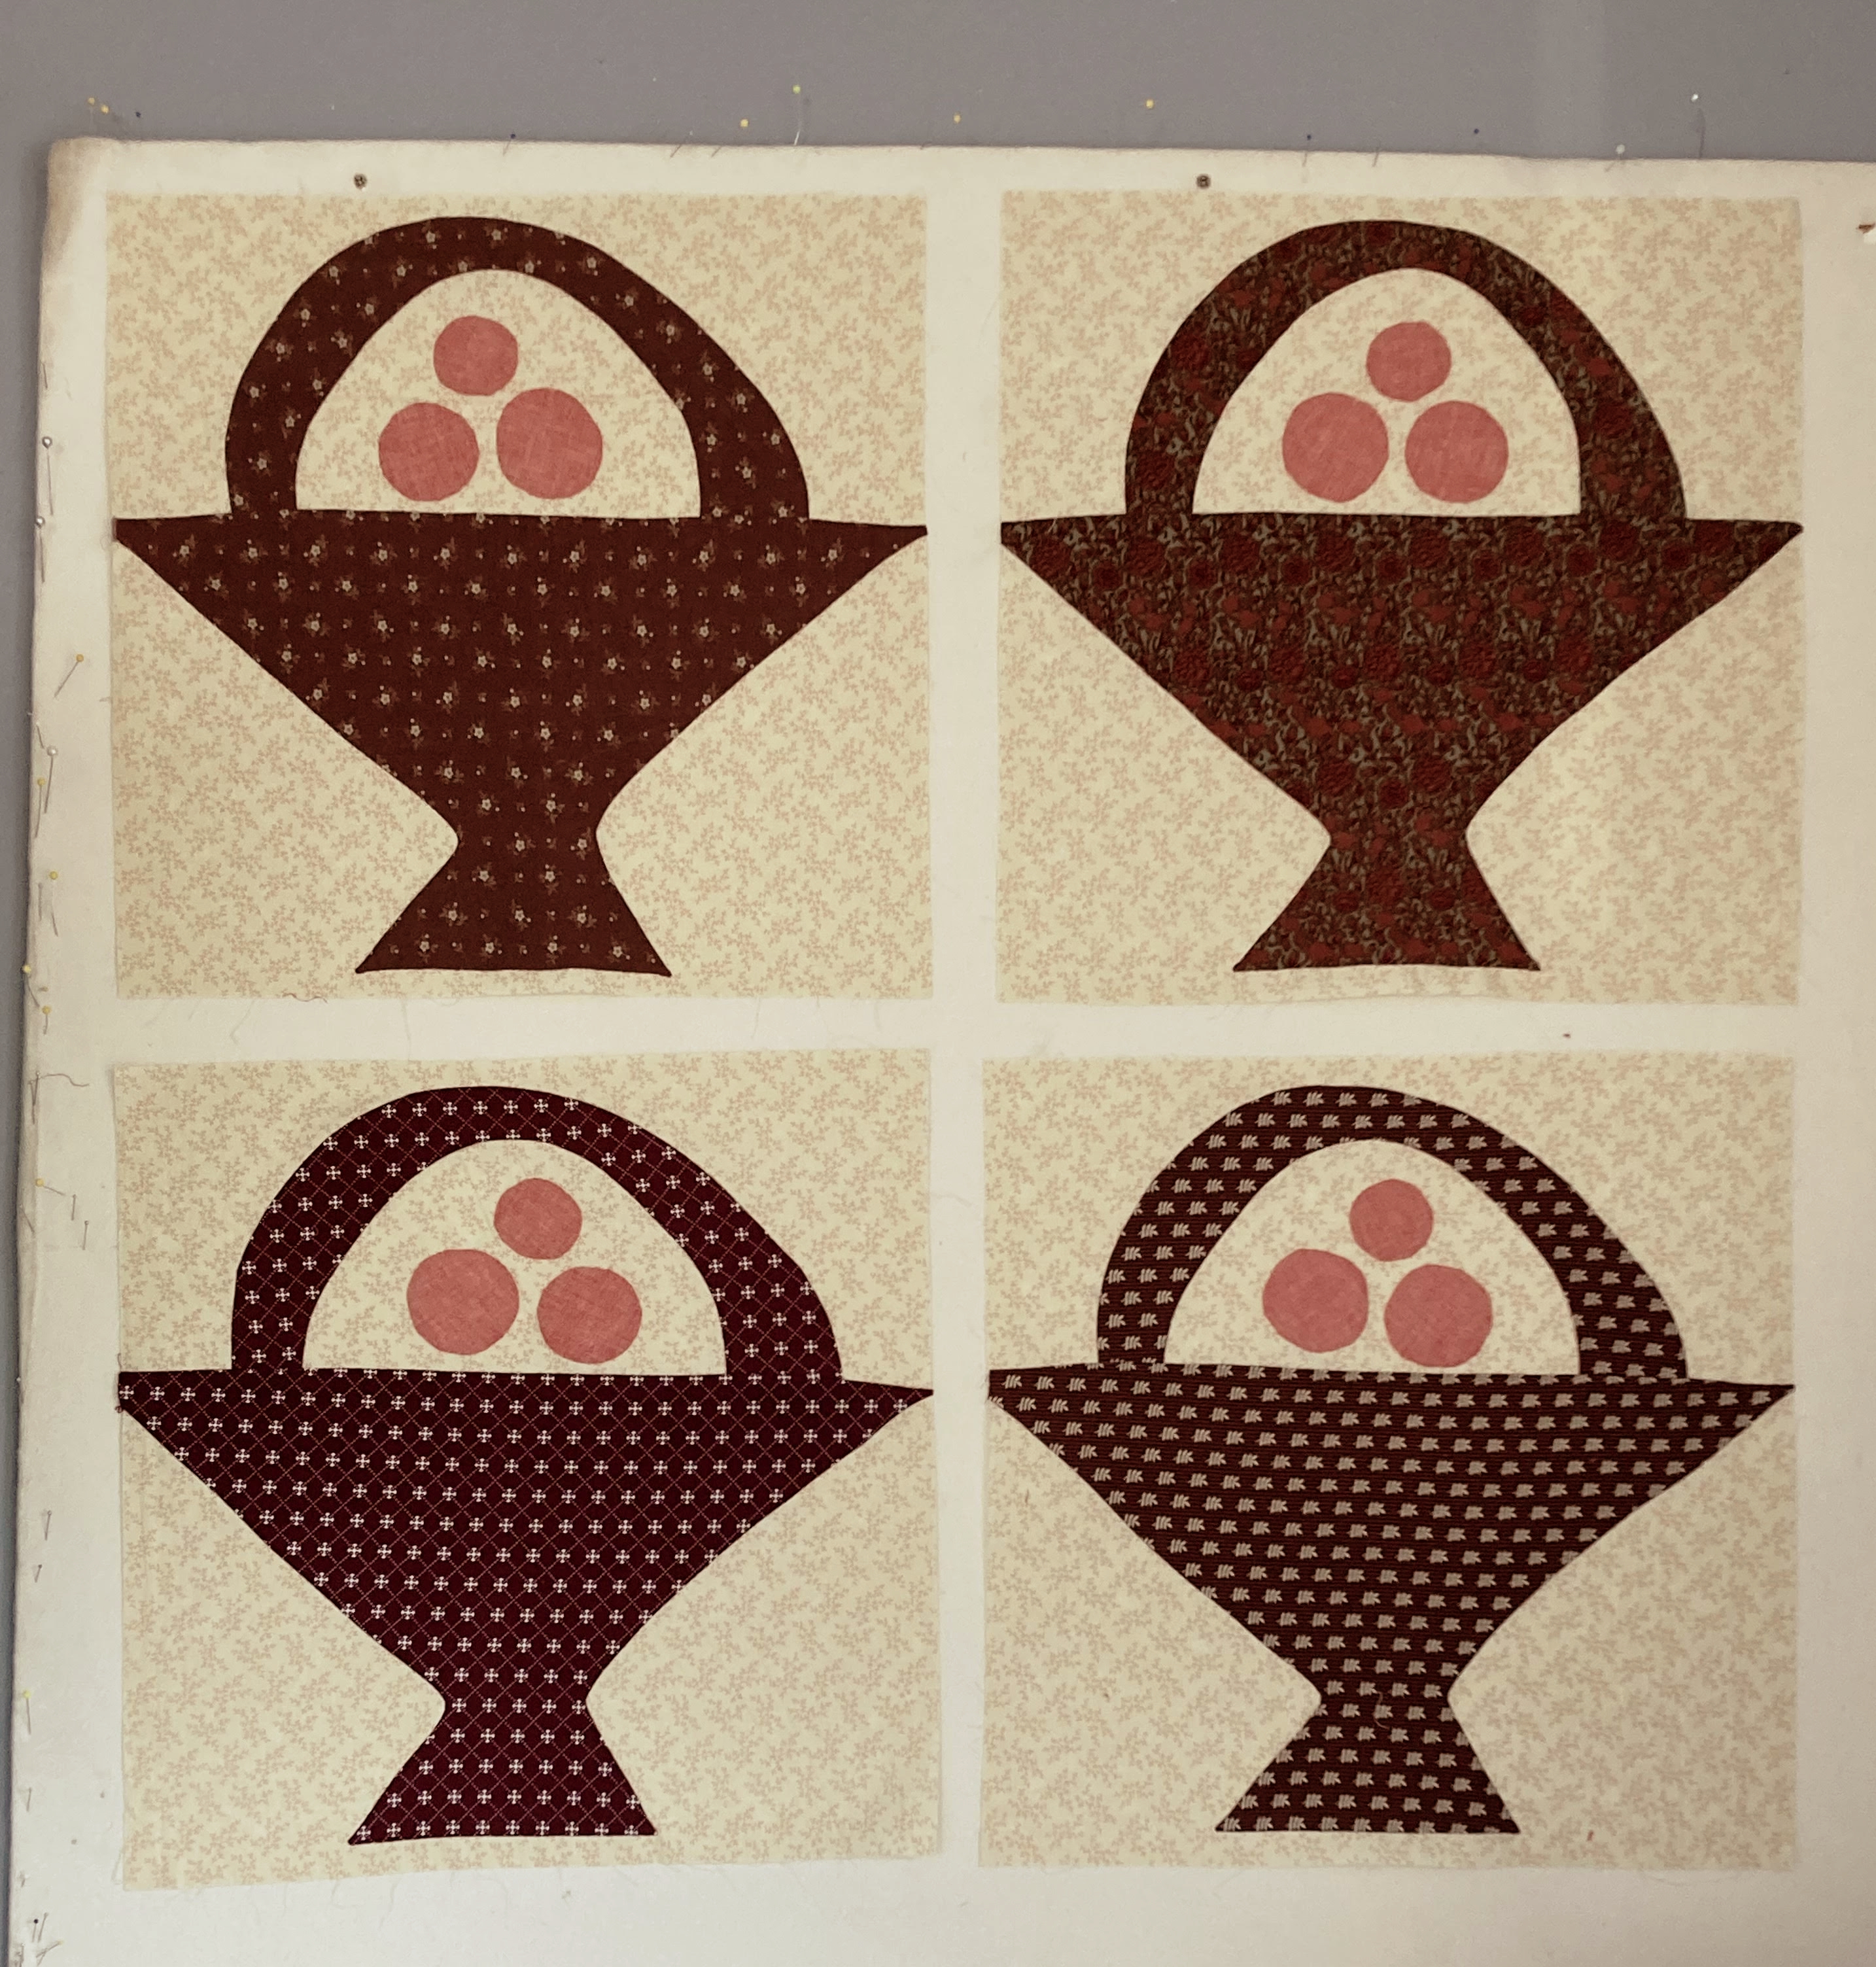
Well, in all honesty, this was sorta, kinda started back in late fall. I've had the stack of fabric forever and even had things narrowed down to a basket quilt idea in terms of design. Sometime during the end of November, I remember cutting out the nine background pieces of fabric, roughing out a couple basket shapes on freezer paper and then putting it up to percolate for just a bit longer. The main thing holding me back was trying to decide which fabric color to use where. 

Anyway.... when I couldn't deal with any of the current projects here in the past couple weeks, I fell on that project like a drowning sailor. I mean, it was so obvious that the baskets needed to be cut out of the darker cranberry red fabrics! Right? And it was a very soothing project to hand stitch on overall. Very easy to pick up or set back down, nothing jarring or too demanding in wanting solutions for further design dilemmas. Perfect project and place to pick for a 'restart'.

#AHIQColorPalette
Then, much to my surprise, the 'Revised' quilt started popping into my head once again. Hmm... what if I did this, or that? All those holes in the puzzle of how to fit the loud, obnoxious tulips together in a somewhat harmonious way began to slowly make sense. And I found myself getting the blocks finished up to a point where they could be laid out on the design wall floor for further design work. I played and contemplated and just generally enjoyed the feel of healthy creative flow. Ah! Where have you been my old friend? I've missed you so...

The brighter yellow fabric stack
While the sewing machine itself has barely been used of late, I have definitely been in and out of the quilt room. Mostly to pull out stacks of marinating fabric and take a good, long look. Refamiliarizing myself with old ideas and wisps of some sort of concept that may or may not end up being something wonderful. In all my overdue blog reading the past couple weeks, I stumbled upon this little snippet that greatly resonated, 'I have this constant tug, a yearning even, to just dive in and sew without a plan.  There are so many styles I want to explore, so many fabrics I’d like to combine.  I feel a pent up energy trying to break free.' Isn't that just the way it is for so many of us? That was from Hopeful Homemaker, a quilt blogger who I've followed for a couple years now, enjoying her unique outlook about quilting, creativity and life in general.

The mellow yellow fabric stack
As most of you know, for several years now, I've been slowly addressing overflowing stash totes in various colors. Yellow has been the latest and greatest to gain the spotlight. In July of last year, the Adhoc Improv. blog that I follow along even had a timely challenge concerning my over abundant color. But did that help? Nooooo. It simply paralyzed my thinking completely. Because now I was thinking 'improv.' and super creative and interesting etc. etc. I kept trying and trying to get a good group of yellows together, but every time I thought 'this is it!' then, basically nothing would happen with any of the fabrics or ideas or glimmers of greatness. 

Okay, long story made a lot shorter. After being sick for so long and then coming back into the quilting room looking around at everything like a newly hatched bird? I have come to the conclusion that I need to make a very basic, mellow looking yellow and cream quilt. Old fashioned looking and sweet as can be. Ditch the brighter yellows for now and then sort of work up to something that includes a more creative and interesting thought process. This feels like a breakthrough, a keeper of a plan and I'm actually sort of excited about it! And, wouldn't you know it, as soon as I decided on the plan {with the more mellow yellow fabrics that I'm currently crushing on}, and then tucked the brighter fabrics away? I stumbled upon the perfect idea for the improv. challenge. Or at lest the beginnings of the challenge! All you can do is laugh at that point. It's just too funny. 

But I'm still committed to the idea of making the more traditional, older looking quilt first and then diving into the improv. one next. A sequence or series? I really, really like this. Better get crackin-alackin' on getting those blocks cut out though before I lose the spark for the rest!

#AHIQStringTulip quilt in the hoop
I also managed to get enough hand quilting done {on the current quilt in the hoop} to finally reach the outside border. Whew! I was starting to think my get-up-and-go might be gone for good. As you can see, I'm stitching a wide echo stitch over the top of the basket handles. It gave me a bit of anxiety about overall look and vibe, but now that I'm on to the second border, it's looking pretty good to me. Am crossing my fingers that this quilt will be totally hand quilted by the end of February. Just feels so, so crazy that my first finished quilt of the year will probably be accomplished in March. I don't even know how many years it's been since that has happened around here!


Thursday, September 8, 2022

A Whole Lotta Yellow

 It's been a struggle to make time for this post. The days have finally started getting cooler around here and it feels like I've just sorta collapsed into an end-of-summer fugue state. Don't wanna do much of anything!

Looking very cozy
We had dinner with some friends the other night and during conversation, I complimented Jessica on her beautiful, intensely detailed tapestry type print she had hanging on the wall. She is a wonderful, successful artist with many followers on social media. Super talented! Anyway, long story short, she said that the tapestry was one of her favorites, but she hadn't sold very many. Most people seemed to prefer another version in the series. Then the conversation riffed from there into how true it is that so many of the things that we personally make and LOVE end up not being someone else's favorites. How ironic in fact, that a lot of times the vast majority seem to prefer something we're not even feeling oodles of love for! I mean, we don't hate it. It's just not in our 'top 10' so to speak.

Love Apples is a true-blue completion!
We ended that conversation agreeing that it's a very good thing to mostly make for ourselves. That way we can continually shore up that feeling of satisfaction and personal validation at the close of a project. Be inspired enough to keep on making the good things that resonate with our inner spirit. Don't you just love conversations like that with people who get you? Who speak much the same language even though our formats might be different?
The Love Apple Blocks
And that's how I realized another thing besides summer fatigue was holding me back from writing this post. This latest quilt really isn't destined to be a favorite with very many people. It's sort of an odd color palette and the structure/layout is a little too formal for the quirky blocks. Maybe. I rather enjoy the sense of not knowing for sure! 

This one started on a whim, me hoping to use up some peachy pink border discards and wanting to dive into a long-marinating stack of fabric. It's also got a whole lotta yellow in it. Which might just turn certain people off. Technically, probably not more than the amount of pink or gray used in the quilt? It's just that yellow has a way of shining very bright and bold in whatever spot it's used in.

Loving this texture
Oh well! You know me. I've been bird dogging the color yellow ever since I ran out of interest in pursuing the oldie moldy greens {and after that, the color orange which somehow didn't inspire much of anything}. It's a surprisingly hard color to play with. So bright and sunny, you'd think it would be easy breezy, but it can quickly look fake or hard in quilts. I don't usually love combining it with black or gray. Hmmm... Still pondering. This is probably my best effort yet, though I do intend to keep working with the color from many as many different angles as I can imagine. 

In an interesting twist, the free-style Baptist fan stitching looks especially great here. Don't you agree that the yellow and white checks here just soak up the comfy vibe from the repeat stitched arcs?  Will have to remember this for future quilting endeavors. Don't bother getting too fussy with the stitching when it comes to yellow...

The free-hand Baptist fan look
So...., you're probably not surprised to hear that this stash tote has been extremely full for a long time now. I buy the fabric {or have it donated to me} and then only tend to use little bits and pieces. It's a wonderful, warm and cheery spark in quilts, but alas, a little bit usually goes a very long ways. 

The problem is, there's a lot and I'm tired of the lid not wanting to close properly. I've been seriously trying to work toward winnowing down the sheer amount without throwing anything away. Again and again, I make a quilt and then toss a thick stack of yellow fabric right back into the totes.*sigh  I've been putting it on the backs of quilts and that helps a bit. Truly. Must do something about this fabric that is starting to get so stale-dated that it's starting to get on my nerves!

The first go-round, before borders
I don't know if you can tell from the pictures, but the shades in this quilt top are more along the lines of 'cheddar'. Deeper, richer, orangish shades of yellow. Which I love! Might be my most favorite version of yellow, this cheddar thing. At this point {with the layout in above picture}, I could have probably said 'Ta-da! It's a finish' and gladly moved on. This quilt though.... it just kept nagging at me for a border. For more attention. Something simple, right? You're not really just gonna slap some blocks together and waltz away?

It's too big for a proper picture!
Right....  See how well I'll sleep after that happens! As most of you know, I have a penchant for half square triangles, especially in quilts. Or borders in quilts. Thinking along the lines of KISS, I cut up pretty much all that was left of the blue fabrics from the original stack, added a cut-up plaid shirt and rummaged around for complimentary yellows and just pretty much went with the flow. Some of these were cheddar shades and others, more of a yellow gold or gold brown. Whatever it takes as long as it blended well.

Had to change out the cornerstones in the center
Then, after I had the border idea starting to take shape, I remembered to double check my measurements. Yeah. About that. That's when I had to make a judgment call on whether or not to severely chop into the last hst unit on each vertical border? Or perhaps add another small strip of 'coping' border before sewing on the hst border.

Lillabelle is a completed quilt top!
I fell down on the side of adding a coping border, choosing a very late 90's strippy floral print. Easy enough to fussy cut it to meet the correct measurements and hopefully see it 'disappear' into the overall scheme of things. I should mention here that it was 'close' to correct measurements. Since I wasn't intending to trim down all those hst's, ha! I knew there could be a certain amount of 'fudging' that probably needed to happen anyway. Just didn't want to lose three-fourths of a  5 1/2" hst on this particular quilt! And don't ask me why it's okay on some quilts and not others 'cuz I really don't know....

With the coping borders added to top and bottom of the quilt, I went ahead and sewed on the hst borders to the vertical sides of the quilt too. Measurements for the top and bottom hst repeats looked good, so no additional coping borders needed. Woohoo! Moving on!

While I was auditioning the hst borders for the top and bottom {something I often do for the sake of good color transition from light blue hsts to darker hsts etc.}, I reluctantly decided that the cream cornerstone squares in the very center of the quilt needed to go. I'm not sure if it made a huge difference to the look of the quilt, but having those blue squares inserted instead of the cream just makes me much, much happier. It's the little things. Hey! It only took an hour or so to seamrip out and change over. 'Cuz of course I ended up sewing part of the quilt right into the new seams.*groan.... 

A small, almost hidden coping strip
Hst borders successfully figured out, I was left with one last question. Was it done now? Well no, the quilt wanted more yellow. Can you believe that? Personally, I thought we were parked a little too close to the corner of 'overdone' and 'tacky' and you know how that goes. Nobody will ever want the quilt except for grandma with the bad eyesight. 

That stash tote though!! Might as well take advantage of this opportunity. And so it happened. A scrappy pieced 3 1/2" addition of more yellow to the outside border of the quilt, making it 85 1/2" x 97 1/2". I do think that it served to emphasize the old fashioned vibe of the entire quilt somehow. Could it have actually toned things down? I know, I know. That doesn't even make sense. How could adding MORE of the overblown, in-your-face yellow simultaneously give off a softer, more delicate energy? Go figure. There are some things that I will never understand and that's perfectly okay. I'm still learning and that's the most fun of all!

Enjoying this look!
More questions for the quilt history:

6. When do you normally quilt? Time of day, year?
Such an interesting question. I am not a morning person on any day of the year, so the quilting process that takes place in the quilt room is more likely to be late afternoons {depending on my schedule}. Or, if that doesn't work out, my best, most efficient quilting time is immediately after dinner. Hand quilting takes place at about 9:00 - 11:30 pm while I'm curled up in the corner of the couch, winding down from the day. Perhaps, if I'm lucky, for several hours in late afternoon and evenings on most Sundays. I obviously quilt all year long, but like most quilters, more intensely during the fall and winter months. 

7. Do you belong to a quilters' guild or club? If so, for how long? What groups?
Nope, never belonged to a quilters' guild, for many, varied reasons. Either I was comfortable with the quilting group I had, or I intimidated by the {thought of a} guild, or it met during a bad time for our schedule, or they didn't have a style that I enjoyed, or whatever. I'm not actively opposed to the idea. The groups that I belonged to were always groups from our church--just us gals getting together with a shared interest during some of the winter months. I'm a bit of an introvert in my own way and this was probably more of a comfort thing than anything else.

Currently {and since prior to 2017}, I am part of an online group I love called AHIQ:Adhoc Improvisational Utility Quilting. It involves loosely structured, group challenge projects headed by Ann from Texas and California and Kaja from the United Kingdom. We've slowed down a lot since inception, but I still find it immensely valuable to my creativity as a whole.

8. Do you know others who quilt in your community or parish?
Years ago I would chat with a lady quilter or two in our community. Usually when we bumped into each other at a quilt show or at the fair. Most of the ones that I knew were about 20+ years older than me with a very different style. 

There has been several quilter friends in our church throughout the years, but the numbers have thinned considerably in the last decade or so. I have found myself seriously dialing down my outwardly expressed enthusiasm for the craft in an effort to not come off as strangely obsessed and/or fixated. Uggh. So exhausting talking about quilting with people who don't care the slightest about the creative journey of it all! {Which makes me sound very snotty.} I have had a  tiny bit of interest in doing the quilt meetings again this winter so that might happen again. Am trying to wrap my brain around a way to make it interesting for all involved, including me, as it does take quite a lot of my time!