Showing posts with label #brambleblooms. Show all posts

Wednesday, December 11, 2024

Bramble Blooms II Link Party is Ready!

Time for the 2nd Bramble Blooms Link Party! This is a quilt top that should be similar but different to the first one. I want everyone to feel comfortable posting whatever progress that's been made, whether it's a completed top or not quite there yet. It's also okay to post your previous BBI quilt top or total completions as well! Just make sure to let us know which quilt top we're viewing. We'd love to see all the details!

BBII-A quilt top
First up, for my efforts, is the BBII-A quilt. As mentioned in an earlier post, there was a lot more fussing with this last border attempt than the quilt probably warranted. One of the things that I think improved the overall look of the quilt, was to fuss-cut a few lighter half circles and applique directly them over the top of those bright blobby red flowers in the left hand sashing fabric. See? They don't even look blobby anymore. Mission accomplished!

Looking at the flower detail and
vines that don't join up at the corners
Another thing that was bugging me, was the brash look of most of the flowers on the outer border vines. As you can see, just adding the smaller little detail to the bottom of most of the flowers seemed to work wonders. I know it doesn't look like much, but the entire quilt just acted relieved. Don't be afraid to chase that feeling of getting everything just right. The key is to know when to quit and let the quilt be. 

Closest to actual quilt color
The last thing this quilt got, was a narrow brown outer border. So surprising, but it totally made sense when it occurred to me to try. It probably could have ended up being the binding fabric, but I just felt that the quilt center needed somewhere to connect at a deeper, almost unconscious level. That chunk of brown at the outside of the quilt really helps balance the quilt out in a way that make the vine border work better now. The flowers settle into the quilt as though they were always meant to be there, instead of looking like they just got slapped onto the quilt.

All these simple details work to make me so much happier with the look and feel of the entire quilt! It actually feels like a success now instead of just another reason to sew older fabrics together!

BBII-B quilt top
Next up is the Bramble Blooms II-B quilt. The afterthought. The experiment. The why-not-try and see what this fabric can all do together? This quilt always had the more compelling energy, to my mind, but in the end I don't think it actually looks better. It just looks different. Love that!

Simple vine border work
I'm very happy with the stripey 'coping' border. Glad that it was worth the effort. The subtle way it adds depth to the quilt also gives a nice transition place for the applique border to come next.

Close look at the vine going around the corner
The flowers on this particular quilt seemed pleased enough with the fabric and design, no extra fussing needed here! I did second guess using the darker green vine for this quilt rather than the other one, but it all worked out in the end. Probably too dark a shade for the other quilt to accept it gracefully!

As you can see, both of these quilts have used all of the same elements that were introduced in the first Bramble Blooms quilt. Everything is simply rearranged in a different order, dimensions are altered here and there, and blocks are changed up to fit the new quilt vibe. 

Are you starting to feel your creativity 'turn on'? Do the available options make you feel frustrated, or does it make you think about possibilities? Series work should hopefully give you lots to think about in terms of trying a new direction. {I've done this so now maybe I'll try that.} And the fabric. Has it been easier to play knowing the fabric has been hanging about for years? For myself, I'm finding it a bit of a roller coaster. One minute I'm quite bored with the fabric options and the next, really pleased there's no real expectations attached. For some reason, that gives me an extra bit of leeway with creativity. I'm much less stressed about doing the wrong thing. Which... usually leads to taking risks with design that I might not take when I'm super attached to the fabric.

Please link up your BBII quilt top if you have some progress to show!

You are invited to the Inlinkz link party!

Click here to enter


Thursday, September 19, 2024

Second Border Prompt for Bramble Blooms QAL--{BBII} & Eek! a Bias Vine Tutorial

Here we go! This is the second {and last} prompt for Bramble Blooms II. It's taken awhile to get here and the pictures are abysmal. Ughh! Sorry for that, lots of late evening quilt play. 

Second BBII Border Prompt: Short and sweet, the prompt is as follows: Piece together an outside border as simplified or as complex as you like. Add floral applique motifs similar to what was used in your first Bramble Blooms quilt. These motifs can be exactly the same as the originals {BBI quilt} or not. Feel free to size them up or down. It's all up to you! Just try and keep the shapes relatively similar so as to keep good continuity going with the series. If you want to end up with a floral vine look for your quilt, scroll down through the post for tips on bias vine making.

BBII-A with borders cut to desired measurements
As per usual, you can add an additional 'coping' border in between the last border prompt and the newest one. As you can see in my BBII-B quilt, pictured below, I am in the process of adding a thin, striped coping border. Not for any specially intended whole-quilt size, but more for overall interest. Totally optional. If you need one, go ahead and make it happen! We want our quilts to be happy, right?

BBII-B with border fabrics still being auditioned
When adding borders with applique, don't actually sew them onto the quilt until after the applique is stitched down. {Unless that's your preferred method!} It's much easier to stitch applique motifs to your quilt on these smaller border widths than to wrestle with the whole bulk of the quilt. Measure out the proper length of the intended borders and maybe add 1/4-1/2" extra for stitching shrinkage. Butt these border lengths up against the quilt and play with the applique design until you're satisfied, then pin or baste the applique elements you choose into place. Sew them down in whatever method you like, and then after all parts are secured, sew each border onto the quilt in the proper order. I generally add the side borders first and after that, the top and bottom. 
Label your measured border units
Thoughts on my BBII border work:  Obviously still a work in progress, the applique on both of my BBII quilts will include vines. One quilt will have vines that completely wrap around the borders and the other will have a flowy individual vine at each border side. I love including vines and flowers in my work! Bias vines are a really easy way to include a bit of sweetness and whimsy into our quilts and also, create a bit of movement and energy. 

You can use large single pieces of fabric or even incorporate a purposely pieced background look behind the applique--perhaps more of the patchwork. Another, oft used design element around here, is to piece together somewhat scrappy, complementary colored fabrics instead. This is a deliberate choice because it helps use up languishing fabrics {something that sorta thrills me}, and also keeps me from making mad, panicked runs to the fabric store. And I love the look, so yeah, there's that. Do try to think about the little details that will add to your emotional response when later viewing the quilt. 

People sometime comment on the 'Quilty Folk' aspect. I truly believe a large part of the overall picture is this utilitarian, improv. style of making. Incorporating lots of random {hit-or-miss}, smaller cuts of fabric. It's crazy how cozy and sweet it can suddenly feel when the right fabrics start playing really well together. But why???? I don't know. It's not like you can plan for it. Or can you? 

It doesn't make sense to stress about not having larger pieces of yardage for borders when the workaround time and again, ends up looking better. So make yourself do the workaround. Take your bland and unassuming fabrics and just start playing with a purpose. We're only talking about one border length at a time! How hard is that? Don't be shy about putting it all to work {no matter how small or odd the fabric} if the color seems right or perhaps not too wrong.

Puzzle piece various potential fabrics together until you have a good looking unit. You'll know if it's working or not and yes, some fabrics may have to go! Then cut each of the chosen fabrics to the desired border width. This may simply end up being the width of your most narrow piece of fabric. You might choose to sew 'make-do', much smaller fabric pieces instead. Or you might determine the border width based frankly on the fact that you can get two border lengths if you cut the fat quarters in half at the 18" side of your fatquarter. Whatever works best. There are no rules!

It's usually easiest to figure out the scrappy border backgrounds while these fabric bits are laying in place alongside of the larger part of the quilt. One piece of fabric at a time, take it over to the cutting mat, make the cuts and then promptly return it in place. Keep doing this until there is plenty of fabric to make up the entire border surround.

Audition for satisfactory look and feel, as to subtle color flow and fabric print pairings.......,  THEN go ahead and cut and sew to the intended total border length measurement--per side. If you look closely at the above pictures, my BBII-A quilt has each border side cut and sewn to the precise border measurements, just waiting for the applique stitching. The BBII-B quilt borders are only cut to proper width, and you can see where I'm still playing with where to cut and trim the fabric pieces {as to length} for good overall appearance. 

Always label your sewn, measured-to-length border units. Left, Right, Top, Bottom. The last thing you want to do is sew applique onto the wrong border or potentially sew a border length onto the wrong side of a quilt.
Playing with applique
TIPS AND TRICKS FOR MAKING A SIMPLE BIAS VINE:

Okay, you know me, I'm all for free-wheeling and making the best of what is available. That also goes for making a simple bias vine. You don't need any fancy tools and it's totally doable with third of a yard cuts, fat quarters and even smaller cuts of fabric. Loosely gauge how many inches of bias vine you might need for your entire quilt. Add another 20 inches or so for good luck and then grab a couple pieces of fabric to get started.

Gathering the vine fabric
Scrappy is good, nothing to be scared of. And don't be confused by the amount of fabric pictured above. Remember, I'm making two BBII quilts, plus, options are fun! Definitely helps with keeping the auditioning momentum rolling along over here at Quilty Folk. And.... all of the extra just goes into my applique 'parts and pieces' totes.

So... To get started, cut your chosen vine fabrics so that they fit inside of your cutting mat--on the vertical length--up and down. If you have an 18" x 24" mat like the one pictured, your fabric needs to be cut to approximated 17 1/2". Shorter is fine if that's all there is left of a piece of fabric. Note: The fabric can extend longer than the 24" mat--however long the fabric is {42", 60" etc.}, absolutely no problem there.

If you have the much larger cutting mat, it's the same premise. Just ensure that the vertical measurement of your fabric fits inside of the very top and very bottom cutting lines, usually something like 23 1/2". 

Determining width of the Bias Vine:

Basically, the width of the bias vine is a personal choice. Just play with some folded fabrics or discarded bias bits and pieces until you find the best look for your quilt. Take that measurement and double it. Then add 1/4" to 3/8" for the seam and folded edges of your vine.

I wanted 7/8" bias vine which doubled is 1.75 + .375 = 2.125 or 2 1/8" for the cutting measurement. I always err on the larger size as wider bias vine tends to be my preference. Note: I could just as easily only added 1/4" extra and ended up with a 2" cutting measurement, probably the better choice as I later made a sewing adjustment anyway!

Making the first cut:  

Before you make your first cut, trim the fabric to the straight of the grain on the top and bottom of your fabric and also the left side. Lay the fabric on the cutting mat where ever, it doesn't need to be lined up with the grid. The important thing is to line the 45 degree line on your rotary ruler up with the bottom edge of your fabric--as straight as possible! Move the ruler over to where you will end up with about an 8" cut line on the diagonal. Cut that corner of fabric off. Discard or save for making applique leaves later.
Placing the ruler
Next, move the ruler over the larger piece of fabric until the right side of the ruler is exactly your cutting width, in my case 2 1/8". 

The first strip cut
Cut your first strip of bias vine and move it out of the way. {Don't be confused by the picture below, the fabric wasn't pressed super well, so the tip popped up after it was cut.} 

Careful placement of the ruler
Keep cutting strips in the desired width, continually lining up the ruler on the large piece of fabric. Important to keep the ruler very straight. You might even eventually have to take a cut just for the purposes of straightening the fabric, something that often happens when you use a very large or very long piece of fabric.

Keep going even around the corner at the top
When you are finished cutting strips from each fabric, you'll need to go back and trim the top left corner strips to the proper angle. You see where they will have a flat, squared off side to them? The easiest way to fix this, is to simply lay another strip right over the top and cut to the proper angle, no special ruler tricks needed.

Trimming the odd cut strips
If you are cutting from several different fabrics, you can sew together random strips and make a hodgepodge of your bias vines as to color order. Or perhaps line them up from lightest to darkest. It really depends on the individual quilt and what it might demand.

Getting strips ready for sewing
Okay, lets sew the bias strips together. Take two of them and make sure the angles will fit together correctly.

All lined up!
Lay them over the top of each other on the angle, right sides of fabric together and sew your seam. You will have tails at each end.

Sewing the angles together
Flip the seam open and make sure the strip edges line up. It's okay if they're a tiny bit off. {This will be hidden at the back of the bias vine.} Keep adding strips until you have a long row of bias vine sewn together. If you ever end up with two strips where the angles will not match up properly for sewing, just lay another strip over the top and cut the angle to the proper direction. This usually happens when you're trimming those strips with the squared off ends--they just get cut in the wrong angle direction, no biggie!

Do the strips match up well?
Fold the long row of strips in half at the width and line up for sewing underneath your sewing foot. Move the needle over to the far right if possible and then line up the fabric along the foot {or even possibly with the foot hanging partially off of the fabric.} Either way is fine, just do it one way or the other all along the fabric strip as you sew!

Placement of folded bias strips under the needle
When you are finished sewing the row, you should have one long tube of bias vine with a seam that is just barely catching the fabric at the right side.

The sewn bias vine tube
Take the tube of bias vine to your ironing station and carefully press it flat with the seam underneath. Use your fingers to carefully roll the fabric to where the seam continually ends up in the middle at the back of the bias vine.

Pressed flat
I don't know if you noticed, but I went back and sewed a second, slightly wider seam so as to change the width of my bias vine from 7/8" to 3/4", pictured below. It's very easy to start with a larger bias vine and make it smaller. Impossible to take a too-narrow vine and make it wider if you later change your mind!

The intended measurement!
I'm leaving town for a long weekend, but hopefully next week there will be time to prep one of my quilts for a bias vine that wraps clear around the corners. That way, I can show {those of you who are interested} how to place the vines so that you can still do all the stitching with the borders unattached to the larger part of the quilt. So much easier on our hands! 

This is the last phase of Bramble Blooms II so lets try to have this part finished up by early December. If we have a link-up party sometime before the 15th of December, then we can start the BBIII quilt in January. That will still leave time for enjoying the holidays. That is if I still have any followers left by then! I'm well aware that a three part quilt series is a whole lotta extra on top of our more cherished projects. No pressure whatsoever to continue onward. I will be doing this regardless!


Friday, May 17, 2024

Bramble Blooms QAL--2nd Quilt in the Series

Here we are, starting in on Bramble Blooms II already! We began working on the first quilt in the series last October, so as predicted, it's been a fairly laid-back QAL. If you're still working on your BBI, that's okay, you can still jump in with the rest of us, we don't mind! In the first Bramble Blooms, we lined up all of our elements, or in 'creative speak', planted a few seeds. Now we'll take those freshly planted seeds, shake them up a bit and explore some options for making a variation. As Andrea Balosky says so well in 'Transitions, Unlocking the Creative Quilter Within'; "Working in a series is the best way to exercise creativity; each project is an extension and complement of the other." Hopefully, along the way, something personal and wonderfully unique will start to blossom!

BBII Fabric pull
MAKE A FABRIC PULL:  
The first thing I suggest you do, is to gather your second fabric pull together. Hopefully using copious amounts of your older, languishing stash fabrics! Many of you made three fabric pulls initially, so you might already have this done. My BBII fabric stack color palette is very, very similar to the fabric pulled for BBI, something done very intentionally. In fact, I grabbed a couple leftover fabrics from the previous fabric stack and inserted them directly into this 2nd round, no problem. If you recall, I started this entire QAL with the feeling of, 'Wowsers, there is sooo much of this stale-dated {and similar colored} fabric hanging around in my stash totes! What am I ever going to do with it?' You, of course, can choose any color palette you like, no matter what your first efforts included. 

CONTINUING THE CHALLENGE
Something I've discovered through the years, when I'm totally out of wanna-be-great ideas, is this: a self imposed challenge can totally kickstart brand new thinking. It starts by breaking us free of our normal habits and gives us permission to forget about imagining the totality of the final result. Isn't that where the pressure usually starts? Making it about a challenge totally changes the goalposts. All we have to do is meet the challenge, we don't even necessarily have to be 'in the mood' to get started.

A lot of times a quilt series comes about because there are many more ideas than can fit into one quilt. In this case, there have been very few ideas, or why wouldn't the fabric have already been used up many years prior? With the Bramble Blooms QAL, we are attempting to prod our creativity awake. Within a guided Improv. setting, we are using all the artificial restrictions necessary to trick our brains into thinking 'This is easy, all I have to do is this one thing.' And then one thing after another, we have literally made a quilt top. Right? All out of previously overlooked, ignored and/or neglected fabrics. And it feels good, even if it might not be the most amazing thing ever made. 

I mean, maybe it is! I've seen some fantastic quilt tops over here. Definitely already picked up on a couple great ideas to keep in reserve!
Just start
Sometimes though, we just can't quite engage. That's when we have to purposefully activate our curiosity, however clumsy the attempt. By making this challenge a combination of series work, using less-than-precious fabrics, structuring the whole endeavor with a medallion layout, and leaving room for improv. opportunities, it somehow makes it all the more playful in my opinion. Series work gives us real opportunity to turn the page and start over. "See? That was just our first attempt!" Using older fabrics? We can hack into it and be less fearful about making some huge, catastrophic mistake plus, it often endues a quilt with a humble, comfy vibe. Then there's the medallion quilt layout--not everyone's favorite, but it's quite easily broken down into phases of starting and stopping.*whew! Sometimes it helps to back off and take a moment to breathe. 

And last, is the Improv. aspect--making things up as we go along. We love it and hate it. No doubt about it, the unpredictability of finished outcome is extremely difficult for many traditional quilt lovers. That's because we want our efforts to be worthwhile and not be a waste of time, money or resources. It isn't! Whatever the final outcome, we at least made it to quilt top stage with Bramble Blooms I. At this point, whether we realize it or not, most of us have unwittingly planted lots of little seeds for our own creativity. Just waiting for a chance to come into existence! Let's take our simple piecing and/or applique motifs, reframe them, and see what happens next, shall we?

GETTING STARTED WITH BBII:
The first prompt is to make a totally different style of centerpiece than the previous BBI quilt start. This one will be focusing on the pieced look rather than the applique.  Refer to your own BBI quilt and choose out one of the pieced elements to make a centerpiece for this second quilt in the series. My suggestion is to use the {corner of the border} quarter triangle blocks from the first border. If you included those. 

Whatever you choose for this pieced block, make sure it's an element with solid connections to your first quilt top in the series. You can make these blocks in the exact style and size as before, or change everything up, including the method or style by which you made them. Can make your centerpiece with as little as one block or as many as makes a decent sized centerpiece! Sashing is completely optional. The colors in this new centerpiece do not have to mimic the colors in the previous attempt at all.

Chunky improv. blocks
MY CENTERPIECE DECISIONS
As previously stated, I have deliberately chosen to stay in a similar color palette throughout the duration of the QAL. Overall, I'm intending to mix the colors up, back and forth, from centerpiece to centerpiece, border to border so all the quilts don't end up reading exactly the same. For this centerpiece, I started with mostly medium to dark colored fabrics and cut 12 improv. blocks ala Sujata Shah in 'Cultural Fusions' book. This is a stack method with free cutting. Needless to say, I got distracted, and cut the first set of blocks with the 'x' quite a bit wider than intended. Oops! 

1st Centerpiece
It shouldn't have been a big deal, I do love the chunky x block shape. The problem presented itself when I tried to lay them side by side without any sashing dividers. Yah. It looked like total mush! After playing around with the blocks for several days, I finally settled on the very light, cream colored, wide sashing strips as the solution. I so did not want to ditch these blocks! This cream floral is a tiny bit busy for the look I was aiming for, but I've been wanting to make use of it for years and years. It's quite lovely in person, but always seemed supremely unwilling to work in any other quilt I've attempted. Just finding a spot for it in this oddly large {at this point} centerpiece feels like a win! There's also part of a special fat quarter used; my mom brought it back from a visit to Georgia over 15 years ago. Just for me. Gotta love that!

2nd Centerpiece
Both of those 'wins' helped me feel better about the centerpiece as a whole, but it's definitely not what I set out to do. Nope. So weirdly proportioned to comfortably settle into centerpiece position. Whatever, I am not a quitter! haha
 
In an atypically extreme reaction, I set about to make a very simplistic block as my 2nd BBI centerpiece attempt. Only one. I've decided after much reflection, to have two BBII quilts on the go. One with too much centerpiece and the other with only the minimum required. That's actually why my fabric pull is so oddly arranged in case you were wondering! I've been playing with the stack, trying to think which fabrics should go into each of the BBII quilts or which might even overlap? Hopefully There's enough fabric to see it all through! 

REMINDER:
Don't forget that this is a guided Improv. QAL. All of the prompts are just that--prompts. Not rules and regulations. If your creativity sends you off in a different direction, by all means, please follow the mojo! Once again, this is intended to be a Medallion style quilt. If it helps to anticipate the bare bones of where we're headed, it will have two more borders--as before--give or take any coping borders. The first border will probably be piecing with possible applique. The second border will definitely ask for applique and also have some guidance for making a freestyle bias vine. If you don't want to include any applique, that's unequivocally your choice. I don't hardly know how to make a quilt without it,*sigh but I do get it! Also, it seems crazy to have to say, but... just because you joined in with the first quilt, doesn't mean there's any obligation to make all three in the series. Make 1, 2 or 3 or none. It's all good. Seriously. I'm doing this anyway!

ARE YOU CURIOUS?:
We never know when or how a spark might flare to life when it comes to exercises in creativity. It's perfectly reasonable to feel like we're soldiering through, just making the minimum effort. Then, at the oddest moment, something tugs at our conscious minds and demands attention. The quilt gets a little bossy. That's our instincts and intuition trying to speak up! Remember those seeds of creativity? It probably won't happen much at the start of a simple pieced centerpiece, but afterwards? What we do next will be about reacting to what came before. Series are about connections. Let's see what blossoms and takes shape with BBII! Will probably try to come back with the 1st border prompt by the end of June or first part of July. 

p.s. I'd totally promise that this quilt will look even better than BBI, but series are kinda odd ducks that way. Sometimes the last quilt is absolutely the best, sometimes it's the first, and other times it's one in the middle. We just never know. The one thing that I'm confident in, is the more we make space for creativity, the better our odds get at ending up with an incredible quilt. None of the effort is ever wasted though. We carry our experiences with us into future projects and you know what? That feels priceless.


Monday, March 4, 2024

2nd Border Prompt for Bramble Blooms QAL {BBI}

Are you ready for the next prompt in the Bramble Blooms QAL? So fascinating to have others along for the journey and see where people end up, even when we all start at exactly the same place! Life is full of interruptions around here as usual, especially now that my husband is feeling just good enough to be antsy, though still not quite good enough to be back at work. We're getting there! This post ended up being miles too long. Consider yourself warned. Just too much information that I keep thinking someone might need.

Back to the reason you dropped by today! For this specific phase of the BBI Medallion quilt, the challenge is as follows: Put together a border that includes adding 4-patch, 9-patch, 16-patch or even larger patchwork blocks. You can set your blocks side by side {continuous block layout} or 'on point'. This border can be any width you like. It does not need to have the patchwork blocks throughout--use as few or as many patch blocks as you think will look good! Totally up to you if the blocks are improv. style or traditional-look.

The first Bramble Blooms quilt top is done!
That's it. Now go forth and create! I deliberately used these style blocks as they are a simple, time honored use of unexciting fabrics and also, they adapt well to the make-do look. If you're wanting a little more information, maybe stick around for a walk-through of my own Bramble Blooms creative process. I'll attempt to thoroughly bore you and ultimately, share some border guidance tips and tricks as well. To be perfectly clear, I'll be happy with any and all of your quilts that deviate from the prompt. Your creativity should always supersede whatever guidelines I suggest throughout the duration of this series.

GETTING STARTED WITH BORDER #2:

Most of us started with a pre-determined fabric stack that we specifically set aside for BBI. At this point in the project, you'll probably be noticing a specific color in that stack that hasn't been used very much. Unless the quilt is adamantly demanding a specific color for the next go-round, try starting with the left-behind color {or colors}. You might not even have to spend a lot of time auditioning, as we know the fabric in the initial stack already looked relatively good together. All the remaining pieces have the potential to fit into this quilt somewhere. In fact, this could very well be your last opportunity to include it into the quilt.

Starting with the patchwork blocks
Now, you can dither for a while and possibly overcomplicate things, or you can just dive in and test out a couple patchwork blocks. For the purposes of this prompt, these are blocks made up of equal sized squares, usually sewn up in units of 4, 9, or 16, depending on what size the finished block is intended to be. 
 
I generally start with some basic questions such as: Do I want smallish blocks or larger ones? How many squares needed to make this block hold its own in the border? Is a 4-patch too simple? Can I make a 9-patch block work out properly in an on-point layout if I only use two colors? Hmm.. I'm not sure that I want to use every single color in the blocks. Will a 16-patch be too busy for this particular quilt? Do I want scrappy or something more controlled merely using two or three fabrics? And on and on. It's all very stream of consciousness and you'll find yourself automatically narrowing down your preferred look in no time at all. Don't worry if you don't have all the answers. Just go with your gut.

THINKING ABOUT MAKING AN 'ON-POINT' LAYOUT:

Eventually you find yourself with a tentative plan. For me, it was this: Scrappy look border using only 2-colors {pinks and creams} in the blocks, but many different fabrics. A 16-patch traditional cut block with a finished size of 8". On-point setting. Mixed fabrics in similar tones of rusty browns for the setting triangles. Still considering whether there is enough larger fabric pieces to cut out enough setting triangles. Might have to consider doing something else?  

A quick check in with the chart below {from my quilt book 'Great Sets' by Sharyn Craig} and I could see for sure that the diagonal measurements would work. No doubt your plan will be totally different, as it should be.

A helpful tip for determining a pleasing width for an on-point border: The blocks in the on-point border shouldn't be much larger than the width of your previous border. They can be smaller, that seems to look great. Any larger and the border tends to get a little awkward looking {proportion-wise} very quickly. Of course this is just an opinion, not a rule or anything! My decision to sew up 8" blocks means that I am making the patch blocks exactly the same width as the previous border. The diagonal measurement {using the on-point layout} will then be 11 3/8". It feels like a good balance to me, but of course your discriminating eye might want something totally different.
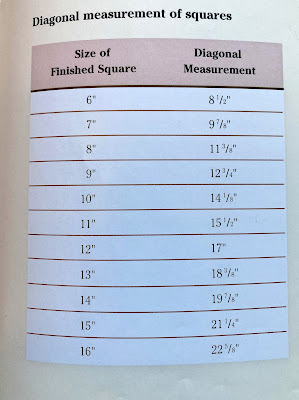
A quick chart for diagonal measurements
Armed with this knowledge and a tentative plan, I cut out and sewed up a handful of 16-patch blocks. Just enough to do a good, solid auditioning. You can absolutely cut out and sew up all the patchwork blocks you think are needed. Dive right on into the deep end if you're ready. Go for it! Sometimes that's what our instincts are shrieking at us to do--to have confidence and own it. 

Other times, we'll find ourselves with the feeling that hmm... ' I'm not sure yet. Maybe it would be good to leave space for those variables that might possibly need adjustment?' Listen to that. Do not ignore! Even if it's the smallest niggle. It invariably means that our subconscious has picked up on something that hasn't been quite realized yet. We still have to forge ahead in order to get anywhere, but maybe with a more cautious commitment. Often it simply takes auditioning the blocks. That's all. We have to actually see it with our eyes, not just our imagination, and then we'll be feeling confident in our choices once again. The plan is ON!
A quick chart for cutting setting triangles
If you've made up your mind to do the on point layout, reference the chart above for help with cutting out corner and/or setting triangles. I use it all the time. Or you can check out this blog post at Spruce Crafts for further information. No one should ever be afraid of an 'on point' layout.

If your fabric choices are running low from the ordinal BBI fabric stack? You clearly have to address that. Dig around in your stash fabric for more options. Don't shy away from expanding on the chosen color palette if needed, going lighter, darker or brighter. You might need to go shopping. Or, may I suggest deliberately making everything a bit scrappier? 

For instance, making the uncomplicated choice of adding corner triangles to all of the patch blocks, instead of only cutting out larger setting triangles, has a lot of advantages. These advantages include making the math easier by virtue of squaring up all of the blocks, being able to cut into much smaller {previously unusable} pieces of fabric, and not least, easily making a limited fabrics and/or color palette stretch even further. Giving your quilt more depth and interest. How? One seemingly out of place fabric looks very wrong, two--kind of questionable and three or more--like it was purposeful. Do the purposeful and 'make-do' like you mean it!
Starting to audition setting triangle fabrics & color
WHEN THE PLAN STARTS TO FALL APART:

If the plan starts to fall apart, like mine did, don't worry. Working improv. is a process full of seeds of inspiration. You just never how they will present themselves. We tend to look at our plan 'failing' as a problem needing a solution. In reality, it's our brains way of saying, 'Hey, something else might look a lot better!' It's our instincts kicking in. Many of us like to say, 'The quilt is talking to us'. Don't worry, it always lets you know before it's too late to make proper adjustments and it hardly ever yells.

In the case of my Bramble Blooms, it was the color choices that started looking wrong first. It just crept up on my awareness. Here I was, busy adding fabrics and 16-patch blocks to the design wall and then, the quilt started saying, 'Yuck! Things are starting to look really mushy. Why is my lovely applique border starting to disappear?'  Ugghh. Not gonna let that happen! Being me, {we all have our default}, I threw some dark fabric up on the wall between the borders. The thought was, 'Ok, that clearly defines the edges of both borders. Problem solved!' Right? {I'm all about the coping borders as a first run at fixing those borders arguments.}

If I was deeply invested in the on-point layout, there could have been new patch blocks made out of different colors and probably cream fabrics used for the setting triangles or whatever.  Any number of choices are possible at any given phase in a quilt. You gotta remember, there are normally always way more than one or two ways to resolve things in a satisfactorily manner. It's not like you're trying to find a single grain of brown rice in a bag full of white rice.
Maybe a coping border will make it all better

CONSIDERING MAKING A CONTINUOUS PATCH-BLOCK LAYOUT: 

On to the continuous block layout. Because why not? It might have been in your plan from the beginning, but I just sort of stumbled on it for my own Bramble Blooms. I admit to being fairly tunnel-visioned about using the on-point layout. At first. It just seemed obvious that it had the potential for infinitely more room to use the leftover pink, cream and rusty brown fabrics in my stack. Sometimes we get an idea in our head and it crowds out any other thinking. Don't mistake what I'm trying to get across here. That resolved version {with the inclusion of the darker coping fabric} would probably have resulted in a satisfactory looking quilt. It wasn't wrong

Still, the prompt did mention two options. Of course I was curious! I went ahead and auditioned the patchwork blocks the other way--in a continuous border formation. Uh oh. No one was more surprised than me. The whole quilt lightened up and gave me the sort of instant warm glow that makes my heart feel all warm and fuzzy. Darn it. Cannot ignore the warm and fuzzies no matter how much I wanted the on-point layout!
This layout is the one for me afterall
And that's exactly how good, personal-to-you changes happen. You just switch plans midstream because the quilt has spoken. And it speaks to your heart. In order to make the 16-patch block border fit properly to the larger quilt, I only needed to add a single extra row {not a full block} on the left and right side borders. This made it possible for the cornerstone blocks to fit exactly in pattern with the every-other pink/cream patchwork look. See the picture below? Ta da! It seemed serendipitous. Always a great feeling.
Looking at the corner blocks in the correct pattern formation
It was a simple matter to measure the outsides of the quilt and count out how many more blocks were needed. Then I took a few minutes to mourn the lack of using the rusty, tan fabrics in the stack and second guess myself. Is this really how I wanted to continue? Which very quickly led to a lightbulb switching on. Hmm...  How about cutting out and sewing up similar, but darker, cornerstone patchwork blocks? 
And then I looked at them like this...
Which is how those came to be. As you can see, the red in the cornerstone blocks is much more distinctive looking than the lighter pink and ties back into the centerpiece very nicely too. I loved the red squares echoing the X lines from the previous border, a very unexpected result. Once I noticed that, I couldn't 'unsee' it. Uh oh. How to get the pattern to work out properly in the border surround?
The close-up view of the cornerstones 
As you can see from the close-up picture above, there is an odd, awkward looking area where the dark red squares meet up with the lighter colored pink ones. The pattern is interrupted for sure. I could have perhaps flipped the borders on the top and bottom, but do I honestly care? 

The weighted look to the corners just make me happy for what it does for this particular quilt. It doesn't have to make sense to anyone else! The echo of the X blocks there in the corners, subtly creates energy and encourages the eye to move around the quilt. I also like how the pink squares form a diagonal line across the corners of the quilt, at the juncture of those corner blocks. Is there any part of this look/feel/vibe that I am willing to give up in order to 'abide by the plan or stick with the pattern formation'? This is what improv. does for us. It frees us from the have to's and gives us permission to think outside of the box. Be curious. Let yourself be surprised!
The completed BBI quilt!
Okay, here's all the tips and tricks you've been searching the post for. Hopefully one of these suggestions will resolve an issue for you and your quilt.

TIPS FOR FITTING A CONTINUOUS PATCHWORK-BLOCK BORDER TO THE QUILT:

Improv. comes with its own challenges and one of them is making new border lengths fit to odd quilt measurements. Do not be discouraged. There are several different ways this disparity can easily be overcome. For the best fitting borders, always measure the sides of your quilt and plan on attaching a border in the same exact size, pinning well before sewing together. 
  • Add an extra row {or two} onto the length of a short border. Does not have to be the full size of a block.
  • Remove an extra row {or two} from the length of the too-long border. Does not have to be the full size of a block.
  • If the border length measurement is too long to match up with your quilt, by less than the width of a single square in a patchwork block, go back and sew some extra large seams. Spread it out over the length of the border--doing it to several seams. Don't sew the extra large seams side by side or the 'fix-it' will be a little more obvious. Usually moving the needle over one or two spots will be enough to take up the extra length necessary. Keep measuring your border until the length has been corrected.
  • Can easily split the difference if the overage on a border length is only 1/4" or less. Trim 1/8" {or less} off of each end of the border length. Nobody will even notice.
  • If perhaps the border length is 1/4" too short, simply pin the quilt and border together at the middle points and gently stretch to make up the difference. Warning: Anything more and you're likely to have a wavy border and a sloppy looking quilt!
  • Add precisely measured Coping Borders to make your patchwork block border fit perfectly. A little more work, but sometimes it feels important. See tutorial here for guidance with that.
*****************************************

TIPS FOR FITTING AN 'ON-POINT' PATCHWORK-BLOCK BORDER TO THE QUILT:

These are similar to the tips that were given in the first border challenge, but I will list them here for continuity:
  • Sew an extra block to a border of pieced blocks and chop off the extra. Very utilitarian
  • Add little narrow strips of fabric between each pieced block to stretch the row in order to make the length fit with the quilt. Add wider or narrower strips at the very ends of the pieced blocks, as needed, to finish up and get to the correct border length.
  • Deliberately piece less blocks than needed. Add on extra fabric at both ends of the border length until you have the correct length.
  • Make quite a few less pieced blocks than necessary, then arrange them tight together at one side of each border, say at the left side of each border moving around the centerpiece. Sew on a long piece of fabric to only one side of the blocks, making up the extra till it fits the centerpiece measurement. Do this similarly for every border length. There will be pieced blocks on every side of the quilt, but the arrangement will convey a certain symmetry.
  • Sew all of your blocks in a row {per border side}. Then add in a precisely measured coping border cut for the express purpose of fitting perfectly between the centerpiece and your newly pieced border length. See this tutorial for guidance with that.
JUST A COUPLE MORE PICS FOR THE VISUAL LEARNERS:
When the on-point blocks have corner triangles
Sometimes the on-point border layout is easier to play with if you can add corner triangles to the patchwork blocks, instead of trying to wrangle large setting triangles. The square-in-a-square blocks are just easier to move around and find a 'make-do' solution if/when the quilt measurements aren't being particularly cooperative. If you feel uncomfortable with these make-do solutions, that's okay. We're all wired differently! Just be prepared to do a lot more math and pre-planning before you end up with a finished quilt top. 

The cool thing about improv. is that it's wonderfully receptive to 'fix-it' solutions. Consider it a 'work around' for dealing with the side effects of flying by the seat of our pants. The more of it you attempt to do, the easier it is to find the coping strategies that make sense with the way your exceptional brain works. As long as your quilt lays flat and you're satisfied with the look? Who cares about the details?
Another border idea
Along with the tips and tricks mentioned above, a 'mirrored' block arrangement can often be a really fast and easy solution to the on-point border arrangement.--for those times when you don't want to spend time figuring out the math for setting triangles. It's not cheating, it's improv.! And it doesn't take very many blocks set 'on-point' to give the quilt the same kind of energy. 

It usually looks better to arrange blocks in unequal amounts per corner. In the picture above, there are two blocks on top and three at the left side, not counting the corner block.  With this arrangement, I would add fabric to finish out the needed length of the border, keeping the pieced blocks relatively spare. You can repeat this look at the lower bottom right of the quilt only, {reversing the unequal block positions as to sides for the mirror}. OR you could do every single corner. An arrangement like this definitely needs to be auditioned, as it can make all the difference in the world where the last block falls alongside the previous border. 
So happy with the cozy look to this
WRAPPING IT UP:

Okay, that's it. Let's go get creative! This will be the end of the prompts for Bramble Blooms I quilt. Getting this top together will hopefully give a better idea of how the process will work with Bramble Blooms II as well. This first quilt sets the tone for rest of the series. It establishes a common color palette and/or elements that we will change up and tweak here or there as we move along on our adventure together. 

The idea is that we start with a base of ideas and let our innate creativity expand, flourish and grow from that particular place. As each quilt progresses, we will try to push a little bit more, drawing from our well of experience with the previous Bramble Blooms {whether the experience feels successful or not}. We will probably not LOVE every single quilt that we make in the series, but hopefully we will end up with at least one quilt that rocks our foundations. Wowsers, did I really make that? Out of a stack of fabric that I'd grown so tired of? 

Wrapping this us, please remember that this is YOUR quilt. If you feel that it needs another border or two, then absolutely feel free to continue on with your journey.  Look for a Link Party for all the completed Bramble Blooms quilt tops towards the end of April. Shortly after that post will be the start of Bramble Bloom II. Looking forward to seeing all of your wonderful progress!

Friday, November 3, 2023

Bramble Blooms QAL--The Applique Centerpiece

Are you ready for the next BBI QAL prompt? It's pretty much what you'd expect: Add simple floral applique to your centerpiece background. That's it. Easy peasy! There are a couple options here. No doubt there are patterns at home you can browse through to borrow applique elements for this exercise. Or, you can do something much more fun and interesting. Learn how to implement it in a freehand, free-spirited way! Whatever you do, try to keep the final applique relatively uncomplicated so as to not spend unnecessary hours attempting to get the pieces sewn down. We want this stage to be finished up in approximately a month or so--six weeks if the holidays interfere too much. 

Also, keep in mind that this is the first element being adding for the purposes of series work. Make sure it's something you might be interested in expanding on, repeating, or playing with in a slight revision. I am assuming you have, at the very least, a rudimentary knowledge in basic applique skills or are interested in pursuing the details on your own.

If you think that I'm being a bit bossy about the applique having to be 'floral', let me explain. This is not a 'mystery' QAL per se, it's much more of a nudge toward getting comfortable with improvised quilt-making. By narrowing the choices, it's serving to provide gentle guiderails for the less experienced. Trying something new and out of our comfort zone can be a bit terrifying. Our mind often reacts with stress and/or complete overwhelm. When I suggest make something with a 'floral' look, then it immediately eliminates literally thousands of ideas you don't even have to contemplate anymore.

Neglecting to give you the blueprint for this quilt isn't me being difficult. This is me helping you learn how to be open to the process of figuring out what might come next--after this phase is totally finished up. Then you can more readily {and organically} react to what came before. I don't want to enable anyone to plan too far in advance! Also, floral applique is a rather lovely way to find that cozy, comfy feel so many of us seem to admire and aspire to. Lets get to it, shall we?

Example of some of my applique doodles
The definition of Improvisation {Improv.} according to Wiki: The activity of making do or doing something not planned beforehand; using whatever can be found. 

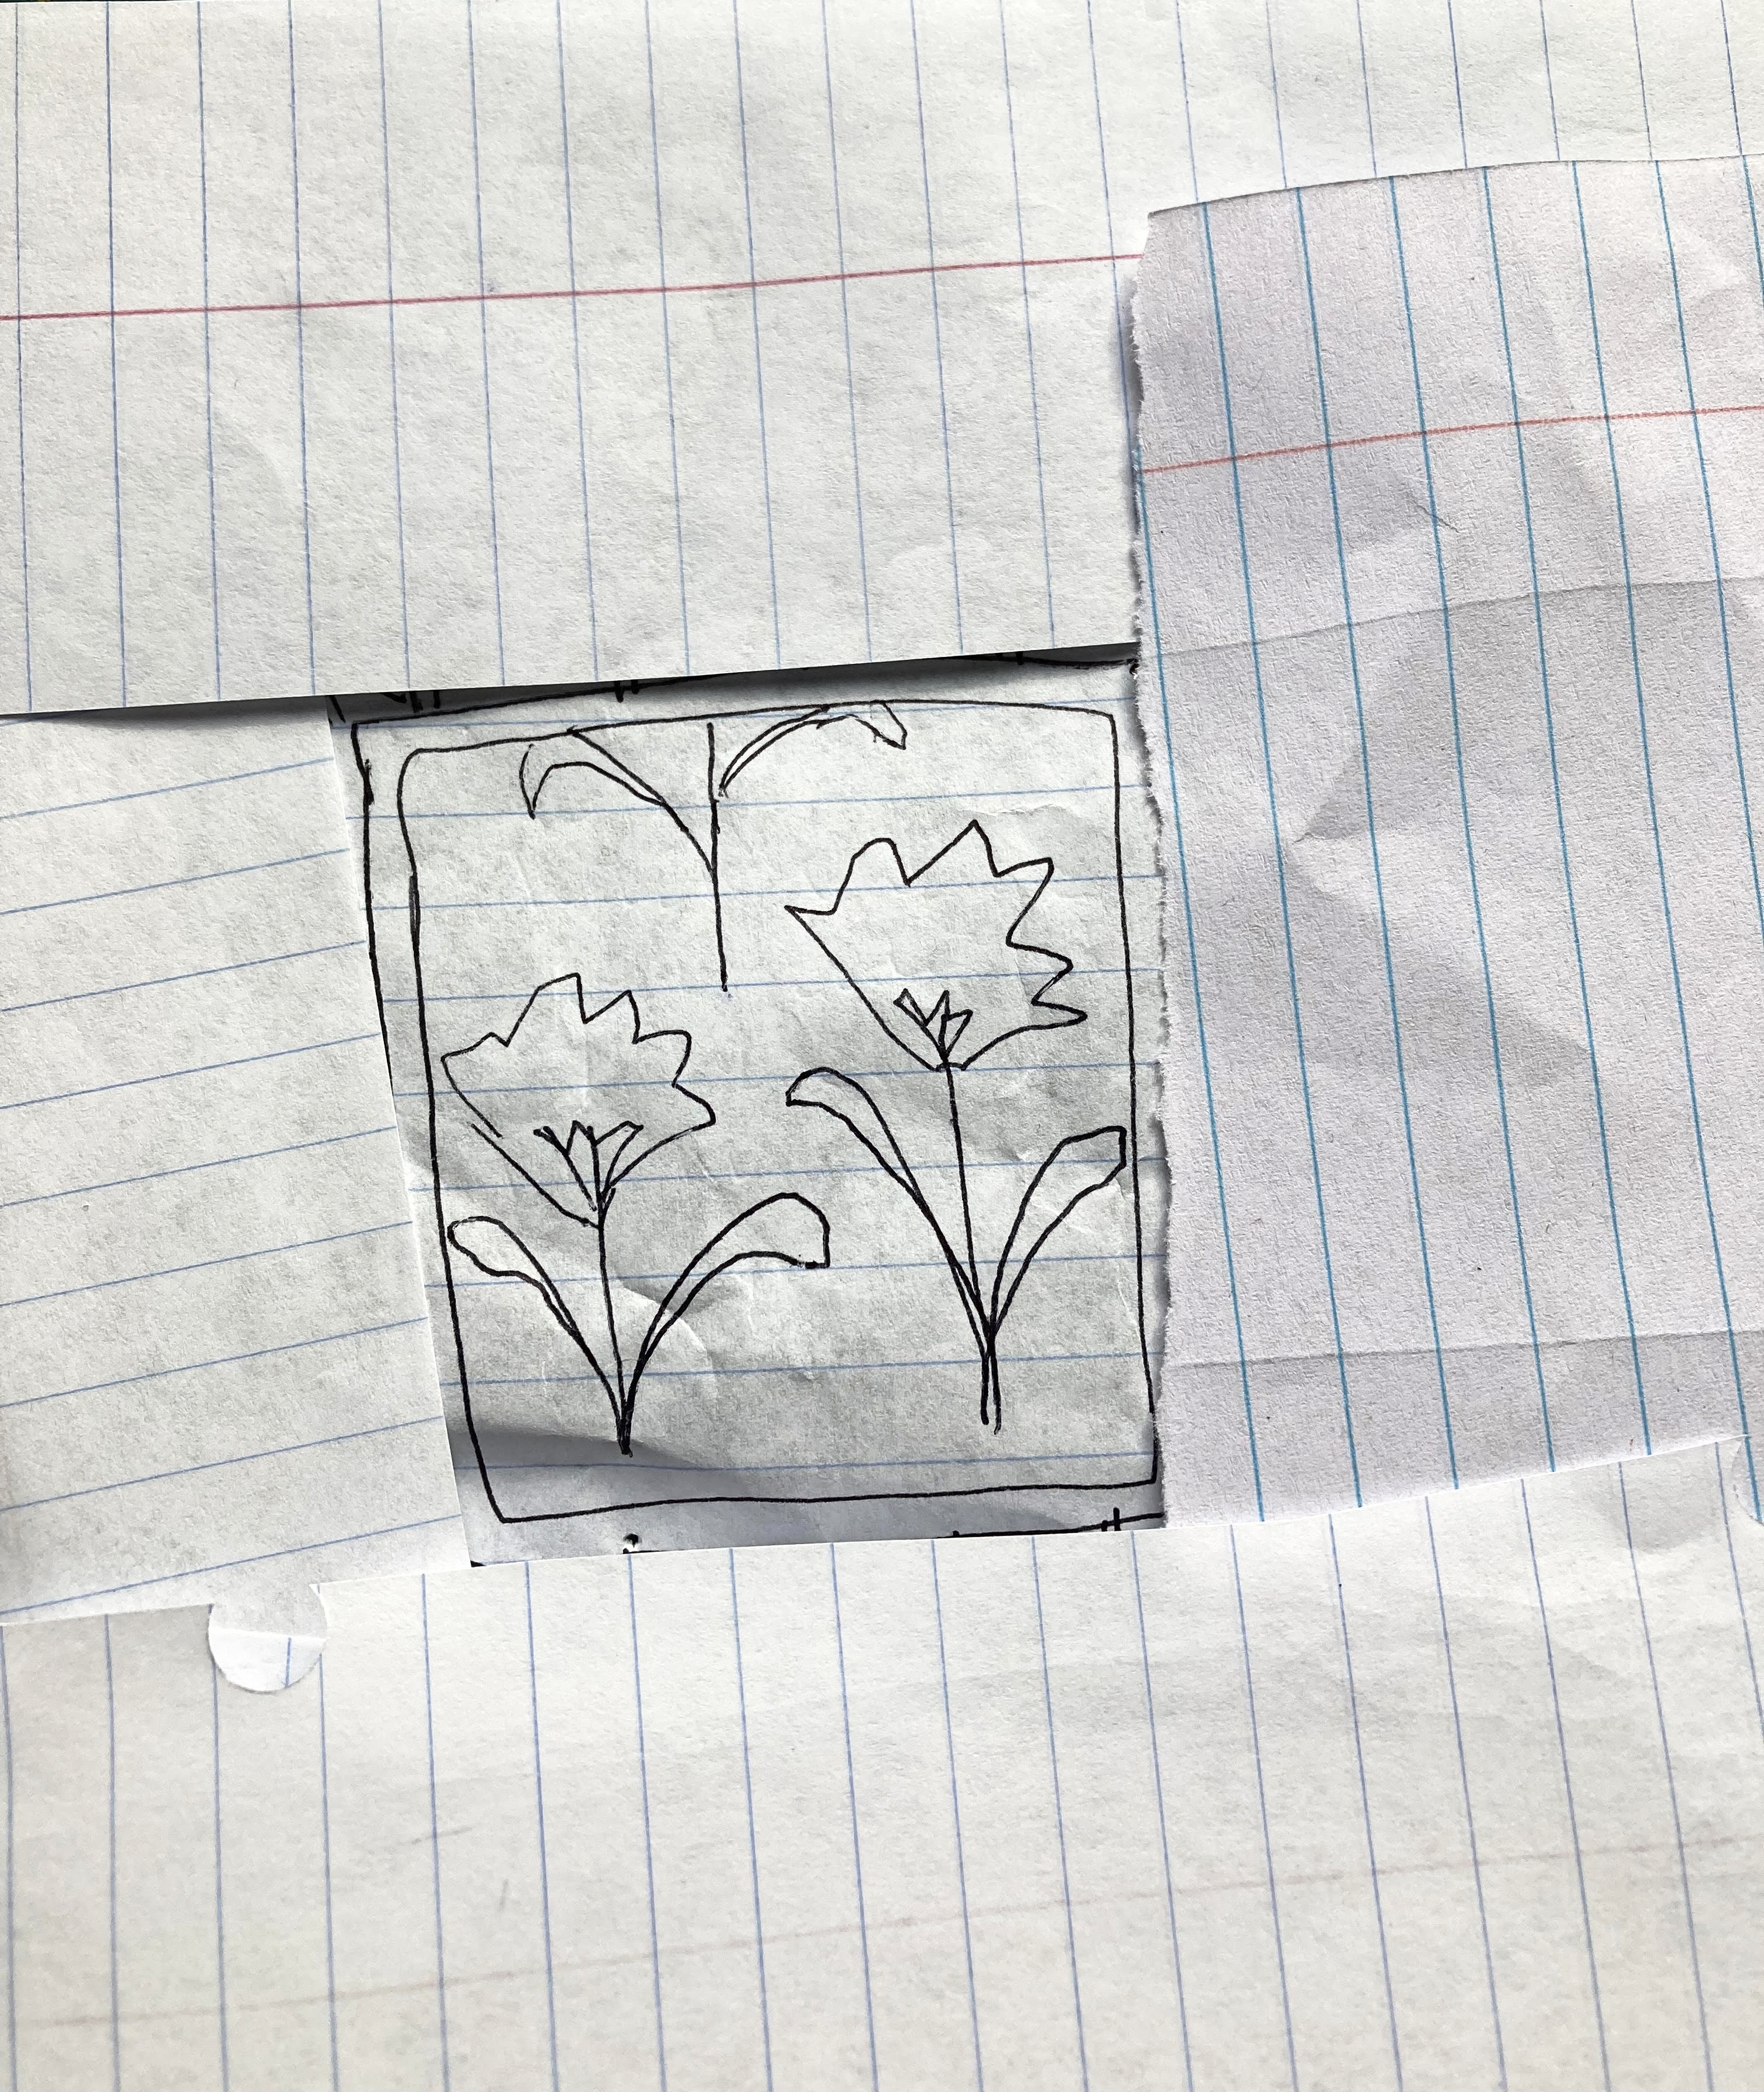
So... Freehand Applique? Any takers? I'll walk you through the steps of how this happens over here at Quilty Folk. Often, the very first thing I do is get out a notebook and start doodling. No, I'm not a trained artist. However, there is something really fascinating about the way the brain communicates with our hands. It's important to trust this instinctive thing that helps give us a visual to our thoughts. With barely any practice, you'll be able to draw up wispy little doodles of the ideas and elements percolating in your very own head. After making this a regular habit, you'll be able to do this quite unforced. 

You're the only one who thinks like YOU do, so it makes sense that these drawings will most reflect that--no matter how naive or primitive they might initially appear. If you're having trouble conjuring up ideas, maybe browse through quilt books, quilt magazines or even Pinterest. I personally find antique quilts to be some of the very best inspiration!

This is the one that gets to shine this time
Choose out the favorite drawing to turn into a quilt or perhaps a portion of a quilt--in this instance the center of a medallion quilt. Now it's time to somehow make these little doodle shapes become the right size and proportion needed! It's not nearly as difficult or scary as you might think.

Free Cutting Applique Shapes: At times, it's easiest to pick up a pair of scissors and just start free cutting. Use scissors and do that mind/hand thing just like you did with the doodling. Uh huh. You'll be surprised at some of the results, especially if the intended outcome is a simplistic shape. I have massacred many a stack of fabric scraps in pursuit of the perfect leaf, berry or flower! And it's easier than you think once you get the hang of it. 

Free cut leaves can be cut straight from random widths/lengths of rectangular sized scraps and berries are super easy to cut from rough cut squares. No, they won't be exactly identical to other elements in the quilt, but the shape will be similar and the human touch will definitely shine through. Flowers are a bit more complicated, but with practice comes a lot of interest and personality. Don't practice on your 'good' fabric unless you have a lot of it and don't particularly care about waste. And don't be surprised when your scrap bin leaves end up finding a place in your quilt after all. They can be fairly charming at times!


Trying to figure out proportion
Making Paper Applique Templates: The other method that I use quite a lot is to cut paper templates first--before cutting and/or wasting good fabrics. Can you tell that my frugal side takes over sometimes? Referring to your doodle picture, {I'm using notebook paper primarily as it's cheap and the lines can be helpful}, draw each individual shape over and over until you get something decent. Surprisingly, this CAN happen as you're only copying at this point. I promise it gets easier and easier with practice, and eventually you'll get to the point of only having to draw a shape one to three times before getting it right!

If it's a tricky shape {or a larger size} and you're worried about proper proportion, here's a good tip. Cut out paper squares, rectangles etc. in the approximate, intended size and place them onto the made background fabric. Step back from your design wall or floor and take a look. Keep going until you think the proportions are within the desired range, then try drawing the wanted {planned} shape onto those same papers. You're still copying a pre-determined shape, but now you have a box to keep it inside of. Sometimes that feels helpful and other times can be annoying. You'll want to take the papers off of the background of course, before drawing. For very large sizes, I've used everything from freezer paper, butcher paper, light weight cardboard and even the back of gridded Christmas paper! 
Drawing, cutting and more drawing
When there is finally a shape that seems satisfactory, go ahead and cut it out in paper shape. Don't worry about seam allowances at this point! Also, remember that this shape doesn't have to be identical to the one in your doodle. In repeated drawings, your hand/mind connection will make constant little adjustments and revisions to make it ever more pleasing to your discriminating eye.

 Place all the shapes onto the background fabric in as close to the right spot as possible. Move shapes side to side and up and down until everything looks fine. Be sure to step back and look at it with some distance too. Sometimes there will be a small adjustment needed that's not immediately obvious when looking at close range.

The paper template audition
If certain shapes are bothering you {for whatever reason} then it might be necessary to make small tweaks to them. Use your scissors judiciously at this point. Sometimes it's better to keep a shape that almost works than permanently ruin any hope of ever achieving it again! If something needs to be made a little bit larger or smaller, then washi tape might be your friend. Extra paper can be added behind to stretch a design, careful folds can be introduced, another triangle can be taped into just the right place.... Play until you can relax and smile or take a break and come back later with fresh eyes.

Making adjustments to paper templates
Choosing fabric for applique: Probably want to get your fabric choices sorted first. For a centerpiece in a medallion style quilt, look for slightly bolder, darker, brighter or perhaps lighter fabric blendings than might be used in the rest of the quilt. Doesn't have to be more than a degree or two, but you want these applique elements to 'pop'. You want them to matter. Using all medium value prints just won't pull off enough of a look-at-me vibe here in this spot! Look through your fabric stack and deliberately use value changes to your advantage. Might be a good idea to dig deeper in the stash if there seems to be any lack. 

Occasionally a fabric will seem to be way too obnoxious to be added into a marinating stack of fabric, but will work really, really well here. I often lay fabric options right over the top of those paper shapes still resting against the background fabric. You can kind of scrunch the fabrics around or fold them into smaller pieces to get an idea of how they might look in the proportionate size.

I much prefer the scrappy look for applique. Lots of different fabric use for leaves and flowers especially as I love the subtlety of 'similar but different' and the opportunity for highlighting minor value changes. It can effortlessly add lots of spark, energy and soul to a quilt by mixing things up. In this case I used three different fabrics for the stems. If the quilt seems to need specific areas of calm, then try a single-fabric use for all the stems or whichever element needs to be more in the background.

The method for which you intend to apply your applique might determine the fabric you choose for applique too. Many people will recommend using Batik fabrics as they are very resistant to fraying. Ughh. They are horrible to hand sew. Don't use painted on fabrics either unless you are applying your applique by machine. Soft, supple fabrics, upcycled fabrics, wovens--all of these will feel and handle ridiculously better if sewing by hand, and the time spent stitching will be cut in half.

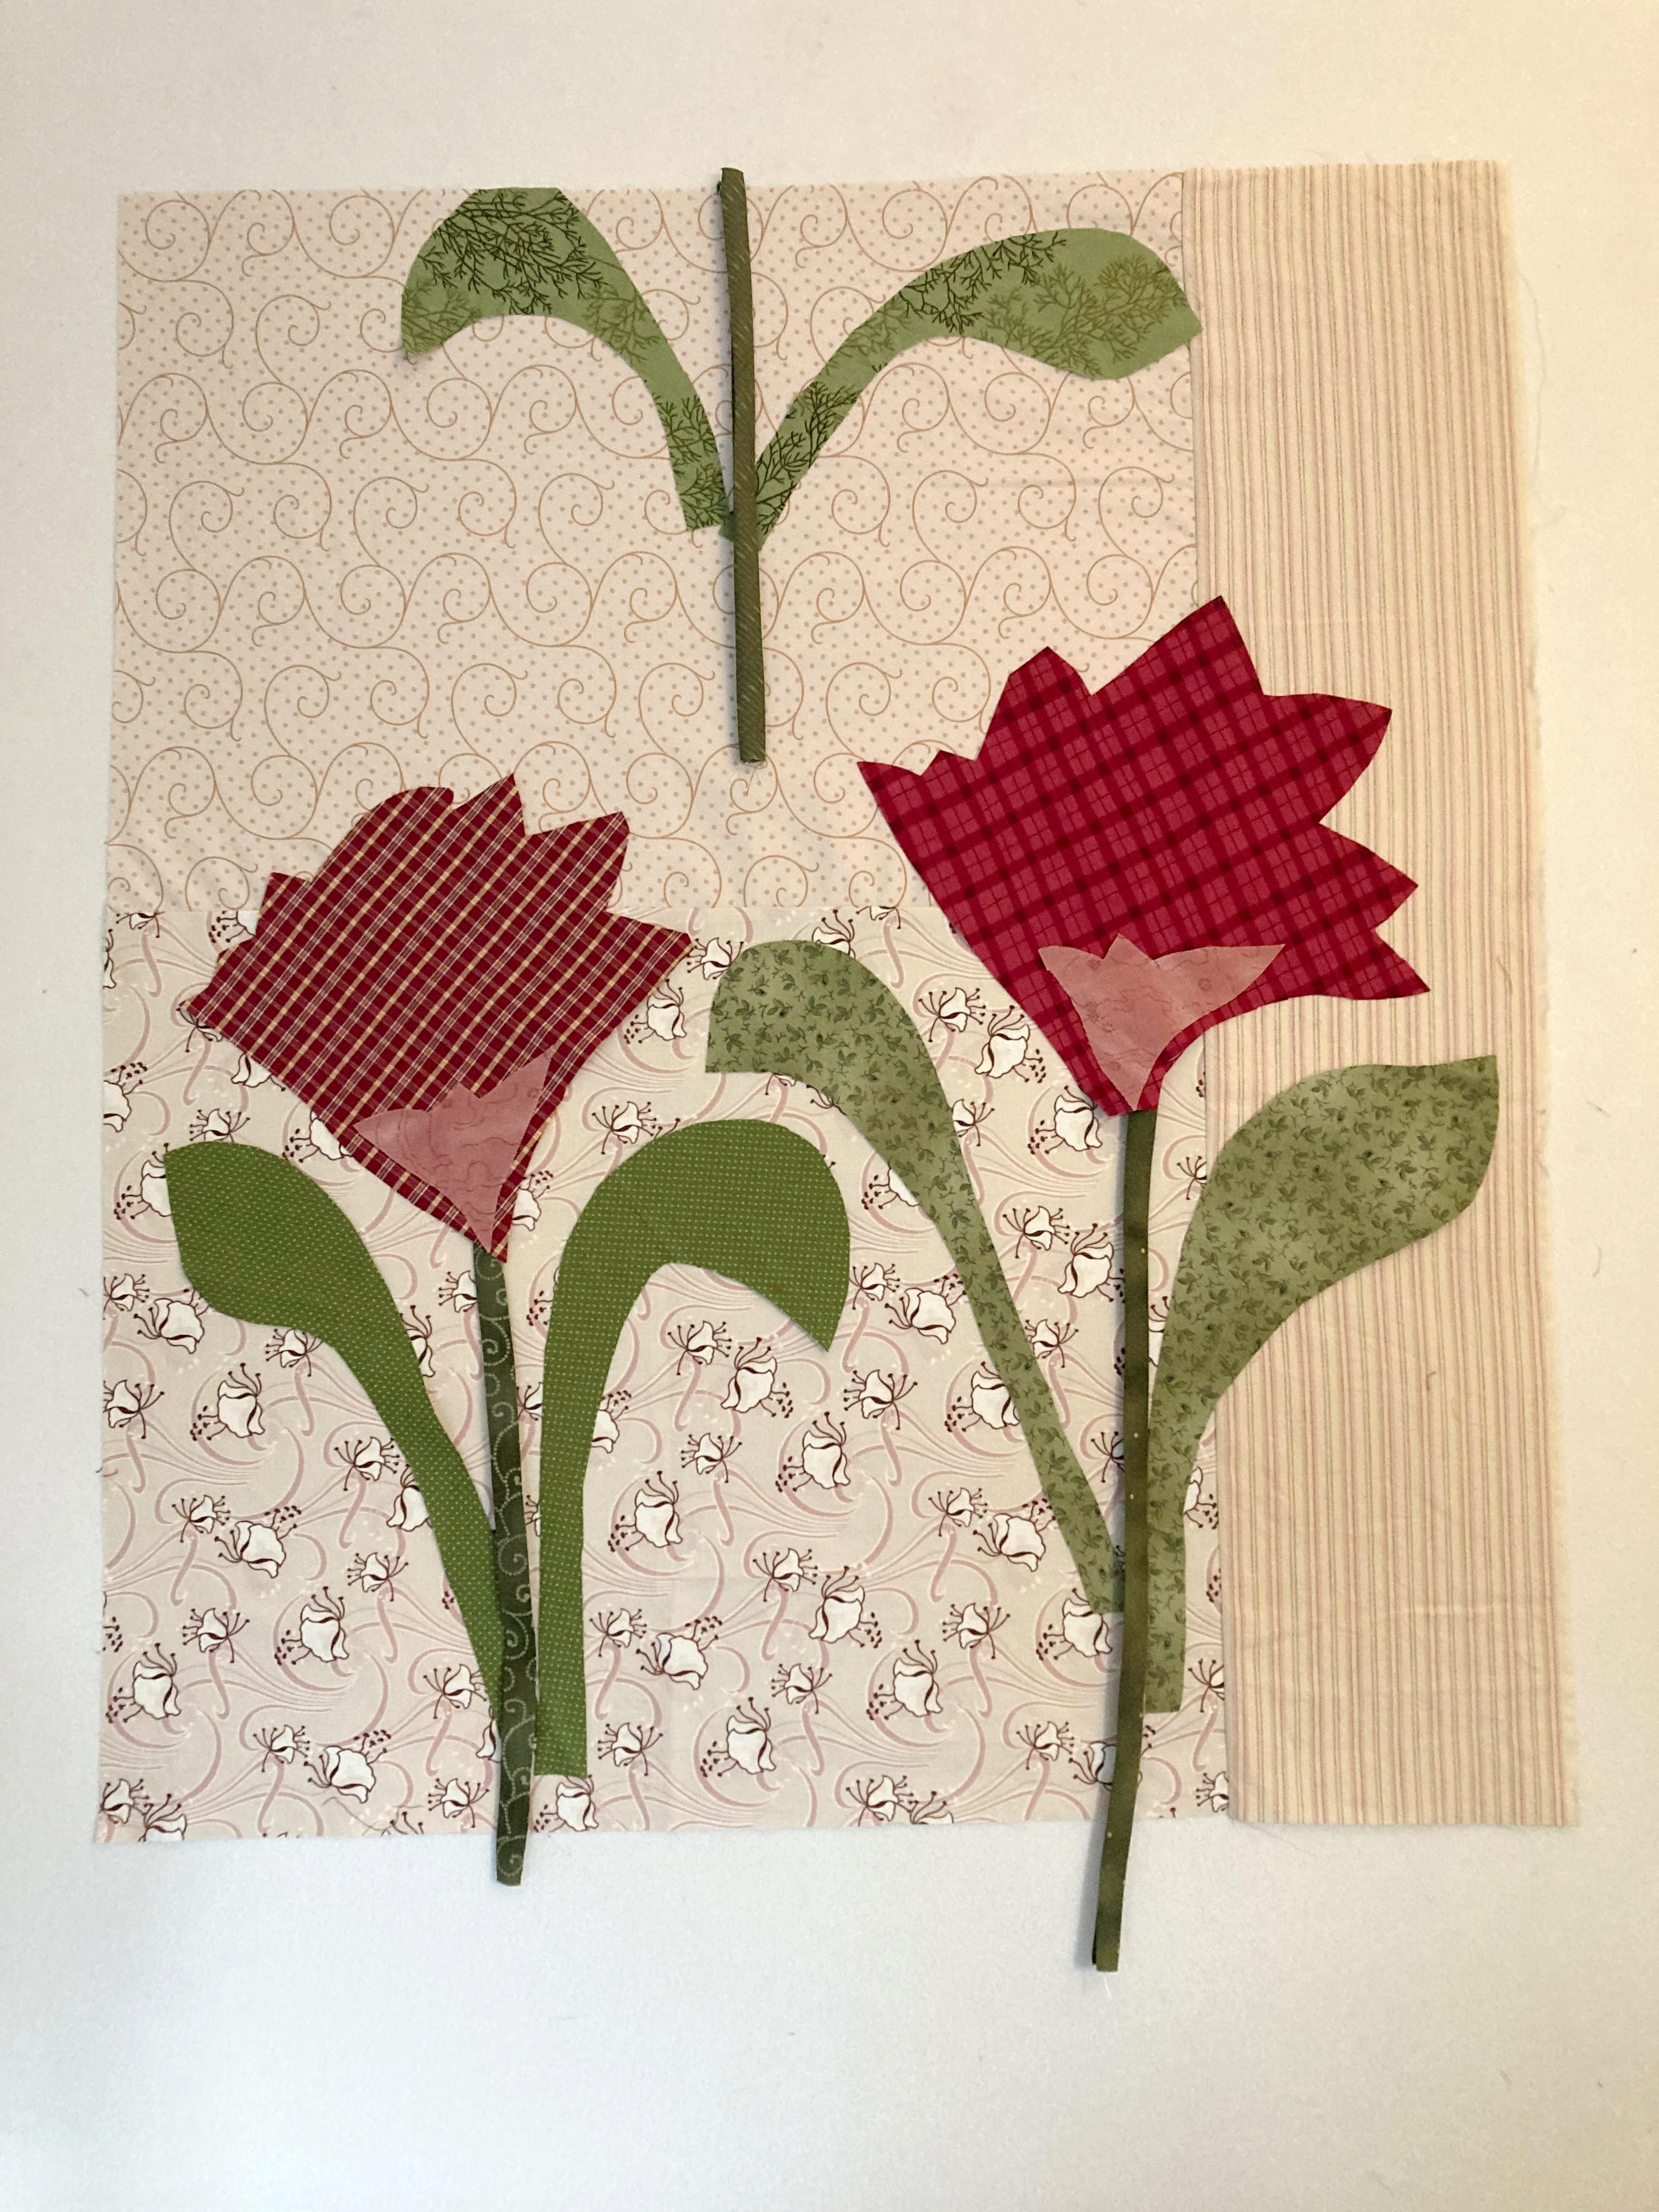
In the picture below, you can see my first choice fabrics cut out in the designated applique shapes and sort of thrown onto the background fabric. All of these are cut out with a seam allowance included, so of course after sewing, they will shrink slightly in appearance.
Getting the shapes cut out into fabric
Three common methods to transfer paper shapes onto fabric:
Draw your paper shapes directly onto the backside of the chosen fabric {ball point pen is perfectly fine} and cut out, adding a scant quarter inch extra for seam allowance. Remember to use the reverse side of the template when marking the template lines so the applique shape will present the right way!

Another common way to transfer the template is to draw the paper cut-out shape onto the top of freezer paper {dull side}. Cut freezer paper out exactly at the marked lines and then iron over the top of the appropriate fabric. Don't slide the iron back and forth, but try to cover the shape with the iron and hold still for a moment. Pick up and move the iron again if needed. When the freezer paper is sticking to the fabric, then you can cut out your fabric shapes, once again adding the scant quarter inch extra for seam allowance. Gently peal off the freezer paper and use over and over again, if necessary.

The third way to transfer a paper template, is to draw the paper shapes directly onto what's called 'template plastic ' sold in sheets at JoAnn Fabrics etc. Carefully cut out your new, more long-lasting templates and proceed the same as with the paper templates.

Option of smoothing the look of applique
You can simplify applique shapes: Occasionally you will find that an applique template is just the right size and proportion, but maybe a little too complicated for your skill level. Or maybe it's going too take up time spent sewing that you're not wanting to commit to at the moment. Perhaps you want a naive, prim look. It's easy enough to smooth out the sharp, trickier edges with a pair of scissors, either directly on the paper template or the cut-out fabric shape itself. This goes for applique templates you've borrowed from other patterns, or even ones you've made yourself. There is no shame in simplifying the look of any applique design. In fact, altering templates in this way can serve to heighten a cozy vibe or quickly personalize a look.

Fine tuning the applique representation before sewing: In the picture below, I still haven't positioned or pinned things in the exact spot for sewing. Before doing that, I often take a deeper look. Is it doing what I want or need it to do? Matching up to what I had envisioned in my head?  Here, I was questioning the look of that first flower stem fabric, which I still didn't like. You probably didn't notice, but this is my 2nd choice fabric. Sometimes you have to actually see it cut out in the true size, then place it in the intended spot, before you say 'meh!. That won't work either.'*sigh  In this case, I went back to the first choice and called it good.

Looking at a stem in different fabric
Making Simple Straight Grain Stems: My basic rule of thumb for making straight grain stems is to cut out the intended width x 2, plus a quarter inch extra. These particular stems ended up being cut out at 1 1/4" x whatever length was needed. Each long, rectangular fabric unit is then folded in half with wrong sides together. Sew those wrong sides together with a very scant seam {move your needle over if possible}. Next, iron the thin tubes of fabric flat, making sure the seam ends up in the middle of the back side. 

You can skip this step and cut out stems with seam allowance only {like how you sew flower shapes etc.}. The trouble is, inevitably, long straight applique pieces want to ripple and warple even with good pinning. Sewing a tube of fabric helps stabilize things and give off a sharper appearance. I will endeavor to explain a simple method for making bias stems at a later date.
Figuring out how add another color
Letting your intuition do its thing: Improv. works best when you pay attention to the little niggle of feeling that says 'You know, this could probably look a lot better'. It's not usually some majorly complicated thing. Many times, in fact, it's a relatively easy fix that involves more of something or less of something. Perhaps one of the elements simply wants for a slight value change or hmmm.. a completely different color or print of fabric used altogether? Tiny adjustments can have a big impact. Play a little but don't ever think you have to start completely from scratch. If you're willing to cut up a little bit of fabric, do a little 'trial and error', you'll no doubt find the answer.

As to my centerpiece, a bit of contemplation helped me understand that the overall look was clearly too bland. It needed a spark to lift the look. Rifling through my fabric stack didn't conjure up anything exciting, and so back to the stash totes I went for inspiration. Finally, I pulled out this much lighter, kind of blue-ish green fabric that didn't feel specially complementary to the original fabric pull. Funny how it seems to work fabulously in this setting though! In the picture above, you can see where I cut out little triangles and tried placing them at the base of each flower. Hmmm... that's better, but still not quite right. What else could I do?
Finally getting the look I want

I left the composition up on the wall and ignored it for the evening. Much, much later in the night, the thought casually popped into my head that many natural flowers have little, barely-there leaves up near the base of a flower. Replicating that look could hopefully {fingers crossed} make a little, much needed sort of magic start happening. Just a miniscule addition and now the whole thing resonates incredibly better. 
Playing with minute changes to an applique element
Another thing you might have noticed that I tinkered with, was the pink motif at the base of the flowers. I kept cutting out slightly different, but similar shapes until finding the ones that had the just the right energy. One of the shapes was basically the same size/shape, only in reverse! Such a simple thing, but it helps to keep playing until a quilt says 'enough'! And there is definitely a time to stop and move on. No sense in driving yourself crazy!

When everything looks just right color-wise and design-wise, then it's time to position the applique exactly where it needs sewing. Pin in place and stitch the bottom layer first, then the next layer, and so on till it's all finished. 
BBI templates all ready to go
Feel free to apply the applique to your quilt in any manner you like, be it hand sewing or machine sewing. I use a form of needle-turn applique as I love the slight imperfections that seem to organically happen, but you do you. Lots of good tutorials and options floating around on the Internet these days. Also, I have the templates converted to pdf's for anyone who doesn't have the time or energies to dive into Freehand Applique right at the moment. Please request these in my email at audkateaster at gmail dot com, NOT in the comment section. This QAL is generally free to all, but I respectfully ask that you consider dropping a couple dollars in the tip jar if you are specifically wanting the pdf's. Hopefully this will be set up by next week if my un-techy self can figure things out!

Yes, it's a rather lengthy post about the process of Improv. when it comes to applique play. It's kind of my passion! Such a wonderful way to add lots of personalization and the also the charming benefits of the human touch to our makes. You did want to know how to do things the 'Quilty Folk' way, right? 

Next up {after some normal quilty posts}, will be another prompt in the QAL. Which incidentally, is the first border to our medallion design. For those just joining up, please send an email when you have posted your start to this QAL. That email is the only way I will add you to the link list of participants. If you're not especially interested in being included in the link list, but want to follow along with the QAL regardless, that's perfectly fine too. I get it! Stepping outside of our comfort zone and sharing our work at the same time can probably feel somewhat brutal. Ughh  Don't know how many times I've winced when pressing the 'publish' button. As per usual, sometimes I'll need a couple days to respond. 

**There are still comments on posts where I am unable to link back to the person or specific blog. Sharon from Pflugerville and Chel Smith from Texas--Sorry, I don't have a way to contact either of you. Please email if you want to join the link list. Sorry, don't have a clue how to make the commenting easier for everyone without opening the blog up to mountains of spam.