Showing posts with label Playing With Scale #2. Show all posts

Saturday, December 14, 2019

Finishing Up the Last Minute Christmas Makes Was Great Fun

Well, here it is! Playing with Scale #2 is a true blue finish. It's been hanging around for awhile, just waiting on the binding stitches. While hand quilting this one, I decided to gift it to our oldest granddaughter. This seems to have a happy, youthful vibe plus it will match with the decor in her bedroom. Not that it matters to me, but it will probably make her mama happy!
Playing With Scale #2 is finished!
It's large enough that she should be able to use it for years and years too. Personally I have a fondness for quilts that will grow with children. My own children very much cherished the ones given to them by me and others, when they were little. By the time they were old enough for a change, those quilts were often faded and many times mended. Three times is the charm. Time to put them up for good!

I have been stressing over making a princess quilt or something equally appealing to this sweet little charmer, but never felt any major inspiration strike. Finally, I tried to look at it from the position of just being gifted a quilt 'from grandma'. Okay, that works too! She's only four. I could probably make her a frog quilt and she would be delighted, she's just that easy.

So glad I added the applique flowers.
I have to say that it was an absolute joy to hand quilt this particular quilt. No pressure whatsoever, no marking, and no thinking really, except for whichever thread I had picked out for each specific area. Love that so much! It makes me realize that I need to keep making scrappy, improv. quilts to mix in with the other more ordered quilts that I make, even if just for the hand quilting love.
The hand quilting really added to the quilt....
It was difficult to get proper pictures with the winter light being so variable these days. I actually had to get the quilt out for two different settings because so many pictures were just too dark the first time around. Now there's a Christmas tree right in the middle of the best-lighting-in-the-house, so pictures are going to be getting more and more problematic until the end of the month.
Love the vintage fabric addition {in green}
Not quite sure when this quilt was actually started, but it's not been much more than a year. The entire quilt was started based on an AHIQ challenge, Playing With Scale. This was the second attempt at this challenge and yes, I know the large and small triangles are different types. That was totally on purpose. The concept of scale still works and was actually quite fun seeing it all come together. In spite of the nerves 'cuz there's most generally a wee bit of anxiety when doing improv. around here! That's just part and parcel of trying to work free of a script, but always so thrilling when things start to 'click' properly and you can see some momentum happening.
A different color palette, but lots of fun to work with!
One of the things that makes this quilt work, {in my mind} is that it mostly has the same background fabric throughout. This light green/white print was one where I bought the rest of a bolt of clearance fabric {for a backing fabric} and then switched quilt tops and only used up about three yards of it. Then I was like, 'What am I going to do with all this leftover fabric?'  Hmm.... That may have been what jump started this entire fabric stack!

You'll find that I rarely, ever intentionally buy a great lot of a single fabric for background fabric usage. Instead, I rely on pulling enough similar feel fabrics together from the stash to fake it or else, don't care if they blend less than perfectly together. Truly, in my mind, it's {usually} much more interesting if they don't work fabulously well together, and even more intriguing if one or two of the fabrics squawk a little about the ultimate pairing. More of that utility, make-do siren song that speaks so well to me?
A few strips of shirting fabric added in here and there for character
It's just funny that whenever something like this happens, on those very rare occasion, it's totally by accident. I mean seriously. What if I bought oodles of some odd print and brought it home and absolutely hated it in the potential background fabric position? Then I'd be out all that money and end up having to use it as a backing fabric. The horror! In this case though, I found it very refreshing to keep reaching for the same fabric over and over, knowing it was going to be the 'calm' area in my busy, scrappy improv. quilt. I know this is the way a lot of quilters work, but it's the opposite of how I normally do things!
Wonky quilts are the best
Lots of pictures of the same quilt, but well, you gotta remember that this is my quilting journal. That's really what this has been about from the start. The chronicles of Quilty Folk if you will, and I've invited others to take a peek as I travel along.
All free cut strips
As of this weekend, all of my {soon-to-be-gifted} Christmas makes are finally done! Yay! The two little doll quilts, below, ended up being such a blast to put together. Both of these were started from leftover bits in the orphan totes which totally makes me smile. Such a good idea and also, excellent procrastination from what really should have been happening around here. For some reason, the season came way too early this year...
Doll quilts for some of my nieces
The first little doll quilt used up the very last blocks from a project I've previously turned into two different baby quilts, one that happened just last month. These blocks were right on top so an easy choice, and wowsers, am I glad to see the last of them used up.The first two went for little baby boys and now the last, is a doll quilt for a young girl. Really versatile blocks depending on the colors used alongside! Now I just wish there was record of whether the original project used up one jelly roll or maybe two? Cannot remember those details just now. 

The second doll quilt came from the abandoned bits from the earlier Improv. Wheels quilt and also just a day playing with free cut Drunkards Path blocks a long while ago. Was terrible at it and they mostly ended up being wrinkly and not lying flat at all. Love the look, but hate the massive amount of fabric waste too. Will have to try again some day in the future when I have a mountain of fabric that needs to go.*wink  Weren't we just sort of talking about that?

And then there was also this quilt, you might remember, which was made from literally, the cut-offs from those same, original Improv. Wheels blocks. It's always endlessly fascinating for me to see the similar but oh-so-unique look derived from exact same pieced units or fabric pieces. It's silly, but sometimes there seems to be more of a thrill from the second or third time around quilt than the first! Orphan blocks/units are just too much fun to throw out, don't you think? So many possibilities and then lookie, lookie! Super fast doll quilts all because I had something easy to start playing with. What it does is eliminate that initial step of decision making. What color does this need to be? What fabrics should I pull? The Orphan blocks lead the way and before you know it, you're already halfway through with a project!
 Machine quilted in straight rows, nothing fancy
And last but not least, are the matching {Barbie} doll quilts for the granddaughter. Of course. It's not like I ever did this for my own girls! So sad, that, but it's too late for that now. I couldn't stop at just one right? And before even making an attempt to check myself, was also making matching pillows. Pillows? I am smiling so much as I'm typing this. Just too funny! They perfectly match the little charmers Christmas quilt and should bring her oodles of fun for all her dolls living in the three-story play townhouse. See, now she'll like the larger quilt even more because it will 'match' the Barbie quilts, which is a very important thing. Our granddaughter is a details girl at heart. Aha! There's actually a method to my madness!
The Barbie quilts, all washed up and ready for play
My daughters rolled their eyes at me and my husband agreed that I was a bit crazy. Totally drawing the line at making Barbie clothes though. Not gonna happen! So that's that. Other than one long afternoon ordering Christmas presents online and buying a couple little baby dolls while doing the grocery shopping, there's not much Christmas organization going on here yet. Will have to step it up and stop with all the fun, quilty procrastination! Who knew last minute Christmas projects could be so enjoyable? 

Tuesday, October 29, 2019

Checking Some Things Off the List

The little table runner is totally completed! I'm not sure there is enough hand quilting in the borders, but it's done. Not going to add more at this point.
The fall table runner
Next up in the hoop is Blue Plumes. It's kind of a different quilt for me, but other than admiring a similar shaped element in a shirt one day, the whole project idea is mine. 
Blue Plumes getting sandwiched and pinned
I can't believe this one has been at completed quilt top stage since 2017! Wowsers, does time fly! These funky looking fleur de lis {or whatever they are} were supposed to go with another quilt idea. Didn't work out and you know me, shortly after, another layout idea came along to the rescue. Funny how that happens with us tenacious types!
I think this one is going to be hand quilted
Why waste a perfectly good quilting inspiration? If at first you don't succeed, try, try again! You know how I love a challenge....
Trying to figure out the stitching pattern!
The binding is patiently waiting for me on the Playing With Scale #2 quilt. Honestly, you probably wouldn't believe it, but I've been off having a play with another baby quilt instead! lol
Binding ready for hand stitching!
Yep. I am a great aunt once again! My mom and dad agreed to find room in their suitcase if the quilt gets done in time and so I'm busy, busy. Postage is terribly expensive and I'd be very grateful to avoid having to pay for that plus risk the quilt getting lost in the mail. Best get back to it!

Wednesday, October 9, 2019

Here We Go Again

It was way past time for the Bullseye Medallion to get another border. I've been itching to get the red border on as the fabric just feels yummy. Only waiting for available floor space to properly lay things out and take a 'whole' quilt look!
The red border to Bullseye Medallion
My son {who has had the adjacent space next to the quilting room} finally moved out just last week. It only took him a month after he started talking about it and so I've been so {im}patiently waiting on him. Not that I wanted him to move out especially, but because I have been longing to have a clothes-free floor to lay out quilts. He is still eating dinner with us most nights during the week so this isn't something to be terribly upset about. He's just living a block away!
Trying to plan things out in the usual space...
Awhile back while digging through the applique-parts-and-pieces totes I happened to stumble across these leftover basket handles from a much older quilt. They seemed like a lovely element to try and add into this particular project. So very glad to find them and put them to good use. You know how I am with the orphaned and abandoned bits!
Always a piecing or applique unit to each round
For whatever reason, it was absolutely no trouble at all this time, to keep to the stated goal of having each border finish out at 5". Usually there is an internal debate that happens while I rebel against 'ridiculous' constraints. Ha  Might actually be the quilt that stays within the self-determined boundaries!
Love that the focus is on fabric
I'd say that I was finding my groove with the simple piecing efforts and primary focus being on the fabric and color rounds. Then I started in on the yellow border. Hmm... This one looks like it's gonna be a little bit harder. That's what I get for feeling like I had it all figured out. The quilt is currently 55 1/2" with three borders left {yellow included} to go. Adding all those borders will make it approx. 85" finished. However tempting it is to stop at the red border {and call it good}, 55 inches really isn't a good size for me. Plus, when have I ever backed down from an interesting quilting challenge?
So determined to use this old yellow plaid!
Next up in the hoop is the Playing With Scale #2 quilt. I guess technically, this one shouldn't even be in the running for getting finished quite yet. I like to work on the oldest quilts and then move forward, but as usual, that order does and can get changed around according to the slightest of whims.
Playing With Scale #2 getting sandwiched and pinned
This quilt is small, colorful and more importantly, requires zero marking. Sometimes that's really all that counts when making the decision about which one to favor!
A lot of spiky bits
I can see already that this one is going to go really fast. Every time I hand quilt a quilt top with strippy units it makes me fall in love all over again. There's just something very sweet about the old time 'utility' look to improv. strip piecing. Must do more!
Such a joy to see this one in the hoop!
All quilts should look like this after quilting. Why didn't I learn how to make quilts like this 20 years ago? I could have oodles of them by now.....

Friday, January 11, 2019

Clearing the Old Adhoc. Improv. Projects Out of the Way

*Don't forget! There's still time to enter the Strip Quilt Secrets giveaway over at my last post!*  I really don't mind having a whole list of open-ended projects to work on. It keeps things interesting as I can feel free to work on whatever phase of a project that currently interests me, be it hand work, chain piecing, layout dilemmas, or perhaps the addition of a new border. It honestly works quite a bit better for my quilting mojo when I'm not dedicated to working on a single project until its finish.
Playing With Scale #2 a finished quilt top!
That being said, I often end up working on several different quilt 'series', throughout the length of a year or two. It's not like it's usually even on purpose, but after finishing up one quilt {or perhaps the new idea hits smack in the middle}, I'm eager to see how a certain element will look if I tweak it just a little or try a slightly different spin on things. This particular quilt came along as a companion idea to our Adhoc. Improv. playing with scale challenge. I ended up with a quilt top that was quite satisfying in terms of completing the challenge, but I just had this niggling feeling that the results had room for growth.

Improv. is something that I definitely feel more comfortable working though after this past several years of dipping my toes in the water, then trying to float, later on starting to learn how to tread water. But... {you knew there was going to be a 'but'}, I still have a long ways to go before it feels like second nature. It still stresses me just a little, and so I often drag my heels and easily allow myself to procrastinate on the follow through. And I wonder, so much of the improv. work I see online and from viewing major quilt show pictures feels a little bit cold. Maybe even a teensy bit harsh at times.
It took a couple hours worth of tinkering before
 the layout finally started coming together...
Please tell me I'm not wasting my time pursuing something that will only result in making my quilts look more 'modern or contemporary'! Don't misunderstand, some of that work is very compelling and I admire all the creativity involved in the making. A lot of it is just not my thing.  It doesn't resonate on a deep level. There's something about say, the QuiltCon style of quilts that feel especially chilly and there's sort of a implacability about them. I can't even explain. To put it bluntly, I usually like the QuiltCon rejections much better than the QuiltCon winners! Hmmm... That's an interesting thought. Oh well. I would sincerely love to go to a show someday and see if my reaction would be different in person, because it's obvious that a ton of people get very excited about these quilts! Maybe you have to be there to feel it. It's so painful that the Australian and French {Quiltmania} style of quilting are so underrepresented at shows here in the states. I have a feeling those sorts of quilts would be tremendously inspirational to someone like me!

My best inspiration overall, is in the vintage and antique style of quilts, preferably the softer, less perfect looking utility style of quilts. Those are the ones that invariably make emotion well up inside me and cause me to dream about making my own versions of what I've seen. If there are only five antique quilts mixed into the annual, regional quilt show, you better believe I've circled around to see them at least three or more times before I leave! If I see them in a book or a magazine or even online, I'm almost drooling over them. That's my lodestone if you will, and why I ever, ever even attempted to dive into the scary world of 'improv.'  Something had to give, 'cuz making straight-up traditional style quilts wasn't getting me where I ultimately needed and/or wanted to go.
The upper applique block is approximate 2" larger than
 the smaller one in the lower left corner of the quilt.
This particular quilt feels like a HUGE step in the right direction of somehow getting my quilting voice to speak louder than the fact that it's actually made in the improv. style. Yeah, yeah, I've heard you. I get it. Most of my quilting efforts do fall underneath the umbrella of  'improv.' {working in an unscripted manner and working successfully to resolve any/all issues that come up, etc. etc.}. I think you all know what I'm getting at though. If you type the words 'improv. quilts' into a search engine, there's a certain distinguishable style that immediately pops up. 

As you can see, this quilt is made up of many of the very same underlying elements today's improv. quilters rely on. Yet somehow, I ended up with a look/style that does actually resonate on a personal level! And so now I'm pondering. Is it the fabric print that makes the difference for me here? The color palette? Adding in a little bit of applique? A bit of vintage and up-cycled shirting fabric? All of these things, without a doubt, help make the quilt more appealing to me. Having those elements, alongside the improv. piecing, somehow makes it more snuggle-up lovable. I guess it's sort of a package deal in my world.
It's the best part of the quilt, those two applique additions...
So it's been a journey. If my quilts don't end up feeling cozy, whimsical, sweet, comforting, joyful, or perhaps even a little bit primitive and naive, then I feel bit lost and maybe even a lot disconnected. Feeling like I completed wasted my time and energies. Sometimes I win and yes, sometimes I lose, but I'm always, always, trying to move forward. Kaja and Ann have been a huge help with their Adhoc. Improv. linkups/blog and real efforts to support and nurture individual creativity and exploration of personal style. It's been great fun to ride along with them and see what new challenge they present next!
Although the rest of the quilt has its charms as well...
So Yay! for a complete win in the 'me quilt' category! Yay! for wrapping up another individual challenge! All that striving, practicing and sweating out the decision making part is finally starting to come together. Don't mind me. Mentally, I'm doing a little fist pump here. It's wonderful to have evidence that all the hard work in the trenches is starting to pay off.

Ultimately, every element seemed necessary to the
success of this particular quilt. Even the vintage
and shirting fabrics play an important part!
On a different note, I decided to throw in a couple more pictures of the Maps Challenge quilt. The color in the pictures from the other day were absolutely terrible. Ughh! I was in a hurry to get the post up, but later on, realized that all my blog records would forever be warped by those lousy pictures.

Adhoc. Improv. Maps Challenge quilt
Who was it that initially raised the bar for having Pinterest worthy quilt pictures anyway? Well, these are much better than before, but they would never qualify for 'Pinterest worthy' that's for sure! This quilt top had already been stuffed in a clear zip-bag and shoved into the quilt tops drawers. Did I iron it upon taking it out of the bag? Um..., no?

Still in love with the brown/white gingham fabric...
Really? The sun was shining and I had about 15 minutes before people were charging through the living room and making demands on my time. Would you have been ironing? Don't answer that.

It's simple, but it works for me
I picked off a lot of stray threads. Surely that counts for something. And you have to admit, now that you're seeing this quilt top in better lighting, it's starting to look a lot more attractive, in spite of its rumpled appearance.  I'm telling you, it looked amazing draped over my sons bed! Couldn't take a picture of that though as there were piles of clothes on the floor. Whatever. It feels good to be starting with a clean slate for the 2019 Adhoc. Improv. challenges and inadvertent detours!  Linking to Wendy's Peacock Party!

Saturday, December 15, 2018

Finishing My Christmas Makes

I should be Christmas shopping today, but will have to wait till next week to finish up. The town we go to for intense shopping trips is just over an hour away. Believe me, we go with a list and do not leave until everything is checked off! All my Christmas makes are finished now--the doll quilt and the potholders I made for my mom.
The doll quilt is finished
This doll quilt was so much fun. I haven't made one in years! My granddaughter has a 'My Life' doll {18" tall} and so I made sure this quilt will be plenty big enough to properly wrap around her baby. No just laying it on top and calling it good! Growing up, my sisters and I got a doll every year for Christmas until we were eleven years old. It was always frustrating when our doll blankets weren't large enough to swaddle our bigger dolls! It was a very big deal. And so this may look large to you, but at 32" before being washed and shrinking a bit, it should definitely work well for whatever Miss Lucy Mae decides to do with it!
The colors are so saturated looking!
It was probably a bad day to begin with, but when I started machine quilting the straight lines I ran into trouble immediately. The fabric was being pushed all over the place and really panicked me for a bit. It took some time, but then I realized that my dual feed wasn't attached to the stitch-in-the-ditch foot like it was supposed to. Arghh!  I flatly refused to take any of the stitching out. {My internalized mantra for the day: It's just a doll quilt for a 3 yr. old!!}. Thankfully, when I switched to the walking foot for the in-between stitching lines that weren't 'in-the-ditch', then it mostly smoothed out and behaved properly. Well, after I finally remembered to place the walking foot 'arm' over the bolt like it needs to be....  Okay, so there are a few eensy weensy puckers. Sue me. Both attachments are genius, but I've found to my chagrin that you do have to use them correctly.....
A fun, happy looking finish
I've had this retro looking decor fabric for years. Found it at a rummage sale and picked it up on impulse. This year I was thinking of all the things that I could get my mom for Christmas and realized, she has everything. Isn't that so true of most of our parents? So I took the plunge {I do so hate the pressure of Christmas makes}, and sewed up three usable potholders. No fancy little hanger thingy on the corners, she would never use it anyway. I used Insul-Brite batting on the inside and also one square of regular batting. They still feel fairly flexible and so I think they should work well. The binding was all leftover pieces from the binding tote which thrills my frugal soul.
Retro looking potholders
In little bites of time, here and there, I have also been tinkering around with Playing With Scale #2. Since I don't have the amazing design wall that some of you have, I decided to use the 'parts' method. It's a Freddy Moran and Gwen Marston thing I first read about years ago in their book 'Collaborative Quilting'. Wowsers, that book seemed expensive at the time, but it pretty much changed my life.
The first layout audition for Playing With Scale #2
Who knew that quilters were allowed to have so much fun with their quilting! After getting the initial parts sewn together, then I did a tentative layout right in front of the living room door. There really isn't any other option during the Christmas holidays. Moving very quickly {and crossing my fingers that none of the family would come home early}, I was able to determine that I needed more triangle units. Also, Wouldn't it look better with an applique block or two?  hehe  You knew that was happening....
Adding some more triangle parts
At the very least I was able to make notes about what widths to trim the larger strip/triangle parts to. I'm totally out of the light green background fabric that I used in those units, or I would probably make another one or two to better balance the quilt. Yes, it's still very rough looking--needs a lot of moving and switching things around before it starts to properly gel. This is one that I don't feel excessively compelled to get perfect though. Ultimately, I want it to have that old fashioned utilitarian look/vibe of just making do. I did get rid of the pink/blue triangle in the center though. Ughh. Some things just have to go....

Linking to Wendy's Peacock Party once again.

Wednesday, November 28, 2018

Trying to Keep up with the Improv.

I'm trying to cut myself a little slack at the end of November here. It feels like nothing is getting done, but I know that's not true. Plus, it's been busy with the holiday and family time. Now that it's Adhoc Improv. time again, I wanted to see where I was with all the open ended improv. projects.
strips for Playing with Scale #2
All the half square triangle strips are sewn together and trimmed for Playing with Scale #2. I even found time the other evening to free cut all the strips needed to start making the improv. blocks. This is one of those quilts where a large design wall would be amazing, but alas, it's not to be. I'll just keep using my imagination along with the trusty 'design floor'.*wink

I've been so tentative about moving ahead with this particular quilt. Not sure what it is that's holding me back because every time I start working with the fabrics, I fall in love all over again. I did take the time last week to make sure there was enough fabrics in all the important colors that I wanted represented throughout the whole of the quilt. Went digging through the stash totes and added about five other fabrics in deeper and/or bright fabrics that will work well for the larger triangles I plan on adding in later. One thing at a time though! Can't really start working on those until I see what size will be needed for 'proper proportion'.
Maps quilt auditioning
Just before Thanksgiving, I made time to cut and sew the 'road' border for the Maps prompt. It was a bit challenging, but overall I think it went together fairly well. Wasn't sure what to do with those corners, but when I laid it all out on the floor, it suddenly hit me. The upper picture just has a cut rectangle on those corners, nothing sewn down, but it brought it all together for me. So, so, easy, peasy, just a little applique work and the corners were sewn down to make the road look like it was turning the corner.  If they're a little chunkier looking than the rest of the white line pieces, most people will never notice!
Applique addition on the corners....
Next up, something I'm really dreading for some dumb reason, will be a long strip with words on it. I thought to do words on all four sides of the quilt, but now am rethinking that. One strip on the bottom just under the road border and all the rest will be a few random strips of different fabrics. Mostly, I just want to start sewing the strips on for a longer, more vertical looking quilt and get away from the perfectly squared off look. I love how it's so similar to the original quilt inspiration, but also starting to go its own way.  
A pretty stack of quilts
I've also gathered together five more quilts to give away before the end of the year. My family was having a bit of a meltdown over it {thinking I was intending to give away ALL of my quilts}, but settled down when I told them who/what/where they were going. It's sweet that they think all my quilts are too special to give away, but I've told them and told them, they might just be a little bit biased. How they could possibly think I was giving them all away when I still have at least 25 stacked up in my bedroom alone is laughable, but hey, they do seem to get attached! 

All of these quilts are older quilts {except for one which is a more recent finish} and that seems to make it easier for me to say goodbye. My husband however, adamantly called 'off limits' to at least three quilts he randomly uses from a stack in the living room. Then the girls chimed in and that's when negotiations started. So that's that for the giving this year, except for the doll quilt that I'm still planning on making for our granddaughter. Better get cracking on that one. Christmas is right around the corner!

Tuesday, October 23, 2018

My Answer to the AHIQ Maps Challenge

What I love most about starting something on a whim, is that it often stimulates the brain in unexpected ways. I have been so stumped about what to do with the AHIQ Maps Challenge. For goodness sakes, the challenge was thrown out to us in July? To me, quilting 'maps' felt kind of complex and 'arty'. Not really my thing on the best of days. Summer complaint fatigue didn't help any either. My brain like mush most of the time.
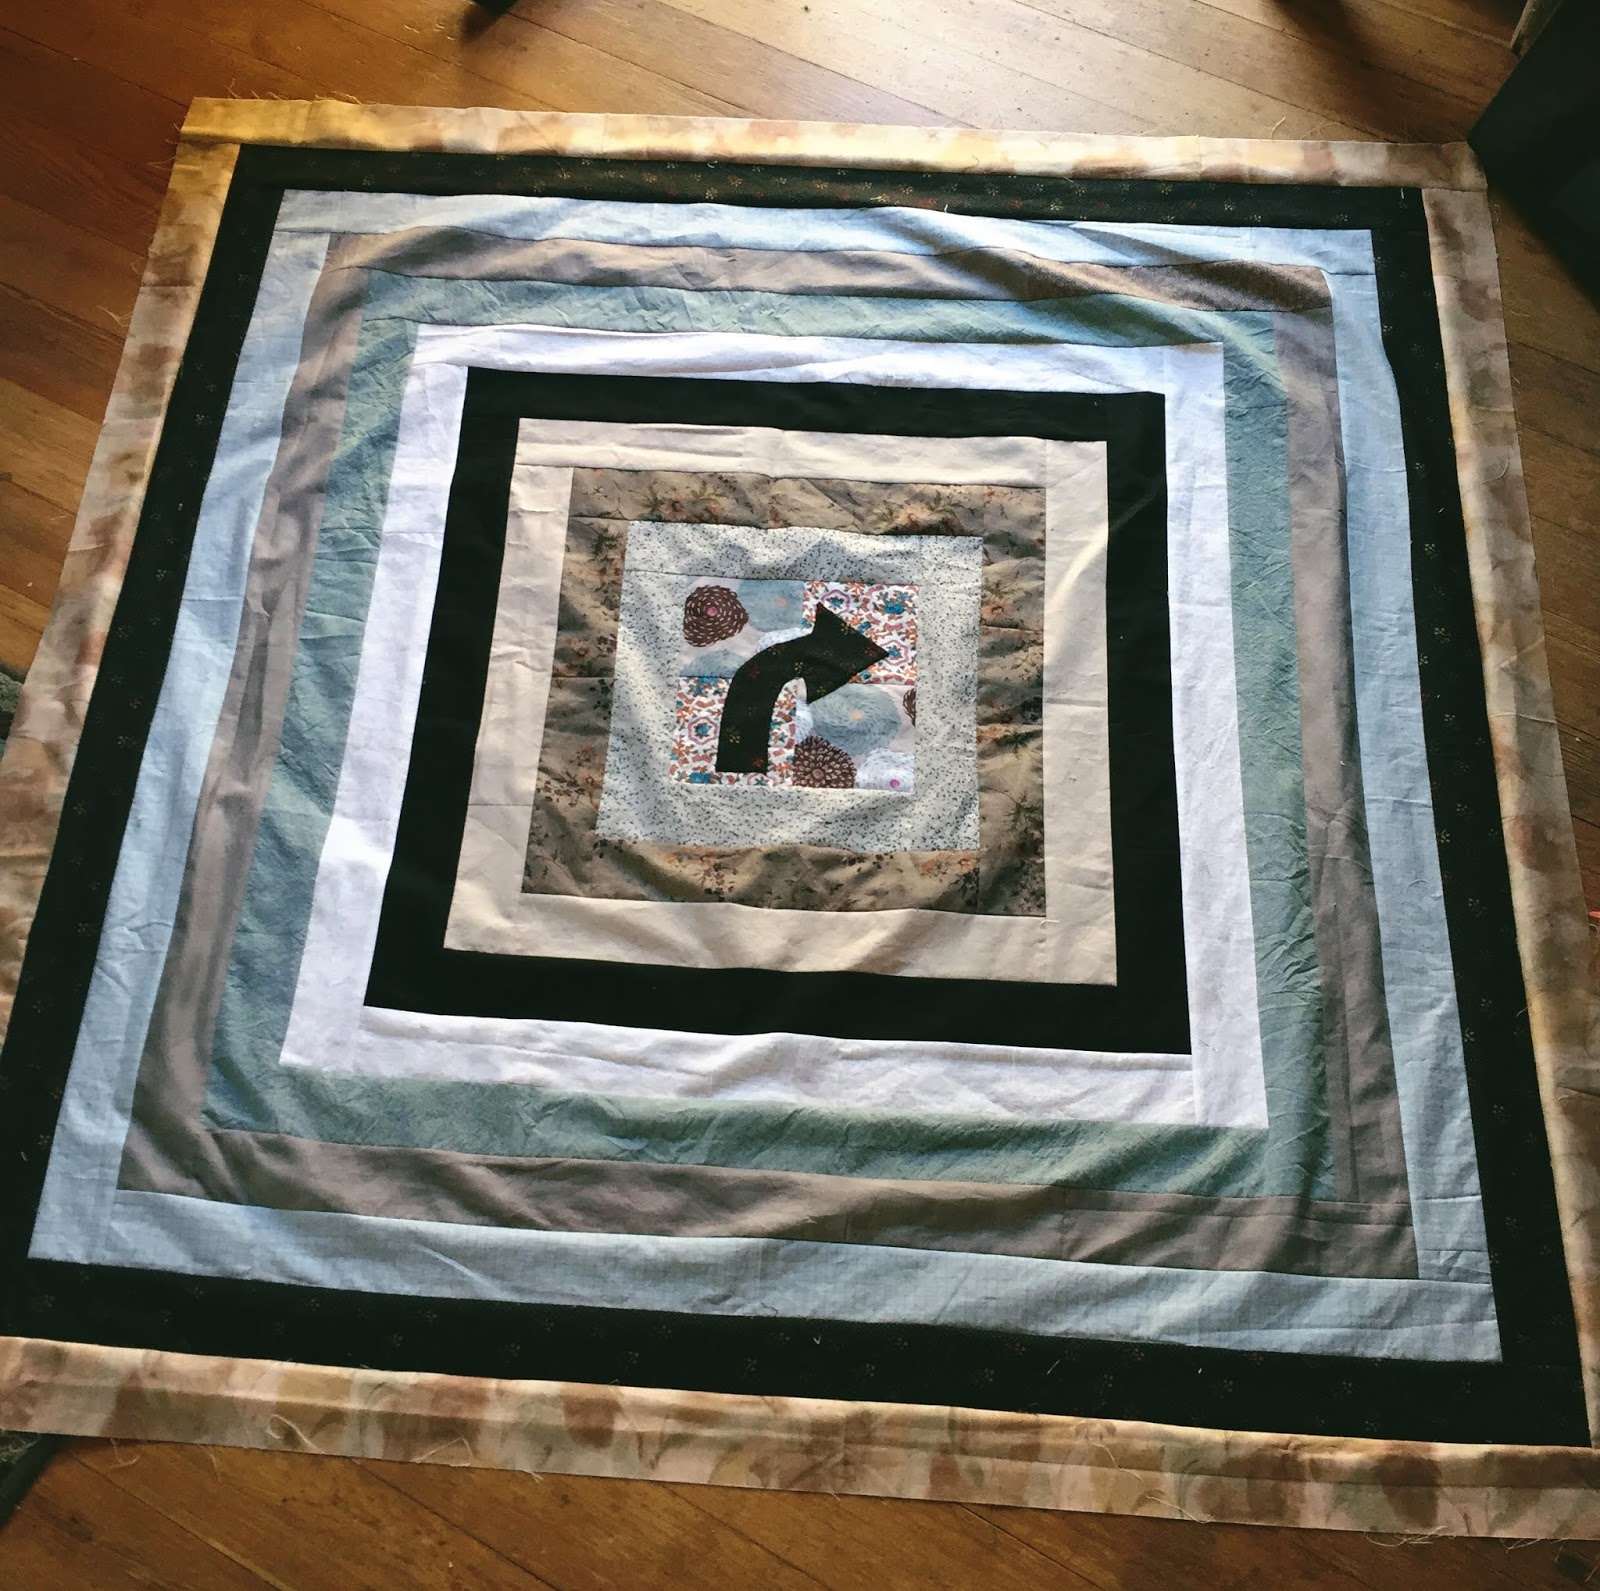
Basic log cabin
The crisp, fall weather has definitely helped to wake me up a bit. With this project, here I am, basically going in circles with the uncomplicated sewing I started earlier this month {enjoying how open ended and pressure free it is}, and it hits me from out of the blue. This log cabin sewing reminds me of how I constantly have to turn around and go back when I'm driving in a new-to-me area! Okay, why not? And so without a lot of extra thought for the end result, I decided to applique a turn right arrow onto the center of my quilt. You see how it works around here? Apparently I have to start some challenges quite by accident!
Turning into my answer to the Maps Challenge!
After that, I just kept on cutting and sewing the 2 1/2" strips, {all without measuring the proper lengths}, until I found myself with a real mess on my hands. Well, you knew it had to happen eventually. I can almost see some of you nodding your head. Uh huh.  Free sewing just doesn't make for straight, square quilts, ever, ever, ever. Sometimes I think my purpose here in the quilt blogging world is to make all the rest of you quilters feel pretty awesome about your own stitching efforts. lol
Too much crazy, even for me....
And of course, by now, I'd also decided that eventually there needed to be a 'road' unit added in as a single round in the quilt. All that accrued wonkiness was definitely becoming a bit deflating in terms of making it larger. Not that I was truly upset you understand. Mostly I just found myself curious as to the resulting dilemma: how very much the fabrics had started misbehaving, at which point it manifested itself and, how very, very quickly it multiplied past a certain point in the sewing.
Not a lot of options so I'll try this....
But hey, it really, really needed to be addressed before moving on. I get that. And so I thought about it for several days until finally, today, I girded myself to do the insane. 'Cuz I was NOT unpicking. Nope. Out came the rotary cutter and I very calmly cut across the length of my quilt, right at the pre-determined area.*gulp! Then I layered the two edges, smoothed from the center of the quilt out, and then very carefully cut once again. Fingers crossed it would take care of all that slack and bias stretch!
What do you know, it might just work out!
The first cut and sew looked promising and so I did the same to the other side. Then, realizing it was gonna have to happen on the other two sides as well, turned the quilt and cut one side at a time into the top and bottom of the quilt too.*whew! Pin, pin, pin and then sew and iron. Would you look at that quilt below! It's much, much flatter and neater than it was before. And I'm not the least bit unhappy with the new look as per those affected strips being slightly curved and much more narrow. Oh, that was a sticking point for sure. Where oh where to make the least offensive cuts? But it works. Thankfully it was a good day in the quilting {and/or living} room today!

I'm absolutely sure this has made quite a few of you cringe and want to look away, but I am having a enormous amount of fun here. Really. A bit of anxiety about the unknown has never killed a single one of us! The next row is going to be where I attempt to make that 'road' unit, but after getting this piece squared up {not pictured here in this post}, I ran out of creative ambition for the day and basically called it quits.

Obviously my version of this maps challenge is going to be very interpretive {improv. anyone?}, but it should satisfy my desire to not intentionally duck a hard challenge. Frustration with dreaming up a workable idea is one thing, but avoidance just gets me to the point of being very annoyed. Kaja and Ann are our wonderfully creative motivators over at AHIQ and are very tough quilters to keep up with on occasion. They like to keep us on our toes!
And here it is, almost totally flat!
Earlier in the week I also dove back into Playing With Scale #2 after leaving it sitting idle for almost three months. Something about the quilt was bugging me and I felt that it needed a chance to gel a bit more. I don't know if it was the quilt colors or the way the strip units were behaving, but I just had a feeling that to continue on at that particular point would end in regret. This time I'm starting from the hst angle on purpose. Maybe I'll backtrack to the strip units as I want to slip these hst strips inside some of them anyway!
Playing with scale #2
Once again, I didn't get nearly as far as I'd like, but what I'm seeing on the wall is making me very happy. All the hsts are cut very freehand and once sewn into units, then I'm just lining them up into a long row, joining like sizes one square to the next. At the point of having a long strip of hsts, I'm using a ruler and trimming off the excess at the edges, taking care not to straighten them to the point of rigid formality. Before trimming, they are very rough and scary looking but afterwards, have a great organic feel to them.

It feels good to be working this type of improv. again and mixing it up with all the other quilting that I love to do. It's when I get boxed into rigidly pre-determined ideas and patterns that I start feeling the most twitchy, bored or otherwise start to lose creative mojo. Balance, people. It's always about the proper balance....