So this is the last post in the series, unless there's reason to provide more information later on. Several people have previously asked questions about how one goes about deciding on the quilt stitching design. It generally doesn't have to be something to overly stress about and in fact, the more that you do, the more intuitive it can seem. In an effort to make cheerful, comfy looking quilts, you'll notice that I tend toward stitching quite simple designs. This is on purpose. The look is inspired by some of the most humble quilts ever made, and yet it's exactly what I have striven for {and nurtured} through all my years of hand quilting.
 |
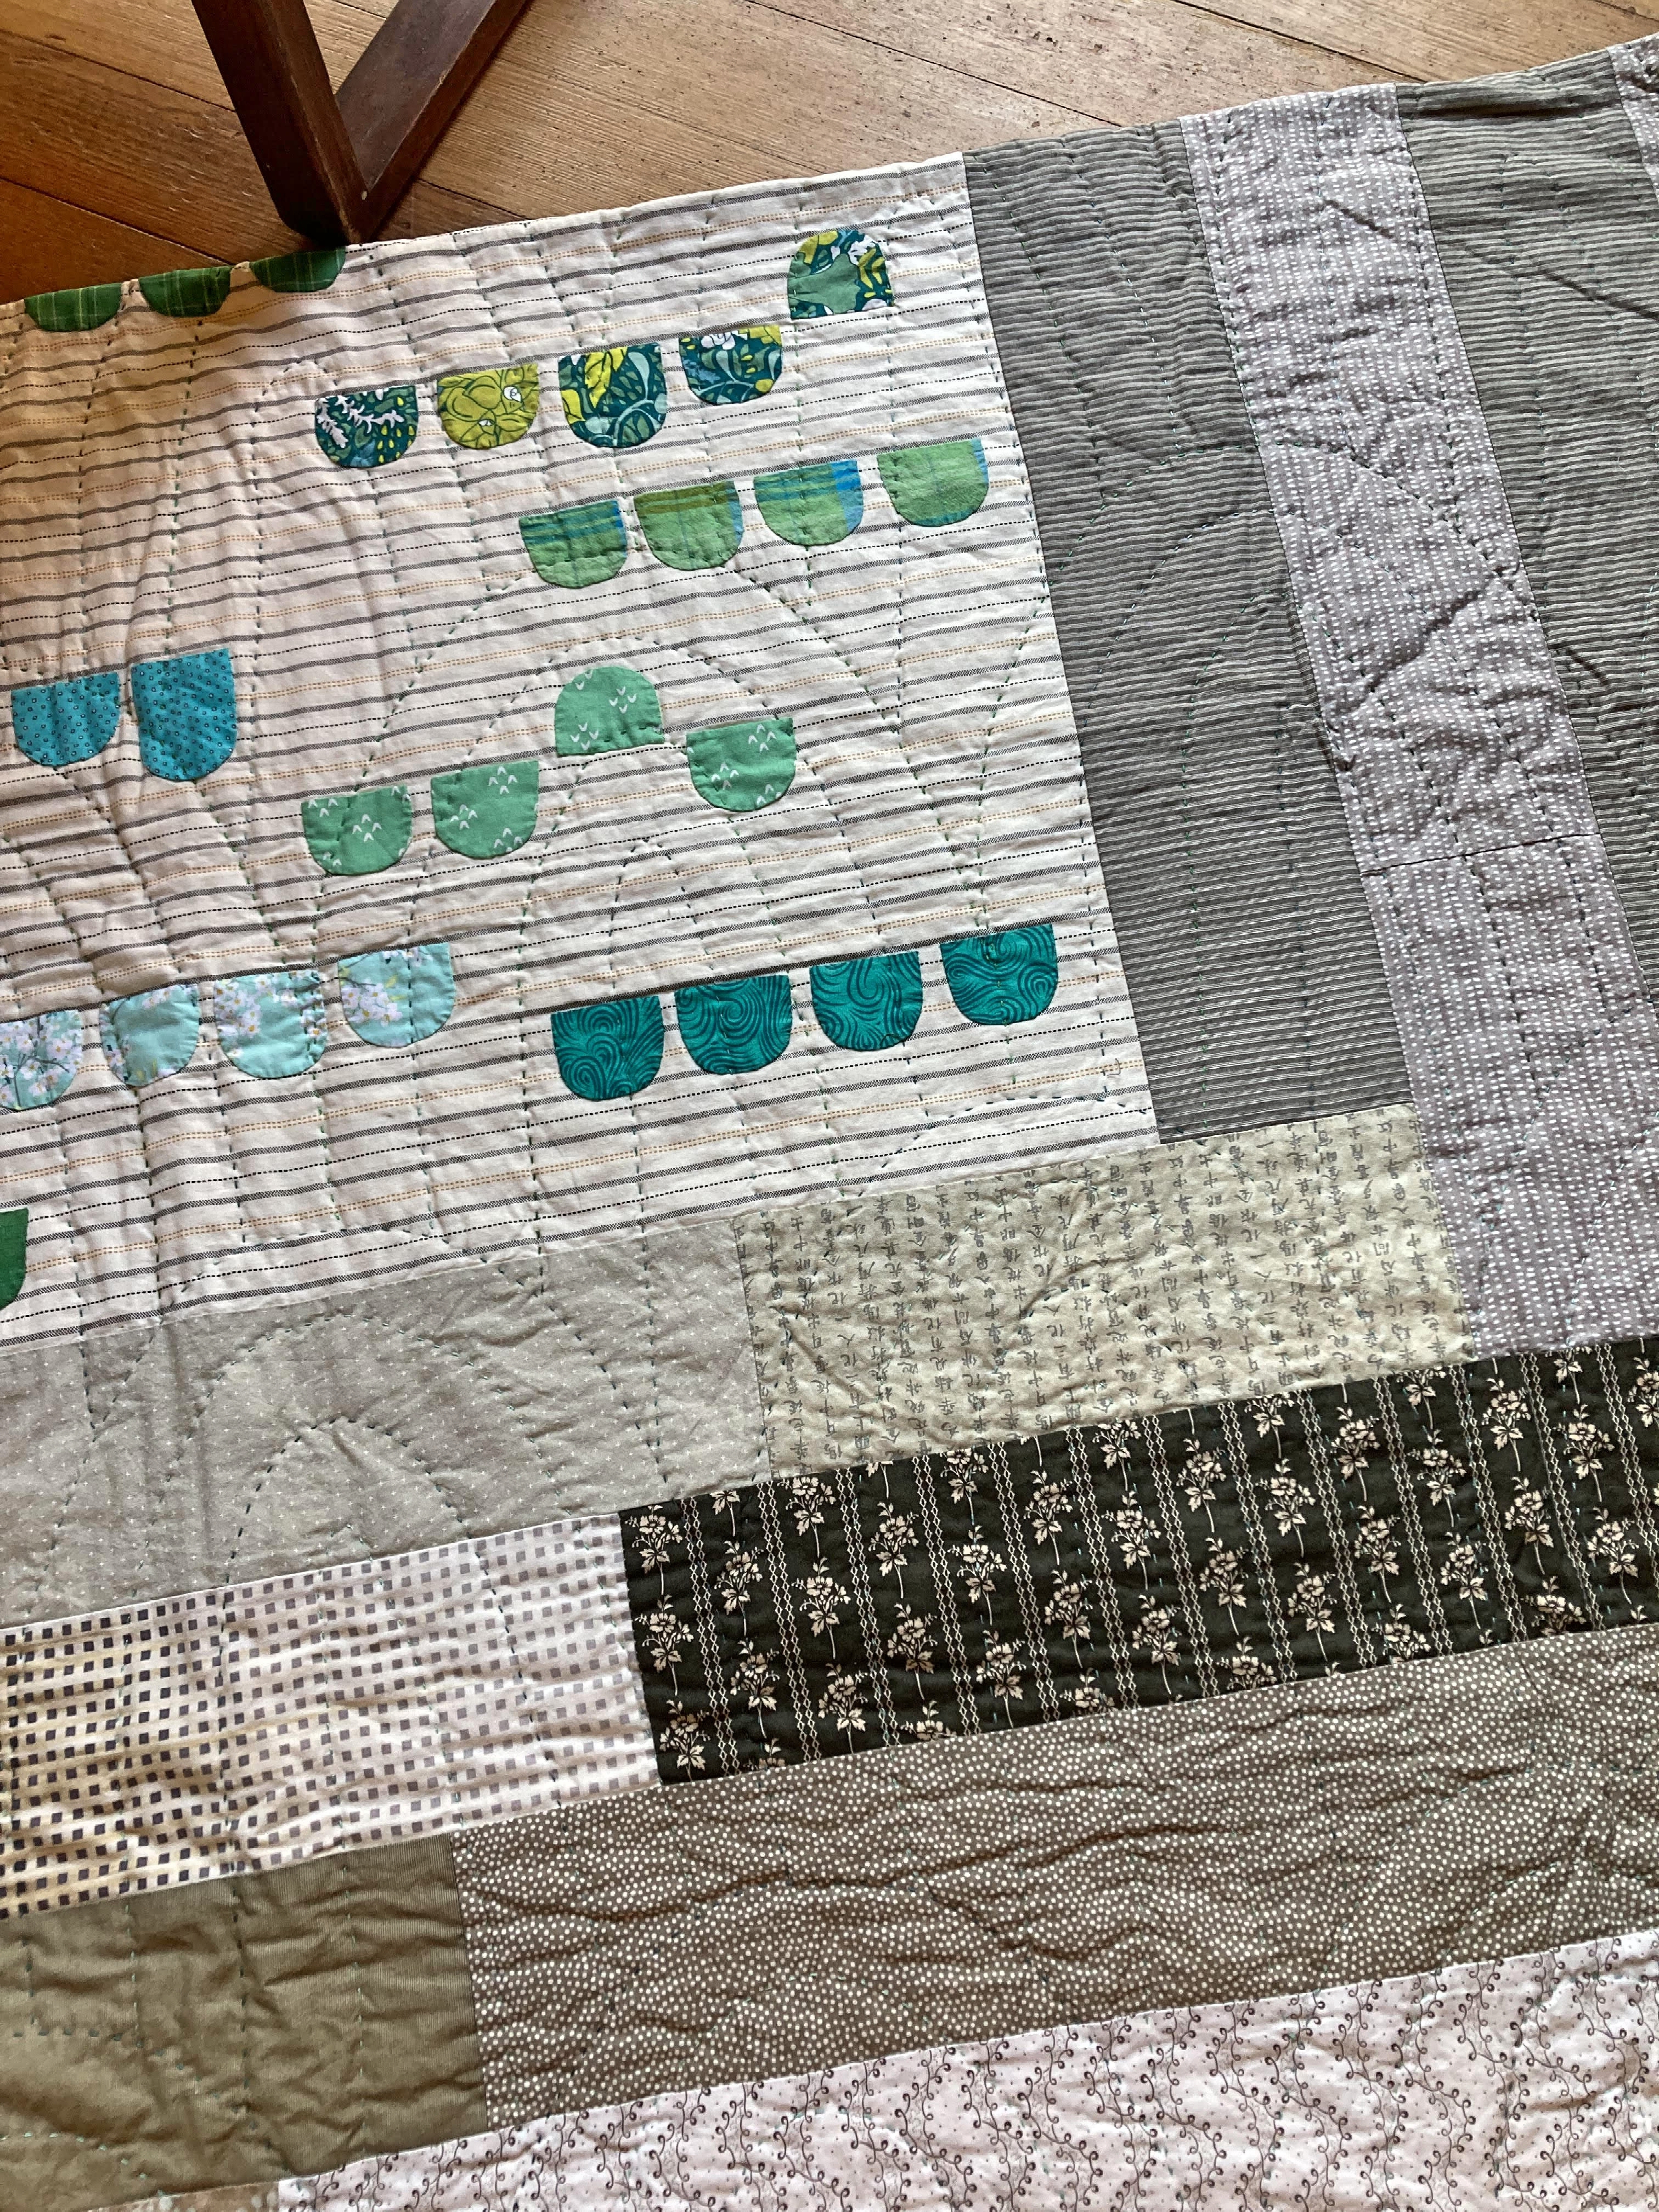
| Improv. Strips #2 |
How to achieve a cozy looking quilt that doesn't look the least bit sloppy or uncaring? This is the question that has driven me crazy since I first started to take quilting seriously. Well, one of the easiest ways this can happen, of course, is to have a good base to play with. Obviously it won't do to make a complex Baltimore Beauty quilt, do some plain stitching and then expect to have that stitching well received! Plan on starting with a quilt top that isn't already screaming for something really complex in terms of the quilting motif.
Then, you basically let the quilt steer your stitching path. I know. Easier said than done. Words to describe this relaxed style of quilting might be: basic, simple, naïve, uncomplicated, and/or utilitarian. Don't overthink things and do try to start in a spot where there's a clear direction forward. Is there set of blocks where you can do some echo quilting, just to the inside of a seam allowance? An applique element that could use some outline stitching? Following is a list of potential options for producing simplicity in stitching design and look. You definitely don't need to get overly fussy to end up with something beautiful!
- Echo Stitching--Stitch approximately 1/4"or less from edge of seam. For background texture, keep repeating at similar distances {usually 1-2"} from original stitch line until entire area is filled in. Helpful to freestyle mark subsequent lines in areas where the stitching lines extend beyond the hoop.
- Outline Stitching over top of applique--Stitch approximately 1/4" or so from edge, over the top of the applique itself.
- X Across Squares--Stitch diagonally in each direction across squares, cornerstones etc.
- Straight Lines--Stitch straight lines through the approximate center of rectangles in log cabin or improv. type units, etc. For sashing, stitch down the entire length of each sashing strip, making 90 degree turn at corners.
- Double Lines--Stitch straight lines approximately 1/4" or more {equidistant} on either side of marked {but not stitched} center line in unit or length of sashing.
- Triple Lines-Stitch straight line in center of unit or sashing. Then, stitch equidistant from left and right sides. These lines generally measure between 1/4" to 1/2" apart but feel free to do what looks best.
- Flying Geese--Stitch flying geese units in rectangle shaped areas, sashing or border. Can make paper or plastic template to mark shapes or freestyle mark for more of a human touch.
The following designs take a bit more effort, but are not nearly as complicated as you might suppose.
- Crosshatch Stitching--Stitch a simple grid pattern over entire area of quilt or in the sashing area, or over the top of blocks, especially plain ones. Can also easily stitch crosshatching over the top of large applique elements. Clear quilting rulers are very helpful when marking the grid.
- Applique Element Imitates--Use a plastic or paper {cutout} shape copying an applique element sewn onto the quilt. Trace around edges of template, marking the shape onto the quilt for stitching. Stitch repeats of this shape in border areas etc. Can also mark these completely freehand for more of a carefree appearance.
- Baptist Fan--Stitch an allover design of repeated curves, generally used to cover complete quilt area, but can also be successfully used just for borders and other areas. Here is an older tutorial for making the orderly-look fans. Or you can make freehand fans if that's the look you prefer.
- Hills--An allover stitching design of repeated hills, generally used to cover complete quilt area, but can also be used in borders and other areas. Make a cardboard or plastic template of one largish hill {usually 10-12" or taller}. Starting at the bottom of the quilt, mark the outside of the hills over the complete area of the quilt, being careful to offset hills at approximately the halfway point. Mark repeat rows, one on top of the other. Stitch consecutively smaller hills inside each of the larger hills in an echo stitching manner, freehand marking if you like.
- Clamshells--An allover stitching design of repeat clamshells, generally used to cover complete quilt but also be used in borders and other areas. Make a cardboard or plastic template of 4-5 {upper half only} clamshells in a straight line. Starting at the bottom of the quilt, mark outside of template over quilt top in one row after another, offsetting the 'shells'.
 |
| Seedpod |
The Seedpod quilt has echo stitching around all the applique. Larger spaced {repeat} echo stitching lines fill in the background of the applique, all in a loose diamond shape. There is echo stitching in the centerpiece border area and also inside the economy square blocks. Straight line stitching anchors the block spacer strips.
 |
| Log Cabin |
This log cabin quilt has straight line stitching in every log and X Across Square stitching in every corner starting square. There is double line stitching in the sashing length and also the cream 'spacer' strips.
 |
| Love Apples |
This Love Apple quilt has freehand Baptist Fan stitching over the entire quilt.
 |
| AHIQFlowers |
This improv. AHIQFlowers quilt has straight line stitching, double and triple stitching, repeat echo stitching, X Across the Squares, and also some cross-hatching in certain areas.
 |
| Rising Sun |
The Rising Sun quilt was machine stitched-in-the-ditch along the sashing and at the outside of every block. There is outline stitching over the top of the Rising Sun block applique and also the berries and leaves. There is echo stitching just to the inside of the center squares, crosshatch stitching in the sashing lengths and also over the top of the largest applique. There is largely spaced echo quilting in the outside, lighter areas of each block.
 |
| Bullseye Medallion |
The Bullseye Medallion has outline stitching in the appliqued centerpiece and anywhere else there might be applique. There is also straight line stitching at the center of the red applique element. Largely spaced echo stitching fill in the gold background of the centerpiece area. Each subsequent border has a different quilting motif, from freehand flying geese, crosshatching, circles inside of crosshatching, and repeat applique imitates.
 |
| Tidbits |
Tidbits quilt has an overall Hills quilting design. Largely spaced echo quilting makes up the freestyle smaller hills inside of the larger hills.
 |
| Antique Crows |
This Antique Crows quilt was machine stitched-in-the-ditch around all of the blocks. It has outline stitching on most all of the applique with largely spaced echo stitching on the inside of the sunburst center. Straight line stitching takes care of the sashing and X Across Squares all the cornerstones. There is very largely spaced {repeat} straight line stitching inside of the border areas--at the shortest measurement of the border instead of along the length.
 |
| Chunky Tulips |
Chunky Tulips was machine stitched-in-the-ditch along the edge of every sashing piece. There is echo stitching to the inside of the coping strips in each block. There is outline stitching on all the tulip applique and echo quilting at the largest tip of the tulips. There is freehand 'extra' stitching inside of the tulips as well, not exactly echo stitching but something very similar. There is X Across Squares at the sashing cornerstones and loosely measured crosshatching in the sashing areas and outer setting triangles.
 |
| Sweet Tart |
This Sweet Tart quilt was machine stitched-in-the-ditch around every single block and both sides of the centerpiece sashing surround. There is outline stitching on most of the applique plus a little extra in the large tulips and larger baskets. Lots of repeat echo stitching in the background of the larger tulips. There is echo stitching in the triangles around the smaller baskets and just to the inside of the background square where those baskets reside. There is also echo stitching at the striped center of the 'every-other' blocks and straight line stitching in those pink floral areas.
 |
| HaHa |
The HaHa quilt has overall clamshell stitching over the top of the all the center applique areas. There is outline stitching on the HaHa applique itself, and echo quilting just inside of the gray blocks. There is largish crosshatching over all of the outside triangle pieced border areas.
 |
The Quilty Folk lady with the ridiculous video set-up!
|
For the most part, I find that loosely spaced quilting gives off a cozier vibe than dense and tightly filled areas of stitching. After all, there needs to be plenty of space for that lovely crumpled affect to happen after washing and drying! In the case of the HaHa quilt, you'll notice that I only echo stitched inside of every other gray background block, not both, as those stitches would be unnecessarily close to each other. I mean, you can stitch there if you like, but you definitely don't have to.
These are just a few ideas {and quilts} to demonstrate ways to involve basic quilting designs. There are endless solutions depending on your specific quilt sandwich and of course, your particular likes and dislikes. The main thing is, there are no rules. Go check out antique, utilitarian quilts for inspiration! Look closely at how the stitching is happening in all of the quilts that you fall in love with!
Everywhere possible, try to 'eyeball' stitching lines and do without marking in your own efforts. Try to embrace the affect of 'the human touch'. Stitches will be slightly different length here and there, possibly even angling off on the random stitch. Straight lines will undoubtedly look organic instead of being perfect little soldiers. Try not to rip them all out! Believe it or not, this is adding charm to your quilt. A little added sweetness. Some of the X's at the cornerstones might even look a little wobbly, and if you can, just smile and wave at the doubters. Quilting with perle cotton accentuates the texture so very quickly, you'll be surprised at how much your imperfect stitching seems to practically disappear!
When you find your quilting rhythm, you'll also be discovering your quilting 'voice'. That is a very special thing. The beauty of hand quilting, is how easily it lends itself to celebrating and illuminating our humanity. None of us are perfect beings. Why would we expect our quilts to be any different? Hand quilting in it's plainest form invariably embeds a bit of sentimentality into the very fibers of the whole, making it practically impossible for the quilt to end up looking too stiff or formal for use. People tend to respond to this unpretentiousness open-heartedly.
If you find yourself without any idea of how to start hand quilting a specific quilt? Get your quilt sandwich into the hoop and load up a thread color that looks agreeable. Then, start stitching something. ANYTHING! Don't like it? Rip it out and start over with a different take. Eventually something will speak to you so that you can quit waffling around and get down to business. With overall designs, I have to say things never tend to look good right at first. At least not to me! I have to give it at least two or three rows before I'm convinced that the right path has been taken.
Wishing everyone the very best luck in their quilting adventures! Hopefully this series has been a help to some of the fledging hand quilters out there. Honestly, it has taken an enormous amount of my quilting time, but I can't be unhappy about that. You wouldn't believe all of the questions I didn't have proper answers to when first starting to hand quilt!*sigh


What a great series on Hand Quilting! I love to add perle cotton hand quilting. It has such a nice sheen and gives it so much more texture. Loved seeing your examples.
ReplyDeletegreat advise it has been fun reading your questions/answers and very informative I'm sure to beginners and those that want more answers on "how to do this"
ReplyDeleteThank you so much for this series! It feels like we're having a chatty conversation and you're answering all our questions!
ReplyDeleteWow - these four posts took a LOT of thinking and writing, not to mention searching out photos to support your ideas. What a gift to hand quilters (and the rest of us). Thanks, Audrey! Quiltdivajulie
ReplyDeleteThis was a great series Audrey, and this post is the perfect capstone.
ReplyDeleteYes, your series was packed full of good tips and reminders and quilted loveliness! Thank you for taking the time. Now the book.....
ReplyDeleteWhat videos you can recommend for tutorials? How long does a twin sized quilt typically take you to hand quilt? Thank you for posting!
ReplyDeleteGreat post, Audrey. Loved looking back on your Baptist Fan tutorial as well as admiring all the pretty quilts you used in your examples. Thank you.
ReplyDeleteThis has been a very helpful series for hand quilters. And for me, a delightful walk down Memory Lane through some of your many beautiful quilts. You're having such fun in your photo. ;-)
ReplyDeleteHi Audrey, I've enjoyed these posts so much. You speak so much truth about quilting. I'm hand quilting a large piece presently and you are so right that the overall look is soft and enjoyable and the odd tilted stitch not noticeable. It seems a bit of a journey to accept the imperfections really. This was a treat also to see snippets of your wonderful quilts too. There is book potential in your work and words, Audrey.
ReplyDelete