Are you ready for the next prompt in the Bramble Blooms QAL? So fascinating to have others along for the journey and see where people end up, even when we all start at exactly the same place! Life is full of interruptions around here as usual, especially now that my husband is feeling just good enough to be antsy, though still not quite good enough to be back at work. We're getting there! This post ended up being miles too long. Consider yourself warned. Just too much information that I keep thinking someone might need.
Back to the reason you dropped by today! For this specific phase of the BBI Medallion quilt, the challenge is as follows: Put together a border that includes adding 4-patch, 9-patch, 16-patch or even larger patchwork blocks. You can set your blocks side by side {continuous block layout} or 'on point'. This border can be any width you like. It does not need to have the patchwork blocks throughout--use as few or as many patch blocks as you think will look good! Totally up to you if the blocks are improv. style or traditional-look.
 |
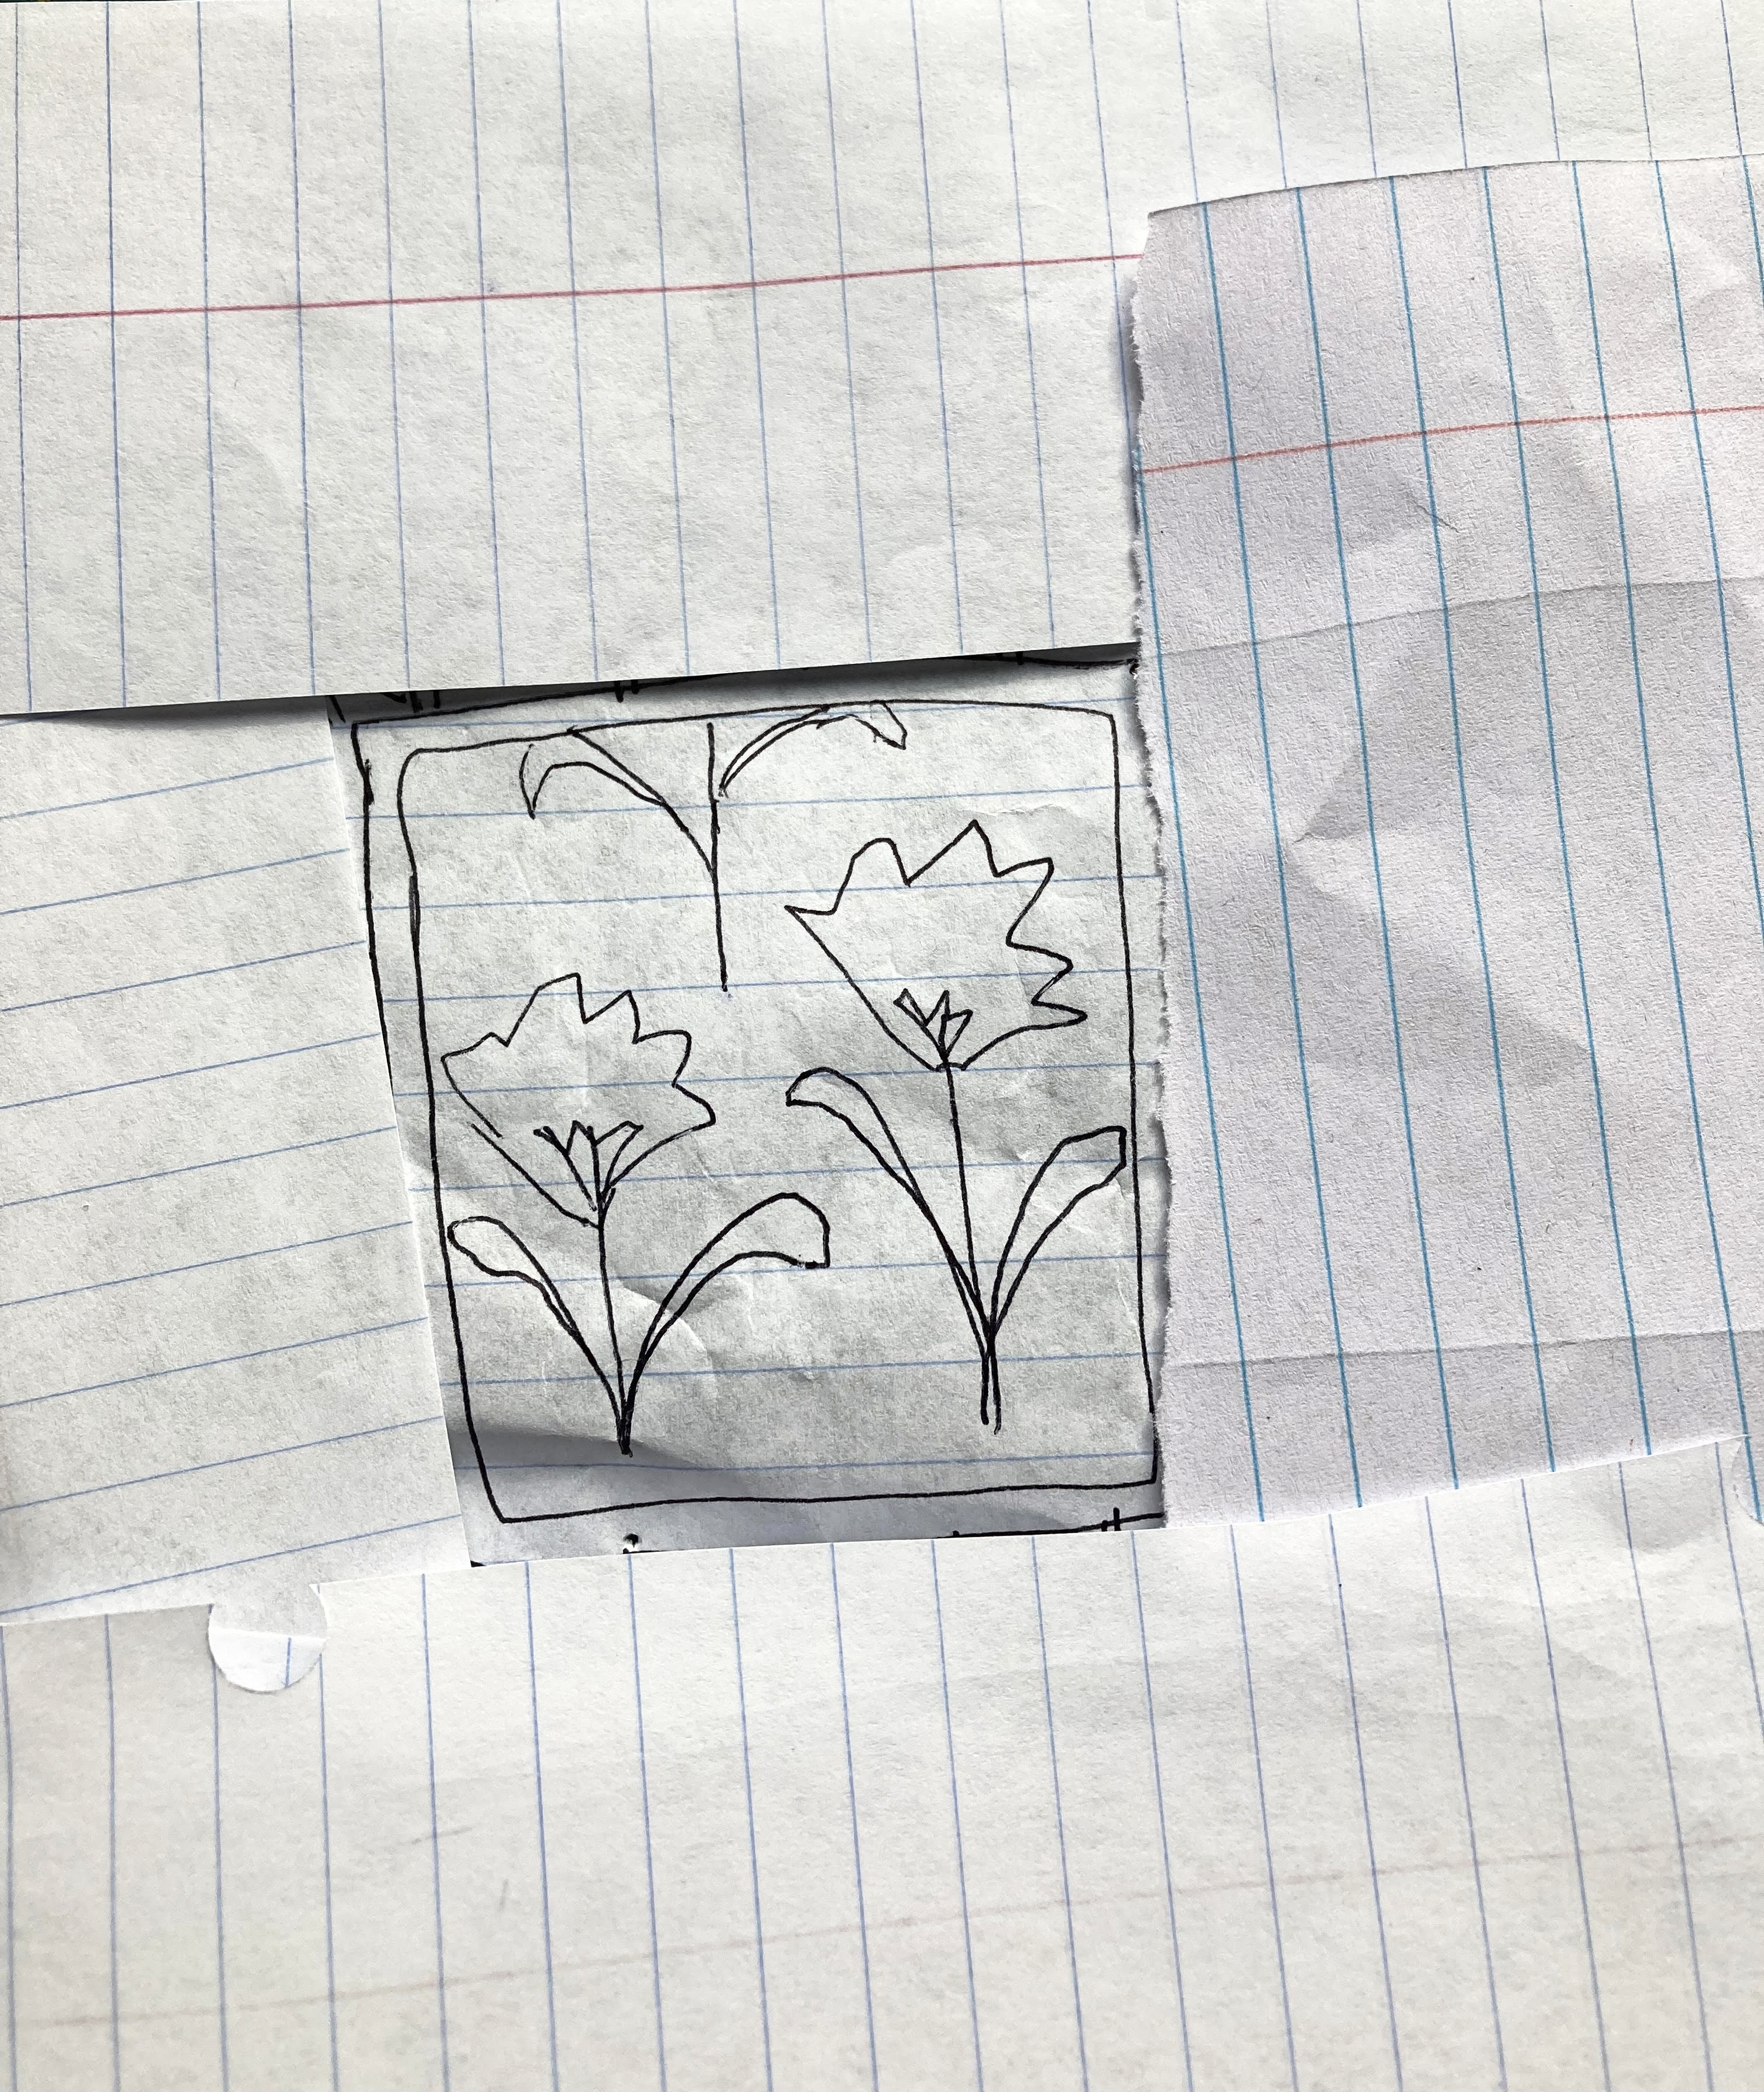
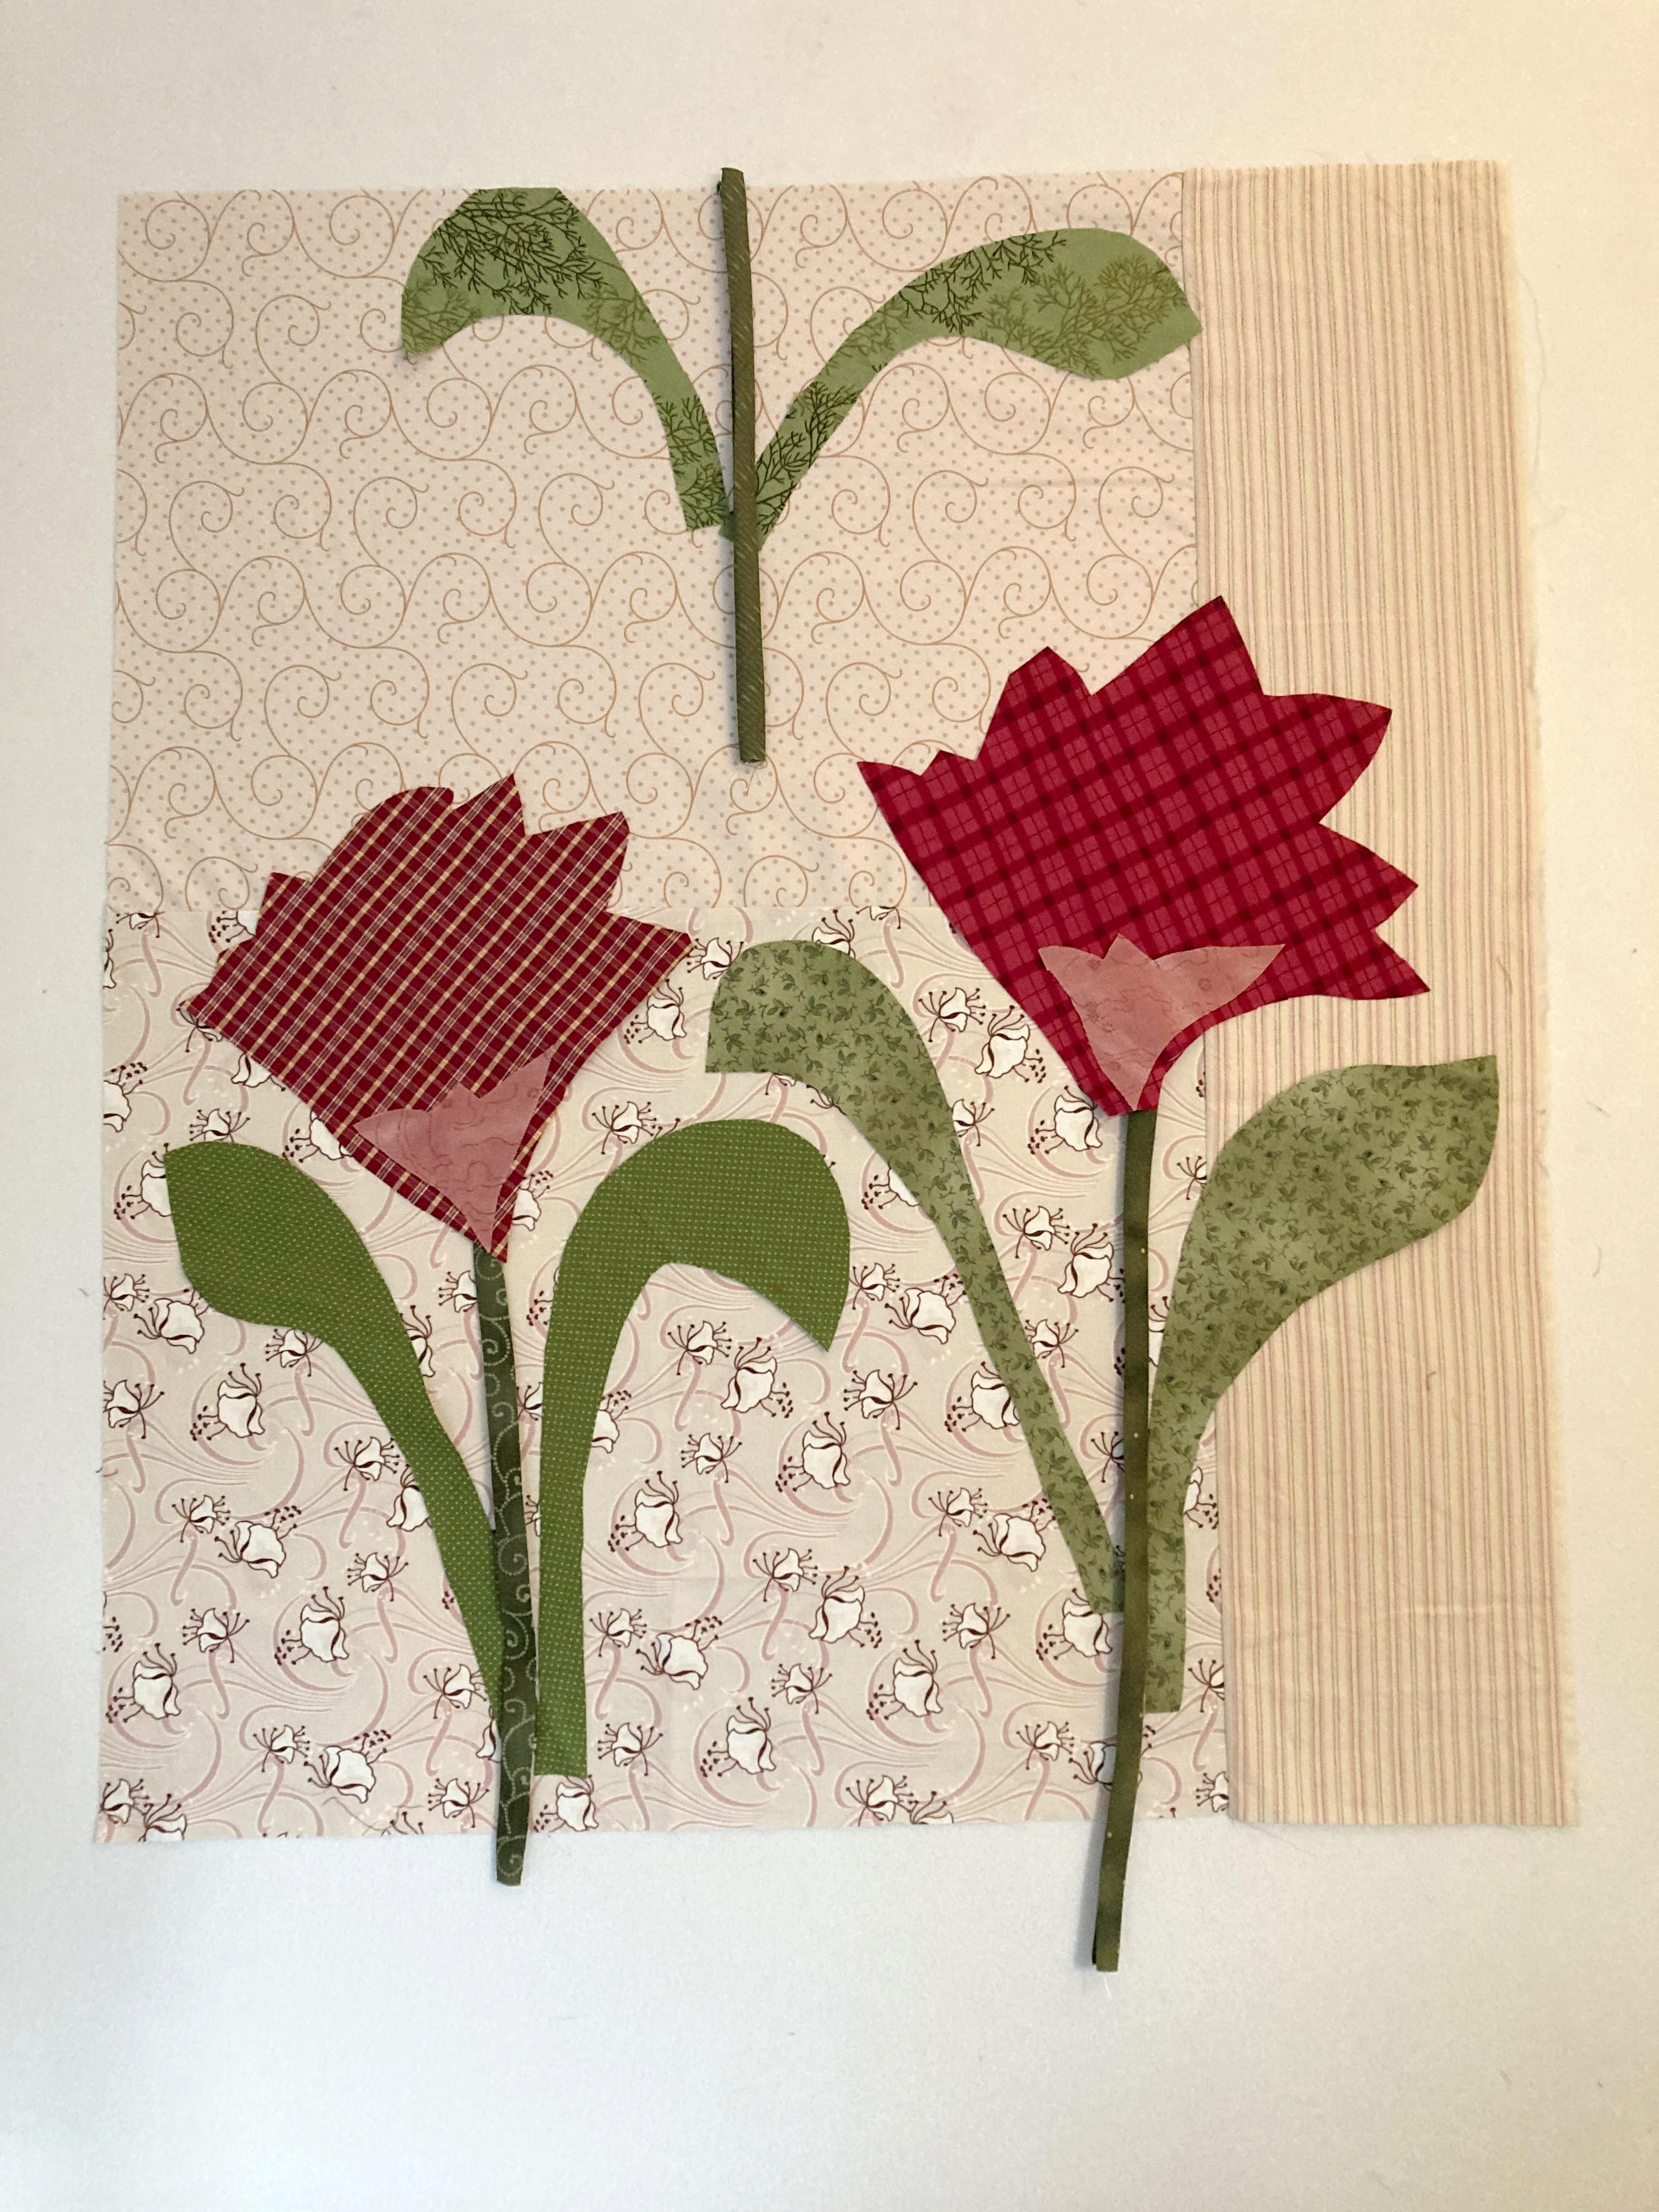
| The first Bramble Blooms quilt top is done! |
That's it. Now go forth and create! I deliberately used these style blocks as they are a simple, time honored use of unexciting fabrics and also, they adapt well to the make-do look. If you're wanting a little more information, maybe stick around for a walk-through of my own Bramble Blooms creative process. I'll attempt to thoroughly bore you and ultimately, share some border guidance tips and tricks as well. To be perfectly clear, I'll be happy with any and all of your quilts that deviate from the prompt. Your creativity should
always supersede whatever guidelines I suggest throughout the duration of this series.
GETTING STARTED WITH BORDER #2:
Most of us started with a pre-determined fabric stack that we specifically set aside for BBI. At this point in the project, you'll probably be noticing a specific color in that stack that hasn't been used very much. Unless the quilt is adamantly demanding a specific color for the next go-round, try starting with the left-behind color {or colors}. You might not even have to spend a lot of time auditioning, as we know the fabric in the initial stack already looked relatively good together. All the remaining pieces have the potential to fit into this quilt
somewhere. In fact, this could very well be your last opportunity to include it into the quilt.
 |
| Starting with the patchwork blocks |
Now, you can dither for a while and possibly overcomplicate things, or you can just dive in and test out a couple patchwork blocks. For the purposes of this prompt, these are blocks made up of equal sized squares, usually sewn up in units of 4, 9, or 16, depending on what size the finished block is intended to be.
I generally start with some basic questions such as: Do I want smallish blocks or larger ones? How many squares needed to make this block hold its own in the border? Is a 4-patch too simple? Can I make a 9-patch block work out properly in an on-point layout if I only use two colors? Hmm.. I'm not sure that I want to use every single color in the blocks. Will a 16-patch be too busy for this particular quilt? Do I want scrappy or something more controlled merely using two or three fabrics? And on and on. It's all very stream of consciousness and you'll find yourself automatically narrowing down your preferred look in no time at all. Don't worry if you don't have all the answers. Just go with your gut.
THINKING ABOUT MAKING AN 'ON-POINT' LAYOUT:
Eventually you find yourself with a tentative plan. For me, it was this: Scrappy look border using only 2-colors {pinks and creams} in the blocks, but many different fabrics. A 16-patch traditional cut block with a finished size of 8". On-point setting. Mixed fabrics in similar tones of rusty browns for the setting triangles. Still considering whether there is enough larger fabric pieces to cut out enough setting triangles. Might have to consider doing something else?
A quick check in with the chart below {from my quilt book 'Great Sets' by Sharyn Craig} and I could see for sure that the diagonal measurements would work. No doubt your plan will be totally different, as it should be.
A helpful tip for determining a pleasing width for an on-point border: The blocks in the on-point border shouldn't be much larger than the width of your previous border. They can be smaller, that seems to look great. Any larger and the border tends to get a little awkward looking {proportion-wise} very quickly. Of course this is just an opinion, not a rule or anything! My decision to sew up 8" blocks means that I am making the patch blocks exactly the same width as the previous border. The diagonal measurement {using the on-point layout} will then be 11 3/8". It feels like a good balance to me, but of course your discriminating eye might want something totally different.
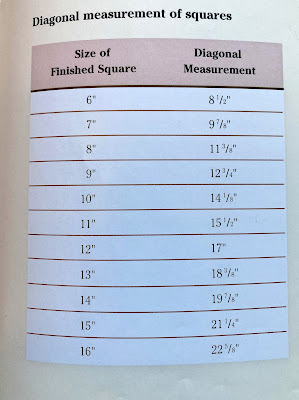 |
| A quick chart for diagonal measurements |
Armed with this knowledge and a tentative plan, I cut out and sewed up a handful of 16-patch blocks. Just enough to do a good, solid auditioning. You can absolutely cut out and sew up all the patchwork blocks you think are needed. Dive right on into the deep end if you're ready. Go for it! Sometimes that's what our instincts are shrieking at us to do--to have confidence and own it.
Other times, we'll find ourselves with the feeling that hmm... ' I'm not sure yet. Maybe it would be good to leave space for those variables that might possibly need adjustment?' Listen to that. Do not ignore! Even if it's the smallest niggle. It invariably means that our subconscious has picked up on something that hasn't been quite realized yet. We still have to forge ahead in order to get anywhere, but maybe with a more cautious commitment. Often it simply takes auditioning the blocks. That's all. We have to actually see it with our eyes, not just our imagination, and then we'll be feeling confident in our choices once again. The plan is ON!
 |
| A quick chart for cutting setting triangles |
If you've made up your mind to do the on point layout, reference the chart above for help with cutting out corner and/or setting triangles. I use it all the time. Or you can check out this blog post at
Spruce Crafts for further information. No one should ever be afraid of an 'on point' layout.
If your fabric choices are running low from the ordinal BBI fabric stack? You clearly have to address that. Dig around in your stash fabric for more options. Don't shy away from expanding on the chosen color palette if needed, going lighter, darker or brighter. You might need to go shopping. Or, may I suggest deliberately making everything a bit scrappier?
For instance, making the uncomplicated choice of adding corner triangles to all of the patch blocks, instead of only cutting out larger setting triangles, has a lot of advantages. These advantages include making the math easier by virtue of squaring up all of the blocks, being able to cut into much smaller {previously unusable} pieces of fabric, and not least, easily making a limited fabrics and/or color palette stretch even further. Giving your quilt more depth and interest. How? One seemingly out of place fabric looks very wrong, two--kind of questionable and three or more--like it was purposeful. Do the purposeful and 'make-do' like you mean it!
 |
| Starting to audition setting triangle fabrics & color |
WHEN THE PLAN STARTS TO FALL APART:
If the plan starts to fall apart, like mine did, don't worry. Working improv. is a process full of seeds of inspiration. You just never how they will present themselves. We tend to look at our plan 'failing' as a problem needing a solution. In reality, it's our brains way of saying, 'Hey, something else might look a lot better!' It's our instincts kicking in. Many of us like to say, 'The quilt is talking to us'. Don't worry, it always lets you know before it's too late to make proper adjustments and it hardly ever yells.
In the case of my Bramble Blooms, it was the color choices that started looking wrong first. It just crept up on my awareness. Here I was, busy adding fabrics and 16-patch blocks to the design wall and then, the quilt started saying, 'Yuck! Things are starting to look really mushy. Why is my lovely applique border starting to disappear?' Ugghh. Not gonna let that happen! Being me, {we all have our default}, I threw some dark fabric up on the wall between the borders. The thought was, 'Ok, that clearly defines the edges of both borders. Problem solved!' Right? {I'm all about the coping borders as a first run at fixing those borders arguments.}
If I was deeply invested in the on-point layout, there could have been new patch blocks made out of different colors and probably cream fabrics used for the setting triangles or whatever. Any number of choices are possible at any given phase in a quilt. You gotta remember, there are normally always way more than one or two ways to resolve things in a satisfactorily manner. It's not like you're trying to find a single grain of brown rice in a bag full of white rice.
 |
| Maybe a coping border will make it all better |
CONSIDERING MAKING A CONTINUOUS PATCH-BLOCK LAYOUT:
On to the continuous block layout. Because why not? It might have been in your plan from the beginning, but I just sort of stumbled on it for my own Bramble Blooms. I admit to being fairly tunnel-visioned about using the on-point layout. At first. It just seemed obvious that it had the potential for infinitely more room to use the leftover pink, cream and rusty brown fabrics in my stack. Sometimes we get an idea in our head and it crowds out any other thinking. Don't mistake what I'm trying to get across here. That resolved version {with the inclusion of the darker coping fabric} would probably have resulted in a satisfactory looking quilt. It wasn't wrong.
Still, the prompt did mention two options. Of course I was curious! I went ahead and auditioned the patchwork blocks the other way--in a continuous border formation. Uh oh. No one was more surprised than me. The whole quilt lightened up and gave me the sort of instant warm
glow that makes my heart feel all warm and fuzzy. Darn it. Cannot ignore the warm and fuzzies no matter how much I wanted the on-point layout!
 |
| This layout is the one for me afterall |
And that's exactly how good, personal-to-you changes happen. You just switch plans midstream because
the quilt has spoken. And it speaks to your heart. In order to make the 16-patch block border fit properly to the larger quilt, I only needed to add a single extra row {not a full block} on the left and right side borders. This made it possible for the cornerstone blocks to fit
exactly in pattern with the every-other pink/cream patchwork look. See the picture below? Ta da! It seemed serendipitous. Always a great feeling.
 |
| Looking at the corner blocks in the correct pattern formation |
It was a simple matter to measure the outsides of the quilt and count out how many more blocks were needed. Then I took a few minutes to mourn the lack of using the rusty, tan fabrics in the stack and second guess myself. Is this really how I wanted to continue? Which very quickly led to a lightbulb switching on. Hmm... How about cutting out and sewing up
similar, but darker, cornerstone patchwork blocks?
 |
| And then I looked at them like this... |
Which is how those came to be. As you can see, the red in the cornerstone blocks is much more distinctive looking than the lighter pink and ties back into the centerpiece very nicely too. I loved the red squares echoing the X lines from the previous border, a
very unexpected result. Once I noticed that, I couldn't 'unsee' it. Uh oh. How to get the pattern to work out properly in the border surround?
 |
| The close-up view of the cornerstones |
As you can see from the close-up picture above, there is an odd, awkward looking area where the dark red squares meet up with the lighter colored pink ones. The pattern is interrupted for sure. I could have perhaps flipped the borders on the top and bottom, but do I honestly care?
The weighted look to the corners just make me happy for what it does for this particular quilt. It doesn't have to make sense to anyone else! The echo of the X blocks there in the corners, subtly creates energy and encourages the eye to move around the quilt. I also like how the pink squares form a diagonal line across the corners of the quilt, at the juncture of those corner blocks. Is there any part of this look/feel/vibe that I am willing to give up in order to 'abide by the plan or stick with the pattern formation'? This is what improv. does for us. It frees us from the have to's and gives us permission to think outside of the box. Be curious. Let yourself be surprised!
 |
| The completed BBI quilt! |
Okay, here's all the tips and tricks you've been searching the post for. Hopefully one of these suggestions will resolve an issue for you and your quilt.
TIPS FOR FITTING A CONTINUOUS PATCHWORK-BLOCK BORDER TO THE QUILT:
Improv. comes with its own challenges and one of them is making new border lengths fit to odd quilt measurements. Do not be discouraged. There are several different ways this disparity can easily be overcome. For the best fitting borders, always measure the sides of your quilt and plan on attaching a border in the same exact size, pinning well before sewing together.
- Add an extra row {or two} onto the length of a short border. Does not have to be the full size of a block.
- Remove an extra row {or two} from the length of the too-long border. Does not have to be the full size of a block.
- If the border length measurement is too long to match up with your quilt, by less than the width of a single square in a patchwork block, go back and sew some extra large seams. Spread it out over the length of the border--doing it to several seams. Don't sew the extra large seams side by side or the 'fix-it' will be a little more obvious. Usually moving the needle over one or two spots will be enough to take up the extra length necessary. Keep measuring your border until the length has been corrected.
- Can easily split the difference if the overage on a border length is only 1/4" or less. Trim 1/8" {or less} off of each end of the border length. Nobody will even notice.
- If perhaps the border length is 1/4" too short, simply pin the quilt and border together at the middle points and gently stretch to make up the difference. Warning: Anything more and you're likely to have a wavy border and a sloppy looking quilt!
- Add precisely measured Coping Borders to make your patchwork block border fit perfectly. A little more work, but sometimes it feels important. See tutorial here for guidance with that.
*****************************************
TIPS FOR FITTING AN 'ON-POINT' PATCHWORK-BLOCK BORDER TO THE QUILT:
These are similar to the tips that were given in the first border
challenge, but I will list them here for continuity:
- Sew an extra block to a border of pieced blocks and chop off the extra. Very utilitarian.
- Add little narrow strips of fabric between each pieced block to stretch the row in order to make the length fit with the quilt. Add wider or narrower strips at the very ends of the pieced blocks, as needed, to finish up and get to the correct border length.
- Deliberately piece less blocks than needed. Add on extra fabric at both ends of the border length until you have the correct length.
- Make quite a few less pieced blocks than necessary, then arrange them tight together at one side of each border, say at the left side of each border moving around the centerpiece. Sew on a long piece of fabric to only one side of the blocks, making up the extra till it fits the centerpiece measurement. Do this similarly for every border length. There will be pieced blocks on every side of the quilt, but the arrangement will convey a certain symmetry.
- Sew all of your blocks in a row {per border side}. Then add in a precisely measured coping border cut for the express purpose of fitting perfectly between the centerpiece and your newly pieced border length. See this tutorial for guidance with that.
JUST A COUPLE MORE PICS FOR THE VISUAL LEARNERS:
 |
| When the on-point blocks have corner triangles |
Sometimes the on-point border layout is easier to play with if you can add corner triangles to the patchwork blocks, instead of trying to wrangle large setting triangles. The square-in-a-square blocks are just easier to move around and find a 'make-do' solution if/when the quilt measurements aren't being particularly cooperative. If you feel uncomfortable with these make-do solutions, that's okay. We're all wired differently! Just be prepared to do a lot more math and pre-planning before you end up with a finished quilt top.
The cool thing about improv. is that it's wonderfully receptive to 'fix-it' solutions. Consider it a 'work around' for dealing with the side effects of flying by the seat of our pants. The more of it you attempt to do, the easier it is to find the coping strategies that make sense with the way your exceptional brain works. As long as your quilt lays flat and you're satisfied with the look? Who cares about the details?
 |
| Another border idea |
Along with the tips and tricks mentioned above, a 'mirrored' block arrangement can often be a really fast and easy solution to the on-point border arrangement.--for those times when you don't want to spend time figuring out the math for setting triangles. It's not cheating, it's improv.! And it doesn't take very many blocks set 'on-point' to give the quilt the same kind of energy.
It usually looks better to arrange blocks in unequal amounts per corner. In the picture above, there are two blocks on top and three at the left side, not counting the corner block. With this arrangement, I would add fabric to finish out the needed length of the border, keeping the pieced blocks relatively spare. You can repeat this look at the lower bottom right of the quilt only, {reversing the unequal block positions as to sides for the mirror}. OR you could do every single corner. An arrangement like this definitely needs to be auditioned, as it can make all the difference in the world where the last block falls alongside the previous border.
 |
| So happy with the cozy look to this |
WRAPPING IT UP:
Okay, that's it. Let's go get creative! This will be the end of the prompts for Bramble Blooms I quilt. Getting this top together will hopefully give a better idea of how the process will work with Bramble Blooms II as well. This first quilt sets the tone for rest of the series. It establishes a common color palette and/or elements that we will change up and tweak here or there as we move along on our adventure together.
The idea is that we start with a base of ideas and let our innate creativity expand, flourish and grow from that particular place. As each quilt progresses, we will try to push a little bit more, drawing from our well of experience with the previous Bramble Blooms {whether the experience feels successful or not}. We will probably not LOVE every single quilt that we make in the series, but hopefully we will end up with at least one quilt that rocks our foundations. Wowsers, did I really make that? Out of a stack of fabric that I'd grown so tired of?
Wrapping this us, please remember that this is YOUR quilt. If you feel that it needs another border or two, then absolutely feel free to continue on with your journey. Look for a Link Party for all the completed Bramble Blooms quilt tops towards the end of April. Shortly after that post will be the start of Bramble Bloom II. Looking forward to seeing all of your wonderful progress!